| Want to see what emails have been sent? Check your Mailbox! The Mailbox page displays a summary of all the messages previously emailed and provides a link for more detail. Summary fields include email subject, number of recipients listed, and email type (HTML or plain text). As you saw when constructing the Send Mail page in the previous recipe, information about an email is stored in the MailMerge table. The recordset for the Mailbox page is pulled from a view based on this data table and two others (MailPriority and MailType) used to look up values. The Mailbox recordset is designed to display the newest addition first. Step 1: Implement Mailbox Design The Mailbox application requirements are straightforward. A basic table to hold the summary items is all that is needed. Navigation to the detail page is handled by attaching a link to one of the data fields. Create a page for this recipe, from the File > New dialog or by using a template.  In the MailMerge folder, locate the folder for your server model and open the Mailbox page. In the MailMerge folder, locate the folder for your server model and open the Mailbox page.
In the content area of your page, create a header for the page and an area for the email summary items. From the Snippets panel, drag the Recipes > MailMerge > Wireframes > Mailbox - Wireframe snippet into the Content editable region. Add labels for three data fields: Sent Items, Recipients, and Email Type. Place your cursor in the row below the words MAILBOX and insert the Recipes > MailMerge > ContentTables > Mailbox Sent Items - Content Table snippet [r8-6].
Figure r8-6. 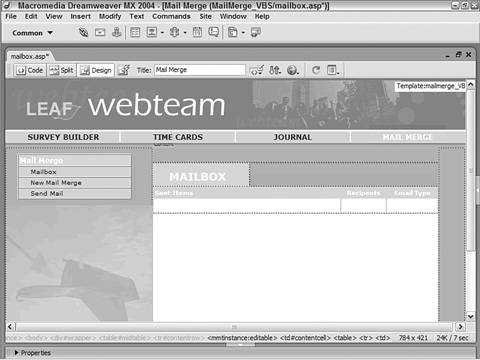
Step 2: Add Database Component The recordset used by the MailBox application is based on a SQL view that combines three tables: MailMerge, MailPriority, and MailType. Although the SQL statement to construct the view might seem somewhat complex, the concept is simple. The basic data is coming from the MailMerge table; both MailPriority and MailType are used to look up text names for numeric values. [View full width] SELECT MailMerge.*, MailPriority.MailPriorityText, MailType.MailTypeText FROM (MailMerge INNER JOIN MailPriority ON MailMerge.EmailPriority = MailPriority  .MailPriorityPassed) INNER JOIN MailType ON MailMerge.EmailFormat = MailType.MailTypePassed; .MailPriorityPassed) INNER JOIN MailType ON MailMerge.EmailFormat = MailType.MailTypePassed;
As we've seen before, because MySQL does not support views, PHP coders must also add a custom code snippet after creating the recordset that populates the temporary table MailBox. From the Bindings panel, choose Add (+) and select Recordset (Query). In the simple Recordset dialog, enter an appropriate name. Enter MailBox in the Name field. Select the desired data source connection. Choose Recipes from the Connection (Data Source) list. Choose the needed table. From the Tables list, select MailBox (mailbox for PHP). Leave the Columns option set to All. Make sure the Filter is set to None. Set the Sort option to show the latest record first. Choose EmailID from the Sort list and select Descending from the accompanying field [r8-7].
Figure r8-7. 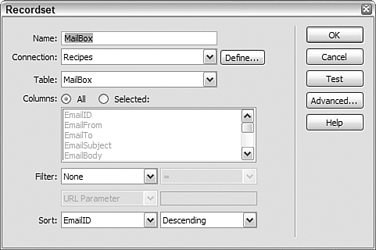
Click OK to close the dialog. Save the page after the recordset is inserted.
The following steps are for PHP users only: In Code view, move to the top of the page, place your cursor after the PHP connection line that starts <?php require_once and insert the following code: From the Snippets panel, insert the Recipes > MailMerge > CustomCode_PHP > Mailbox - Create Temporary Table snippet. This code simulates an Access view and prepopulates the Mailbox table before the recordset information is retrieved. When you're done, save your page.
Step 3: Data Binding Process In this step, we'll bring the data fields defined in the MailBox recordset onto the page. From the Bindings panel, expand the MailBox recordset. Place the desired data source fields onto the page: Drag the EmailSubject field under the Sent Items column. Drag the EmailSize field under the Recipients column. Drag the MailTypeText field under the Email Type column.
Save your page [r8-8].
Figure r8-8. 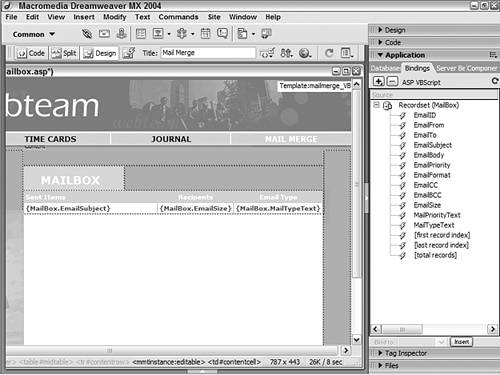
Step 4: Add Link to Subject Dynamic Text In concept, this page is referred to as a "master" page because it shows a summary of records. Typically, some element on the master page serves as a link to the detail page, which allows the user to drill down to get more specific information about a given record. On this page, we'll use the email subject data field (inserted in the previous step) as our link; this link will call the final page in our Mail Merge application, Maillog, and pass the record's ID as a parameter. Select the EmailSubject data field on the page. In the Property inspector, select the folder icon next to the Link field to open the Select File dialog. In the Select File dialog, select Parameters to begin the process of attaching a name/value pair to the URL. In the Parameters dialog, choose Add (+) and enter the name of the variable you want to pass. Enter ID in the Name column. Insert the value you want to attach to the link. Choose the lightning bolt symbol to open the Dynamic Data dialog and select EmailID from the MailBox recordset. Click OK to close the Dynamic Data dialog. Click OK to close the Parameters dialog. Select the file you want to link to. Select the mail_log file for your server model. Click OK to close the Select File dialog.
Step 5: Add Repeat Region We'll finish off the MailBox application by applying a Repeat Region server behavior to the dynamic content. Select any of the dynamic data fields inserted in the MailBox content area. From the Tag Selector, choose the table row tag. Select the <tr> tag from the Tag Selector. From the Server Behaviors panel, choose Add (+) and select Repeat Region. In the Repeat Region dialog, choose the desired recordset. Choose MailBox from the Recordset list. Set the Show option to display the number of records you'd like. Choose Show All Records. Click OK when you're done and save your page.
A quick check of Live Data view should give a clear idea of how the page will look [r8-9].
Figure r8-9. 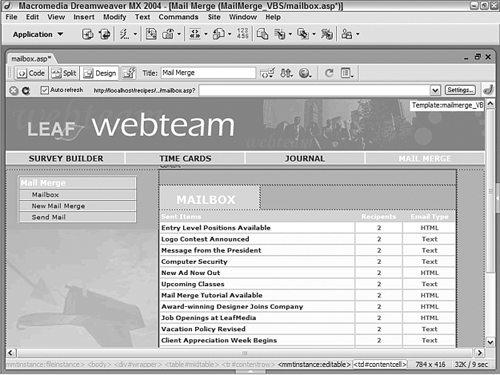
|