| The Send Mail page is the real workhorse of the application and the only page that includes code for sending email. You'll find the Send Mail page to be fairly flexible; you can use it to send email to a group selected via the Search User page or enter one or more email addresses manually or both. Besides fields for the standard From, To, Subject, and Body text, you can also use the Send Mail page to specify the email's priority, send CCs and BCCs, and even choose between plain and HTML text. There are, however, no HTML formatting tools, so you'll either need to write the code or perform a Copy HTML operation in Dreamweaver and paste in the code. If you're using the Send Mail page in concert with the Search User and Mailing List pages developed earlier in this recipe, the email addresses will be supplied for you. After you select the Send Mail to Group link on the Mailing List page, the Send Mail page appears with the search results displayed in the BCC field. Using the BCC field ensures that no one except the sender will know all the recipient's addresses. Constructing the page requires a recordset copied from a previously built page (Mailing List) and several snippets of additional code functions. One function inserts the search results into the BCC field while another handles the actual sending of the email. There is one important limitation to applying this recipe. The server that is hosting the application must have an SMTP server accessible. With ASP, the CDONTS module (used to send the email) only allows email to be sent from the server's own SMTP address to prevent unauthorized use. This means that the SMTP address does not have to be supplied for ASP users. However, it also means that if the user is outside a firewall, he will not be able to run the application unless he is able to utilize a virtual private network (VPN). ColdFusion users will need to supply their own SMTP server address. Note Although ColdFusion and PHP include their own mail protocols CFMAIL and mail(), respectively there are numerous ways to send email in the ASP world. ASP coders will find that this recipe is designed to work both with CDONTS, a standard module in Windows NT and Windows 2000 servers, and CDOSYS, used if your site is hosted on a Windows 2003 server or you are testing on a Windows XP system.
Step 1: Implement Send Email Design Like many application pages, the Send Email layout is based on a form. In the form, you'll need a variety of form elements, mostly text fields, to contain all the email information. Radio buttons are also used to offer a choice between plain text and HTML-formatted email, and a drop-down list provides the priority options. In addition, two hidden form elements are needed to properly track the number of emails sent and to pass along a needed parameter. In the server model of your choice, create a dynamic page.  In the MailMerge folder, locate the folder for your server model and open the send_mail page from there. In the MailMerge folder, locate the folder for your server model and open the send_mail page from there.
Add a table to the content region of your page to contain the interface elements for the application. From the Snippets panel, drag the Recipes > MailMerge > Wireframes > Send Mail - Wireframe snippet into the Content editable region. Insert the form and, within it, a table with nine rows and two columns; name the form SendMail or something similar. The left column should include the following labels: Email Type, Email Priority, From, To, CC, BCC, Subject, and Body. Use radio buttons to offer two email type options: Plain Text and HTML. A drop-down list should include three email priorities: High, Normal, and Low. The rest of the form elements should be standard text fields with the exception of the Body, which should be a multiline text field (also known as a textarea). The form should also include a form button named SendMail and two hidden form elements: TotalRecords and UseRS. Place your cursor in the row below the words SEND MAIL and insert the Recipes > MailMerge > Forms > Send Mail - Form snippet [r8-5].
Figure r8-5. 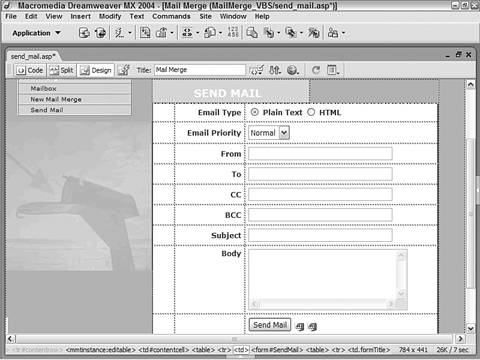
Save the file.
Step 2: Add Database Components Here's an example of a time-saving Dreamweaver feature put to good use. The recordset required for this page is a near-duplicate of the one created for the Mailing List page. We can save a great deal of time by copying the recordset on that page and pasting it in this one; if you remember, that SQL statement was fairly complex and required numerous variables. After it's inserted, we can append a small bit of SQL to custom-fit the recordset for the current page. The code added appends the UseRS URL variable to the SQL statement. Our custom code is designed so that if this value is not equal to 1, then the recordset will not return results. This enables a user to access this page directly and send a single email. Note You'll need to make sure that you've completed the Mailing List page before proceeding.
First, let's copy the previously built recordset into the current page: Open the Mailing List page in Dreamweaver. In the Bindings panel, right-click (Ctrl-click) the SearchResults recordset to display the context menu and choose Copy. Switch to the Send Mail page. In the Bindings panel, right-click (Ctrl-click) and choose Paste from the context menu.
Now we're ready to customize the recordset by appending a bit of code to the SQL statement and adding a new variable: Double-click the SearchResults recordset in the Bindings panel to open the Recordset dialog. Place your cursor at the end of the SQL statement and enter the following code: 
| AND UseRSParam = 1 | 
| AND UseRSParam = 1 | 
| AND #URL.UseRS# = 1 | 
| AND UseRSParam = 1 |
Add a new variable to the recordset definition: In the Variable area, choose Add (+) and enter UseRSParam in the Name column, 0 in the Default Value column, and Request("UseRS") in the Run-Time Value column. In the Variable area, choose Add (+) and enter UseRSParam in the Name column, 0 in the Default Value column, and Request("UseRS") in the Run-Time Value column. In the Variable area, choose Add (+) and select URL.UseRS from the Name list, and enter 0 in the Default Value column. In the Variable area, choose Add (+) and enter UseRSParam in the Name column, 0 in the Default Value column, and $_REQUEST['UseRS'] in the Run-Time Value column.
Click OK to close the dialog and insert the amended recordset.
Step 3: Data Binding Process The data binding process differs from the typical drag-and-drop operation this time around. Instead of dragging data fields from the Bindings panel, we need to enter code using the Property inspector both manually and by using the Dynamic Data dialog. Our first task is to assign a variable to the Init Value property of the BCC text field; this variable is used to contain the search results displayed in the Mailing List page. We'll also need to set the values of the two hidden form fields for our application page to work properly: one to tell us whether or not to use the recordset (UseRS), and another to hold the total number of results returned by the search (TotalSearch). Let's tackle the initial value of the BCC field first: Select the BCC field. In the Property inspector, enter the following code in the Init Value field:
| <%=BCCList%> |
| <%=BCCList%> |
| <cfoutput>#BCCList#</cfoutput> |
| <?php echo $BCCList; ?> |
Press Tab to confirm your code entry.
Now let's add dynamic values to the two hidden form elements, starting with the UseRS element. Select the UseRS hidden form element. In the Value field of the Property inspector, enter the following code:
| <%=Request("UseRS")%> |
| <%=Request("UseRS")%> |
| <cfoutput>#URL.UseRS#</cfoutput> |
| <?php echo $_REQUEST['UseRS']; ?> |
Press Tab to confirm your entry.
Finally, we'll make the TotalSearch hidden form element dynamic. For ASP Select the TotalSearch hidden form element. Choose the lightning bolt symbol next to the Value field to open the Dynamic Data dialog. If necessary, expand the SearchResults recordset in the Dynamic Data dialog. Choose the [total records] entry and click OK to close the dialog.
For ColdFusion Select the TotalSearch hidden form element. Enter the following code in the Value field:
| <cfoutput>#SearchResults.RecordCount#</cfoutput> |
Tab or click anywhere to confirm your code entry.
For PHP Select the TotalSearch hidden form element. Enter the following code in the Value field:
| <?php echo $totalRows_SearchResults; ?> |
Tab or click anywhere to confirm your code entry.
Step 4: Insert Record: Send Mail Although it's great to be able to use the Web to send email, it's even better to be able to keep a record of all the email sent. In addition to actually sending the mail, this page uses an Insert Record server behavior to store transaction information in the MailMerge table. The remaining pages in this application, Mailbox and Maillog, display record information from the MailMerge table. For ASP From the Server Behaviors panel, choose Add (+) and select Insert Record from the list. In the Insert Record dialog, choose your data source. Choose Recipes from the Connection list. Select the table you want to insert the record into. From the Insert Into Table list, choose MailMerge. Set the After Inserting, Go To field to the desired result page. Select Browse and choose mailbox.asp from the Select File dialog. Select the form on the current page from which to gather the record values. From the Get Values From list, make sure SendMail is selected. In the Form Elements area, match the form elements on the page to the fields in the data source table. Set EmailType to insert into the EmailFormat column as Numeric type. Set EmailPriority to insert into the EmailPriority column as Numeric type. Set From to insert into the EmailFrom column as Text type. Set To to insert into the EmailTo column as Text type. Set CC to insert into the EmailCC column as Text type. Set BCC to insert into the EmailBCC column as Text type. Set Subject to insert into the EmailSubject column as Text type. Set Body to insert into the EmailBody column as Text type. Set TotalSearch to insert into the EmailSize column as Numeric type. Set UseRS to be ignored.
When you're sure your choices are correct, click OK to close the dialog and add the behavior.
For ColdFusion and PHP From the Server Behaviors panel, choose Add (+) and select Insert Record. In the Insert Record dialog, choose the current form. Select SearchResults from the Submit Values From list. Select your data source from the list. Choose Recipes from the Data Source list. Enter your username and password, if needed. Select the table in the data source to insert into from the list. Choose MailMerge (mailmerge for PHP) from the Insert Into Table list. Set the data source fields to their corresponding form elements. Set EmailFormat to the FORM.EmailType form element and submit as Numeric type for ColdFusion and Integer type for PHP. Set EmailPriority to the FORM.EmailPriority form element and submit as Numeric type for ColdFusion and Integer type for PHP. Set EmailFrom to the FORM.From form element and submit as Text type. Set EmailTo to the FORM.To form element and submit as Text type. Set EmailCC to the FORM.CC form element and submit as Text type. Set EmailBCC to the FORM.BCC form element and submit as Text type. Set EmailSubject to the FORM.Subject form element and submit as Text type. Set EmailBody to the FORM.Body form element and submit as Text type. Set EmailSize to the FORM.TotalSearch form element and submit as Numeric type for ColdFusion and Integer type for PHP. Make sure UseRS is set not to get a value.
Set the After Inserting, Go To field to the appropriate file. Select mailbox.cfm. Select mailbox.php.
Confirm your entries and click OK to close the dialog and insert the code.
Step 5: Add Custom Code The two custom functions we'll add in this step of the recipe are key. One populates the BCC field with the prior search results, whereas the other is responsible for actually sending the email. The BCC-related function is fairly straightforward. For each server model, the function loops through the search results, gets the email address for each record, and concatenates it into one long string. The string is assigned to the BCCList variable which, you'll recall, was attached to the initial value attribute of the BCC text field. The function to send email is somewhat more complex and specific to the various server models. For ASP, a mail object is created as an instance of the CDONTS or the CDOSYS server object. The email format type is set and mail is sent using the various text fields (To, From, BCC, and so on). CDONTS requires that the mail be sent from an SMTP (Simple Mail Transport Protocol) server found within the current domain so there's no need to specify a SMTP server. This is not the case for ColdFusion, however, where a valid SMTP server must be declared. The SMTP server is defined within the <cfmail> tag, which also holds all the pertinent information. Additionally a CFParam variable must be defined for proper handling of the MailType field in the database. Let's add the first of our two functions that are designed to build the BCC list: From the Server Behavior panel, select the SearchResults recordset. Switch to Code view and locate the highlighted code. Move your cursor just below the recordset code and insert the following code: From the Snippets panel, open the Recipes > MailMerge > Custom Code folder for your server model and insert the Build BCC List snippet.
| <% Dim BCCList BCCList = "" While (NOT SearchResults.EOF AND cStr(Request("UseRS")) = "1") If (BCCList <> "") then BCCList = BCCList & ";" BCCList = BCCList & SearchResults.Fields("UserEmail").value SearchResults.MoveNext() Wend %> |
| <% var BCCList = ""; while (!SearchResults.EOF && String(Request("UseRS")) == "1") { if (BCCList !="") BCCList += ";"; BCCList += SearchResults.Fields("UserEmail").value; SearchResults.MoveNext(); } %> |
| <cfset BCCList = ""> <cfif URL.UseRS EQ "1"> <cfloop query="SearchResults"> <cfif BCCList NEQ ""> <cfset BCCList = BCCList & ";"> </cfif> <cfset BCCList = BCCList & SearchResults.UserEmail> </cfloop> </cfif> |
| <?php $BCCList = ""; do { if ($BCCList != "") { $BCCList .= ";"; } $BCCList .= $row_SearchResults['UserEmail']; } while (($row_SearchResults = mysql_fetch_assoc($SearchResults))&&($_REQUEST['UseRs']==1)); $SearchResults = mysql_query($query_SearchResults, $Recipes_PHP) or die(mysql_error()); $row_SearchResults = mysql_fetch_assoc($SearchResults); ?> |
Save your page.
Now let's complete the page by adding the custom send mail function: In Code view, position your cursor at the top of the page. ASP and PHP users should place their cursor after the connection statement. Insert the following code: From the Snippets panel, open the Recipes > MailMerge > Custom Code folder for your server model and insert the appropriate snippet: Send Mail - CDONTS or Send Mail - CDOSYS for ASP; Send Mail - CFMail for ColdFusion; and Send Mail - PHP for PHP.
| [View full width] <% if (cStr(Request("SendMail")) <> "") then set mailObject = Server.CreateObject ("CDONTS.NewMail.1") if (cStr(Request("BCC")) <> "") then mailObject.BCC = cStr  (Request("BCC")) if (cStr(Request("CC")) <> "") then mailObject.CC = cStr (Request("CC")) mailObject.BodyFormat = cInt(Request("EmailType")) mailObject.MailFormat = cInt(Request("EmailType")) mailObject.Send cStr(Request("From")),cStr(Request("To")), cStr(Request("Subject")),cStr(Request("Body")), cInt(Request ("EmailPriority")) end if %> (Request("BCC")) if (cStr(Request("CC")) <> "") then mailObject.CC = cStr (Request("CC")) mailObject.BodyFormat = cInt(Request("EmailType")) mailObject.MailFormat = cInt(Request("EmailType")) mailObject.Send cStr(Request("From")),cStr(Request("To")), cStr(Request("Subject")),cStr(Request("Body")), cInt(Request ("EmailPriority")) end if %> |
| [View full width] <% if (String(Request("SendMail"))!="undefined") { var mailObject = Server.CreateObject("CDONTS.NewMail.1"); if (String(Request("BCC")) != "") mailObject.BCC = String(Request("BCC")); if (String(Request("CC")) != "") mailObject.CC = String(Request("CC")); mailObject.BodyFormat = parseInt(Request("EmailType")); mailObject.MailFormat = parseInt(Request("EmailType")); mailObject.Send(String(Request("From")),String(Request ("To")), String(Request("Subject")),String(Request("Body")), parseInt(Request("EmailPriority"))) } %> |
| [View full width] <% if (cStr(Request("SendMail")) <> "") then var sysMail = Server.CreateObject("CDO.Message") sysMail.Configuration.Fields("http://schemas.microsoft.com /cdo/configuration/smtpserver") = "smtp.mycompany.com" sysMail.Configuration.Fields("http://schemas.microsoft.com /cdo/configuration/sendusing") = 2 sysMail.Configuration.Fields("http://schemas.microsoft.com /cdo/configuration/sendusername") = "" sysMail.Configuration.Fields("http://schemas.microsoft.com /cdo/configuration/sendpassword") = "" sysMail.Configuration.Fields.Update sysMail.Fields("urn:schemas:httpmail:importance") = cInt (Request("EmailPriority")) sysMail.Fields.Update if (cStr(Request("BCC")) <> "") then sysMail.BCC = cStr(Request("BCC")) end if if (cStr(Request("CC")) <> "") then sysMail.CC = cStr(Request("CC")) end if sysMail.From = cStr(Request("From")) sysMail.To = cStr(Request("To")) sysMail.Subject = cStr(Request("Subject")) if (cInt(Request("EmailType")) = 0) then sysMail.TextBody = cStr(Request("Body")) else sysMail.HTMLBody = cStr(Request("Body")) end if sysMail.Send end if %> |
| [View full width] <% if (String(Request("SendMail"))!="undefined") { var sysMail = Server.CreateObject("CDO.Message"); sysMail.Configuration.Fields("http://schemas.microsoft.com /cdo/configuration/smtpserver") = "smtp.mycompany.com"; sysMail.Configuration.Fields("http://schemas.microsoft.com /cdo/configuration/sendusing") = 2; sysMail.Configuration.Fields("http://schemas.microsoft.com /cdo/configuration/sendusername") = ""; sysMail.Configuration.Fields("http://schemas.microsoft.com /cdo/configuration/sendpassword") = ""; sysMail.Configuration.Fields.Update(); sysMail.Fields("urn:schemas:httpmail:importance") = parseInt(Request("EmailPriority")); sysMail.Fields.Update(); if (String(Request("BCC")) != "") sysMail.BCC = String(Request("BCC")); if (String(Request("CC")) != "") sysMail.CC = String(Request("CC")); sysMail.From = String(Request("From")); sysMail.To = String(Request("To")); sysMail.Subject = String(Request("Subject")); if (parseInt(Request("EmailType"))==0) { sysMail.TextBody = String(Request("Body")); } else { sysMail.HTMLBody = String(Request("Body")); } sysMail.Send(); } %> |
| [View full width] <cfif isDefined("Form.EmailType")> <cfif Form.EmailType EQ "0"> <cfset MailType= "html"> </cfif> </cfif> <cfif isDefined("Form.SendMail")> <cfmail server="smtp.webassist.com" to="#Form.To#" from="#Form.From#" subject="#Form.Subject#" cc="#Form.CC#" bcc="#Form.BCC#" type="#MailType#"><cfmailparam name="X-Priority" value="#Form.EmailPriority#">#Form.Body#< /cfmail> </cfif> |
| [View full width] <?php if (isset($_POST['SendMail'])) { if ($_POST['EmailType']==0) { // HTML Mail $headers = "MIME-Version: 1.0\r\n"; $headers .= "Content-type: text/html; charset=iso-8859-1 \r\n"; } else { $headers=""; } if ($_POST['CC']!="") { $headers.= "Cc: " . $_POST['CC'] . "\r\n"; } if ($_POST['BCC']!="") { $headers.= "Bcc: " . $_POST['BCC'] . "\r\n"; } if ($_POST['FROM']!="") { $headers.= "From: " . $_POST['FROM'] . "\r\n"; } switch ($_POST['EmailPriority']) { case 0: // Low Priority $headers .= "X-Priority: 4\n"; break; case 2: // High Priority $headers .= "X-Priority: 1\n"; break; } @mail($_POST['TO'],$_POST['Subject'],$_POST['Body'],$headers); z } ?> |
Note The first code snippets shown here are for CDONTS. Note The next two code snippets are for CDOSYS. When coding for CDOSYS, ASP users should be sure to replace the generic smtp. mycompany.com value included in the snippet with an actual SMTP server address. Save the page.
As mentioned earlier, ColdFusion users require one additional step to insert a CFParam: In Code view, place your cursor at the top of the page. From the Bindings panel, choose Add (+) and select CFParam from the list. In the CFParam dialog, enter MailType in the Name field. Leaving the Default field blank, click OK to close the dialog.
This CFParam is necessary to properly store the MailType value. The database expects a boolean value (1 or 0), whereas the <cfmail> tag uses either Email or an empty string as its values. The CFParam statement works in conjunction with the custom code to convert the database values into ones the CFML tag understands. Scaling Up Your Email Not all organizations run their email on CDONTS, CDOSYS, or CFMAIL. Many third-party vendors including SoftArtisans SMTPmail, Dimac w3 JMail, Persits AspEmail, and ServerObjects AspMail offer email components for mass mailing. Each component requires a particular syntax to carry out basic emailing functionality. For designers who are working with one or more of these systems, WebAssist provides an all-in-one email extension for Dreamweaver. Universal Email works with a full range of email components from a single interface. Designed for quick, simple setup and customization, WA Universal Email is fully loaded with premium features, such as e-commerce support and attachments. For more information, visit http://www.webassist.com/Products/Recipes/WA/UniversalEmail.asp |
|