Enhancing the Model
|
The example we've just looked at illustrated how to generate code from a UML model. However, it is a very simplistic class. We need to work a bit harder to generate code for more sophisticated models. In this section we'll take a closer look at using Visio to generate the basic constructs that we will use constantly in applications. In particular, we'll look at the following:
In our discussion we will use C# terminology, but most of the things we are talking about can easily be interpreted for Visual Basic .NET. Let's begin by creating an enumeration, EmployeeType, that will hold information about the employee's role. To create the enumeration, drag a DataType shape onto the page, and select its properties. Set the name to EmployeeType and the stereotype to enumeration. After selecting this stereotype, you can insert the values for the enumeration from the Enumeration entry of the UML Datatype Properties dialog. The literal value for a member of the enumeration can be explicitly specified from here, or the value can be left blank and it will be created by the language compiler when the code is generated and later compiled. Our enumeration will have three values, and a preview of the generated code will look like this:
// Static Model public enum EmployeeType { Manager, Developer, CustomerSupport }
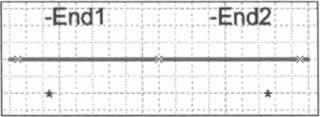
Mapping AssociationsLet us consider different types of associations that perform the links between objects. In our test model we have utilized the Visio features to show the links between objects. Every association has two association ends. Double-clicking the association allows you to edit the association properties: By editing the parameters of these ends, you can change the code generation process. The End Name of each end shows the member name for this association. If you have an association between Class A and Class B say, then setting the parameters for the Class A end will affect the code generation for Class B, and vice versa. The IsNavigable checkbox for each association end defines whether to show the end of the association in code - if the checkbox is checked, then it will be shown. From this dialog you are also able to define the aggregation type, the visibility, and the multiplicity We'll link the EmployeeType to the Employee class by means of a composite aggregation from the Aggregation drop-down - if you try to connect the datatype with the class by means of any other association, Visio will show a semantic error: Here End1 is attached to Employee, and End2 (renamed to employeeRole) is attached to EmployeeType. By the rule above, there will be an employeeRole field of type EmployeeType added to the generated code for Employee. We also add an EmployeeRole property of type EmployeeType to expose the employeeRole field. A preview of the code generated looks like this:
private EmployeeType employeeRole; public EmployeeType EmployeeRole { get { } set { } } If using the composite association with the Composition shape, employeeRole will be shown in the Employee class with any value of the IsNavigable parameter.
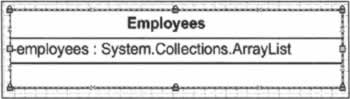
Creating a CollectionWe'll create a new class called Employees. This class will maintain a collection of Employee objects, and will have an indexer that returns a particular employee given their ID number. We won't go through the full design of this class, we'll concentrate on the collection and indexer aspects. Let's begin by creating a class called Employees, and create a new attribute called employees. Here we come to something really interesting. We will modify the multiplicity of this attribute and Visio will automatically generate a member with a collection type for us. From the UML Attributes Properties dialog of the employees attribute, select 0..* from the Multiplicity drop-down. Now if you go to Code Generation Options and select Preview Code you will see how this attribute will coded:
private System.Collections.ArrayList phoneNumbers; We also need to add a System.Collections.ArrayList type, so that we can specify the type of attribute in the UML Class Properties dialog. To do this, right-click on C# Data Types in the Model Explorer, and select New I Datatype. Enter the name System.Collections.ArrayList in the dialog that is launched and click OK. After this, you will be able to work with collection type attributes.
Creating an IndexerNow for our indexer. Create a new operation, call it this - although it can take any name, Visio inserts the word this into the output code, and Visio also suggests that indexers should be called this. From the UML Operation Properties screen, select the return type for this operation as Employee, and from the Parameters category, add a new in parameter of type C# ::int called index. From the Code Generation Options for this operation, select its Kind as Indexer. There are two checkboxes for an Indexer, for get and set accessors, but our indexer will only use the get accessor, so check that box. Clicking Preview Code shows the following:
public Employee this[int index] { get { } } In fact, let's also add some code for the get accessor - from the UML Operation Properties dialog, select the Method category, check the Has Method checkbox to indicate code and enter the following:
foreach (Employee em in employees) { if (em. ID == index) return em; } return null; Now the entire read-only indexer will look like the following:
public Employee this[int index] { get { foreach (Employee em in employees) { if (em.ID == index) return em; } return null; } } This indexer will allow us to access the list of employees with their ID. Of course, we'll need to add some more operations to the class for adding an employee to the employees collection, but we don't need to go into that now.
Creating Events and DelegatesFinally, we'll look at creating a delegate and an event. Firstly, we will create the Task class, and add an operation called TaskStatusUpdated to this class - we'll come back to its return type in a moment. The Task class will inform other object of its status. In a future version of the system managers may want to monitor how their employees are working - this could be easily implemented with the Task class and TaskStatusUpdated event To define our TaskStatusUpdatedDelegate delegate, create a new class, and from the Class entry in the UML Class Properties dialog window select delegate item in the Stereotype drop-down list. Create a new operation, and call it TaskStatusUpdated. These actions lead to the following generated code:
public delegate void TaskStatusUpdatedDelegate(); Now you have to link the delegate with the appropriate operation. This requires the return type of the TaskStatusUpdated operation in the Task class to be set to TaskStatusUpdatedDelegate. To define TaskStatusUpdated as an event, go to its Code generation options and select Event in the Kind drop-down list - a checkbox allows us to select add and remove event accessors. Thus, we have established a link between the delegate and the corresponding event. The generated code for the Task class is listed below:
// Preview of code that will be generated in the implementation file: public class Task { public event TaskStatusUpdatedDelegate TaskStatusUpdated; public void UpdateTaskStatus() { } }// END CLASS DEFINITION Task
Overriding MethodsLet's conclude this chapter with some information about abstract classes and virtual methods:
This looks all very well, but rather disappointingly, if you intend to override some methods in your class, then you have to add the override keyword by hand, even if there is a direct connection to the superclass on the diagram, since Visio does not handle override methods. There are many more examples of UML to C# (and VB.NET) mappings that we could cover - you can find them in the Visio documentation, but the best way to get to grips with Visio and its code generation features is to actually experiment yourself. For starters, open the Visio diagram we created in the previous chapter and look at the code that model produces!
| |||||||||||||||||||||||||||||||||||||||||||


EAN: N/A
Pages: 85