Rotating, Cropping, and Straightening
| Before you perform any other edits, you'll probably want to rotate and crop your image to your desired final proportions. It's best to crop first because you don't want to waste time correcting and adjusting part of an image that is going to be cropped away later. RotatingOn the toolbar, you'll find Aperture's two rotation tools (Figure 5.2). These tools let you rotate an image in 90-degree increments. Aperture provides no way of performing rotations of an arbitrary amount. Figure 5.2. The rotation tools on Aperture's toolbar let you rotate your image in 90-degree increments.
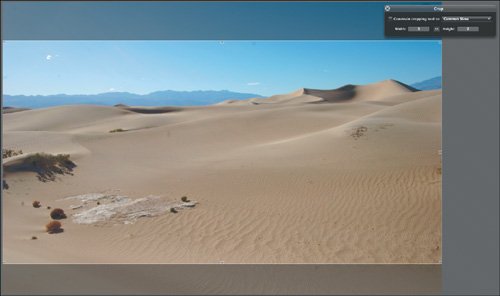
To rotate an image, select either the clockwise or counterclockwise rotation tool and click the image in either the Browser or Viewer pane. Aperture will rotate the image 90 degrees with each click. If you want to rotate back the opposite direction, press the Option key and click again. Note that no matter how many images you have selected, the Rotate tool will rotate only the image you click. There is no way to rotate multiple images simultaneously, and Lift and Stamp do not copy rotation. You can also select the Rotate tool by pressing R. Aperture will select the last rotation tool you used. Tip No matter which tool you're using you can select the Pointer tool at any time by pressing A, making it easy to switch from a task like rotation back to image selection. CroppingCropping is one of the most powerful editing tools at your disposal. You can crop an image only in the Viewer pane, not in the Browser, so you must select an image before you can crop it. As with Rotate, Aperture's Crop tool does not let you crop more than one image at a time. Here's how to crop an image:
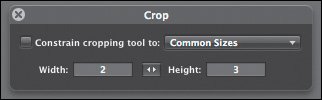
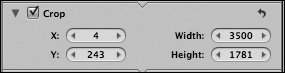
The Crop HUD lets you lock the Crop tool to specific aspect ratios. If you know that you want a crop with a particular aspect ratio, select the Constrain Cropping Tool To check box in the Crop HUD. You can choose the aspect ratio that you want to crop to from the pop-up menu. You can also enter aspect ratios numerically in the Width and Height fields of the Crop HUD. Adjusting a CropIn a destructive image editor, once you've cropped your image, the pixels that you've cropped away are gone for good. In Aperture, though, your original pixels are never altered. Instead, the crop you define is simply added to the list of edits that you have made to your image, so you can easily go back and adjust your crop later. To adjust an existing crop, select the cropped image and select the Crop tool (or press C). Aperture will display your entire image with your chosen crop. You can now resize the crop by dragging the cropping rectangle's control handles. When you're done, press Return to accept the new crop. Editing a Crop NumericallyWhen you crop an image, Aperture adds a Crop brick to the Adjustments panel. The X and Y values show the coordinates of the upper-left corner of the current crop. The Width and Height values show the width and height of the crop, in pixels, starting from the specified upper-left corner (Figure 5.5). Figure 5.5. After you crop an image, a Crop brick is added to the Adjustments panel. From here, you can adjust the crop numerically, or you can deactivate it altogether, restoring your image to its full size.
You can enter new values directly in the fields or use the arrow keys next to each field to increment and decrement the values. As you adjust the numbers, the image shown in the Viewer pane updates. Copying and Deleting a CropThere's no way to copy a crop from one image to another (the Lift and Stamp tools won't copy crop information), but because you can get a numeric readout of the crop, you can easily enter the same numbers in the Crop adjustment brick of another image. Note that Aperture doesn't require you to switch back to the Pointer tool after performing a crop, so you can quickly move from one image to another if you need to crop several images.
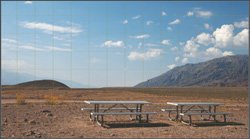
To delete a crop from an image, click the Crop brick in the Adjustments panel to select it; then press the Delete key to remove the Crop adjustment. StraighteningBecause even the most exacting photographers sometimes shoot off-kilter images, Aperture provides a simple Straightening tool. Straightening throws your image out of square, so it almost always requires an additional cropping step. Aperture's Straightening tool lets you straighten and crop in one step. As you rotate your image, Aperture automatically crops it and displays the final result in real time. As with rotating and cropping, you cannot straighten multiple images at the same time, and you cannot lift and stamp straightening data from one image to another. Also, you must perform straightening in the Viewer pane; you cannot straighten thumbnails in the Browser pane. Here's how to straighten an image:
When you straighten, Aperture adds a Straighten brick to the Adjustments pane (Figure 5.7). You can adjust the straightening of your image by dragging the Rotate slider. If you want to completely remove the Straighten effect, click the Straighten brick in the Adjustments panel; then press the Delete key. Figure 5.7. After straightening, you'll find a Straighten brick in the Adjustments panel. From here, you can tweak your straightening.
|

- Key #2: Improve Your Processes
- When Companies Start Using Lean Six Sigma
- Making Improvements That Last: An Illustrated Guide to DMAIC and the Lean Six Sigma Toolkit
- The Experience of Making Improvements: What Its Like to Work on Lean Six Sigma Projects
- Six Things Managers Must Do: How to Support Lean Six Sigma