Working with Individual Images
| If you're working with an individual image, then your workflow is pretty simple: open the image in Camera Raw, process it, save it, and output it (this is assuming, of course, that you've already transferred the image to your computer). There are several ways to open a raw file in Camera Raw, and any of them is a perfectly reasonable way to start editing. Since there is no stand-alone Camera Raw program, Camera Raw must be run inside a host application: either Photoshop or Bridge. The host takes care of launching Camera Raw and opening the raw image, so to open a raw file, you can use any of the techniques that you would normally use to open any type of Photoshop file. Opening a raw file in Camera Raw in WindowsNo matter what version of Photoshop you're using, you can open raw files just as you would open any other type of file that Photoshop supports. So you can select File > Open from within Photoshop (or press Ctrl-O) and then navigate to the raw file of your choice. If you have a shortcut to Photoshop on your desktop, you can drag and drop raw files directly on top of it to open them, or if Photoshop is already running, you can drag and drop files directly into the Photoshop window. Probably the easiest way, though, is to double-click the file. Windows doesn't necessarily default to opening raw files in Photoshop, but you can tell it to by right-clicking a raw file and then choosing Open With > Choose Program. The Open With dialog box lets you select the program that you want to use to open the raw file. If you check the Always Use the Selected Program to Open This Kind of File option, then your selected program will become the default raw file reader. Opening a raw file in Camera Raw on a MacJust as with any other type of supported image format, you can open a raw file in Photoshop on the Mac by choosing File > Open or by pressing Command-O. This brings up a standard Open dialog box, which you can use to navigate to the file you want to open. You can also open a raw file by dragging it onto the Photoshop icon on the OS X dock or by dragging it onto the Photoshop application icon in your Applications > Adobe Photoshop folder. Perhaps the easiest way to open a single raw file, though, is to configure your open preferences so that you can double-click the file to open it in Photoshop. By default, raw files probably appear on your Mac as Preview documents, so that when you double-click a raw file, your Mac automatically launches the stock Preview application. If your type of raw file is supported, then Preview will process your image using default settings and open the results in a window. You have no control over the image processing, but you can save the processed image in another format if you want to edit it. You can change your Finder preferences so that double-clicking a raw file causes it to open in Photoshop (which will automatically open it in Camera Raw). Click a raw file and choose File > Get Info. In the Open With section of the Get Info window, open the pop-up menu and change the setting from Preview to whichever version of Photoshop you have installed. Then click the Change All button beneath the Open With menu to define this as your Mac's default behavior. Now any time you double-click a raw file, it will open in Camera Raw running under Photoshop. Opening multiple files using Camera Raw 3If you're using Camera Raw 3 (which runs only under Photoshop CS2), then any of the techniques that you would normally use to open, say, multiple JPEG or Photoshop files you can use to open multiple raw files. Just as with a single file, Photoshop will automatically launch Camera Raw. With multiple files, though, a scrolling thumbnails view appears down the left side of the Camera Raw window (Figure 5.5). Figure 5.5. When running Camera Raw under Photoshop CS2 or Bridge, you can open multiple raw files at once. The scrolling thumbnails view lets you switch between images with a single click.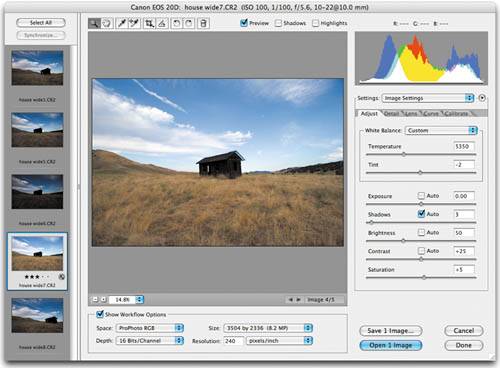 Click any one of the displayed files to edit its parameters, just as if you'd opened the file separately. If you're working on a batch of images that were shot at the same time, then the odds are pretty good that the Camera Raw settings for one image will work well for the others. In the Camera Raw dialog box, click the Select All button above the thumbnails to select all of the images that you've opened; then click the Synchronize button to bring up the Synchronize dialog box. When image settings are synchronized, changing the setting for one image makes the same change in all of the others. You can choose to synchronize all of the settings, or just base settings such as Color Temperature, Tint, and Shadows. You can then quickly go through and tweak the Exposure and Brightness settings for each image by hand. With your image parameters set, click the Open x Images button to process all of the images and open the resulting files in Photoshop, or the Save x Images button to process all of the images and save the resulting files in the format of your choice. However, while these techniques work great for individual images and small batches, they're not much help if you've just returned from a shoot with a card full of dozens or hundreds of images. For these situations, you need a more advanced workflow. |
EAN: 2147483647
Pages: 76
- MPLS VPN Architecture and Terminology
- Implementing Route-Reflectors in MPLS VPN Networks
- Case Study-Hub and Spoke MPLS VPN Network Using BGP PE-CE Routing for Sites Using Unique AS Numbers
- Any Transport over MPLS (AToM)
- Configuration and Implementation of MPLS QoS in Uniform Mode and Short Pipe Mode Operation