Defining a Raw Workflow
| If you're used to shooting JPEG, then your shooting workflow probably goes something like this: shoot pictures, transfer pictures to computer, drop pictures into some kind of cataloging or "light table" application, select pictures you like, make copies of those files, edit and adjust those pictures, print or turn the pictures into a web- or computer-based slideshow. In some ways, the workflow for raw files is more akin to film workflow than to JPEG workflow because your raw file serves as the equivalent of a digital negative. Just as a film photographer must print a negative or slide to have a usable image, a raw digital photographer must process the raw data to have a usable image file. Through all of this, the original raw file remains untouched. A typical raw workflowWhen working with raw files, your basic workflow will proceed as shown in Figure 5.6. Figure 5.6. Though raw workflow can seem complex, it's not that much different from regular JPEG workflow. These are the typical steps that you'll take when working with raw files.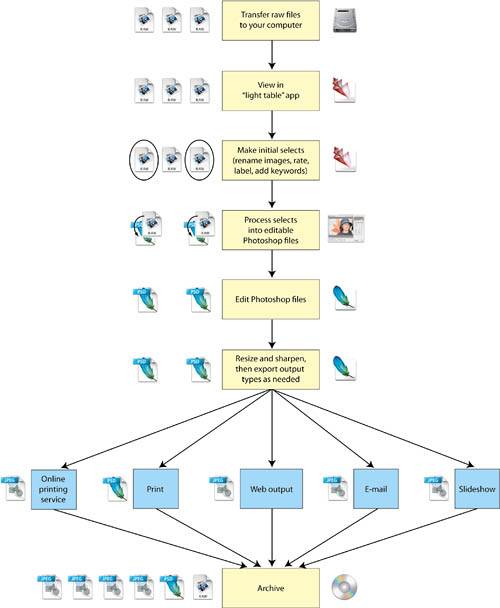 Before you can perform any editing, you must transfer your raw files from your camera to your computer, using either a cable or media card reader. Because these are raw files, you can't just look at them in a normal image viewing applicationyou need to use a program that knows how to read your particular raw thumbnails. A light table or image cataloger application like iView MediaPro will let you view thumbnails of your raw files. Similarly, your raw converter may provide viewing capabilities. Camera Raw lets you view thumbnails using the Adobe File Browser Organizer or Bridge, depending on which version of Photoshop you're using. From these thumbnails, you'll choose your initial selects. Then you'll pass these selected images to your raw converter, which will process them into editable files (usually Photoshop format or TIFF files). You'll open these images and edit and correct them to taste and then output them. Outputting often results in still more files. If you've had even a little experience with printing, then you know that the image on your screen often looks very different when printed. Thus, after making an initial print, you may need to go back and make further color adjustments to get good-looking output. It's often a good idea to make these printer-specific adjustments on a copy of your adjusted file. If you print on different types of paper, you may need to make separate adjustments for each paper type, resulting in even more copies of your files. After printing, you may want to post a copy of the image on your web site or e-mail it to a friend. You'll need to resize your image for either of these tasks and save it as a JPEG file to facilitate faster file transfer. These will yield still more copies of your image. Finally, with all of your output chores complete, you'll want to archive the whole set of files for safekeeping. If you keep all of the versions that you've made, then you can come back later and make additional prints or mail or post more electronic copies. If all you want to do is take some pictures out of your camera and post them on your photoblog, then the process just described may seem like a lot of tedious hassle. Don't worry; as you'll see, Camera Raw provides some automation facilities that make speedy processing very simple. A simplified, speedier raw workflowIf you're simply trying to cover a birthday party or other special event, then your main concern will probably be getting images distributed to other people as quickly as possible. These types of pictures are not usually ones that you meticulously edit and finesse to achieve perfect color or tone. In these situations, shooting in raw may seem like a tremendous hassle. However, there are some things you can do to accommodate a "mass-production" workflow. Shoot JPEGObviously, if raw is too much work for a particular photographic task, then you can always switch back to JPEG and return to your normal JPEG workflow. As already mentioned, when shooting most birthday parties or special events, you're just documenting. Very rarely do you end up with any "serious" shots that you want to edit and adjust. The problem is that you never know for sure when one of those serious shots may come along. While shooting that party, you may capture a particularly special moment that needs to be printed out large and glossybut the image may have a really bad white balance because of the mixed lighting that you were shooting under. With a JPEG file, you have fewer options, but with a raw file, you can easily turn that lucky-to-have-gotten-it shot into a great image. So before you give up on raw for these types of occasions, take a look at the simplified workflow presented in the following sections. NOTE Some cameras, such as the Canon EOS E-300 Digital Rebel, don't actually write separate raw and JPEG files when shooting in their dual-format modes. Instead, they wrap the JPEG and raw files into a single document. If your chosen cataloging and raw processing software doesn't know how to extract the JPEG images from these files, then this may not be a good option for you, as you'll have to add new softwareand stepsto your workflow. Shoot raw and JPEGMany cameras let you save both raw and JPEG files simultaneously. This approach gives you the simplicity of JPEG workflow, but with raw files to fall back on if you need to do any serious editing. The downside is that it uses a lot more storage space and slows down your camera's ability to shoot bursts of images at a speedy frame rate. If you have a lot of storage space and don't usually shoot bursts, then this might be the ideal way for you to shoot raw. Shoot raw with a simpler workflowFor those times when you need to get images out of your camera and output as quickly as possibleto the web, print, e-mail, or a slideshowthen consider using the simplified raw workflow shown in Figure 5.7. Figure 5.7. If you simply want to quickly output a batch of raw files for the web or printing, then you can use this simplified workflow.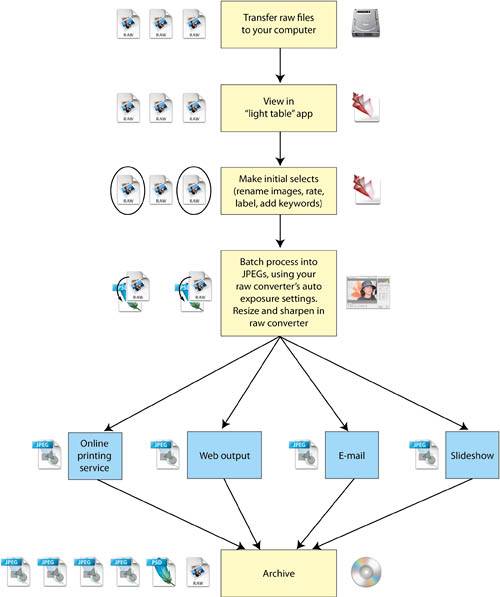 For the most part, this workflow is the same as the one shown earlier. As before, you begin by transferring your images to the computer and choosing your selects. If you're gutsy, you can skip the selection stage and process every image that you shot, but you never know when you may have an embarrassing picture of people with their eyes closed, so it's better to do some paring to avoid getting yelled at later. The main difference between the workflow shown in Figure 5.7 and the workflow presented in Figure 5.6 is that you're letting the raw converter make all of the image processing decisions for you. In addition, you're letting it handle some of the steps that you performed by hand earlier, such as resizing and sharpening. Finally, you're skipping the intermediate Photoshop file stage and going directly from raw to JPEG. This saves you some time in terms of file management, in addition to saving space and simplifying your archiving and backup tasks. |
EAN: 2147483647
Pages: 76