Creating a Child Workspace
Windows SharePoint Services makes it easy to navigate from parent site to child site. Because the Buyer child site was created with navigational links on both the top link bar and Quick Launch, navigating to the child site from the top-level site is easy. Simply click the link on the Buyers tab. However, how would you find the Buyers child site if this navigation wasn’t included? In the following exercise, you will create a Meeting Workspace as a child site of the Buyers child site. Because you must already be in a site to create a child site, you will first see how to navigate to the Buyers child site. You will then view the site hierarchy of the entire site collection from the top-level site.
OPEN the top-level site from the address bar of your browser: http://wideworldimporters. If prompted, type your user name and password, and click OK.
BE SURE TO verify that you have sufficient rights to create a new site. If in doubt, see the Appendix on page 435.
1. On the top of the left nav, click View All Site Content to show all lists, document libraries, sites, and workspaces that have been created on the All Site Content page of this site.
2. In the Sites and Workspaces area near the bottom of the page, click Buyers to navigate to the child site. This link would appear even if there wasn’t a link to this child site in the top link bar or Quick Launch.
| Tip | Alternatively, you can type the entire site hierarchy directly into the browser’s address bar. This may seem a bit odd at first, but Microsoft Internet Explorer learns the places that you type often, which can be a real time saver instead of clicking through the user interface. To see the child sites of the current site, complete the current site’s Web site address with /_layouts/mngsubwebs.aspx. |
3. On the Site Actions menu, from the Buyers site, click Create to display the Create page.
4. In the Web Pages area of the Create page, click Sites and Workspaces.
5. As in the earlier example, type a Name and URL name, such as Team Meeting and TeamMeeting, respectively. Remember to follow the best practices found in the Naming a URL sidebar earlier in this chapter concerning naming conventions.
6. Optionally, in the Description textbox, type a description, such as Site for monthly team meeting details, to help users understand the purpose for the new site.
7. In the Template Selection area, click the Meetings tab. Then, on the Template list, click Basic Meeting Workspace.
8. Keep the default permissions that are set on Use same permissions as parent site.
9. Keep the default navigation and navigation inheritance options.
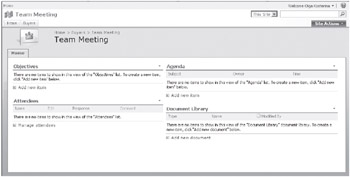
10. Click Create to create and display the new Meeting Workspace.
Notice how Meeting Workspaces differ in appearance from team sites. The Quick Launch is gone. An additional set of Page tabs display above the Web Parts. Add Pages and Manage Pages options are shown on the Site Actions menu.

11. On the global nav at the top left corner of the page, click Home to return to the top-level site.
12. To see the entire hierarchy of child sites, on the Site Actions menu, click Site Settings to display the Site Settings page.
13. On the Site Settings page, in the Site Collection Administration area, click Site hierarchy to display the Site Hierarchy page.

This page shows you all of the flattened out, fully qualified child sites in the entire hierarchy. You can click on the site name to display the site or click on the Manage link to display the Site Administration page for the associated child site.
CLOSE the browser.
EAN: N/A
Pages: 201