Managing Site Users and Permissions
Information in Windows SharePoint Services is secured at one of four levels.
-
Site level
-
List or document library level
-
Folder level
-
List item level
By default, all lists inherit the permissions of the site that contains them. All folders inherit the permissions of the list that contains them. All list items inherit the permissions of the folder that contains them. You can delve deeper into list, folder, and list item security in Chapter 4, “Working with Lists.”
The default option, Use Same Permissions As Parent Site, checks the parent site’s permission every time the user visits the child site. The Use Unique Permissions option initially provides the site’s creator with sole access to the new site as its owner. When creating a new site, the Use Unique Permissions option causes the creation process to present the Set Up Groups For This Site page as the initial page.
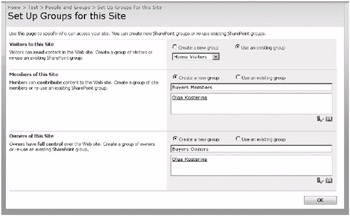
Windows SharePoint Services initially categorizes people into three groups.
-
Visitors: People or groups who only need to be able to read content on a site.
-
Members: People or groups who need to be able to create and edit content but not create lists or manage site membership.
-
Owners: People who are responsible for all aspects of managing and maintaining a site.
A site can be toggled between inherited permissions and unique permissions by clicking Advanced Permissions on the Site Settings page or by choosing People And Groups from either the bottom of Quick Launch or from the Users And Permissions area of the Site Settings page and then subsequently choosing Site Permissions from the left nav. Once on the Permissions page, choosing Inherit Permissions from the Actions menu on a site using unique permissions allows you to toggle the site to have inherited permissions. A warning dialog box will display before toggling.
Choosing Edit Permissions from the Actions menu on a site inheriting permissions allows you to toggle the site to have unique permissions. A warning dialog box will display before toggling.
A site using unique permissions has no tie to the parent site, so you are allowed to add and remove users from the site regardless of whether they have permissions on any other site. When users are added to a site, they must be either added to a SharePoint group or associated with at least one permission level.
| Tip | SharePoint groups were called cross-site groups in the previous version of Windows SharePoint Services. |
Not only can you associate individual users with permission levels, but you can also associate Windows Groups (Windows NT Groups, Active Directory Groups, or Local Machine Groups) with permission levels. This is a very practical approach to providing tight security with minimal maintenance. However, you may not have control over the Windows Groups defined in your organization.
SharePoint groups are maintained at the site collection level and represent a collection of users or groups with a defined set of one or more permission levels and a few governing attributes. When a new user or group is added to a SharePoint group, they are granted the permissions of that group in any site.
Think of permission levels as a named collection of permissions that can be assigned to SharePoint groups or users. Five permission levels are made available by Microsoft Windows SharePoint Services on every site.
-
Read User can view only.
-
Contribute User can view, add, update, and delete.
-
Design User can view, add, update, delete, approve, and customize.
-
Full Control User has full control.
-
Limited User has no permissions to the site in its entirety, but only to specific lists, document libraries, folders, list items, or documents when given explicit permission.
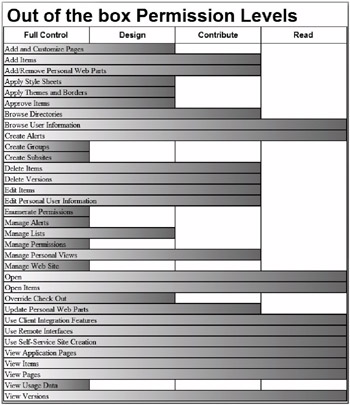
| Tip | Permission levels were called site groups in the previous version of Windows SharePoint Services. You could also go into an advanced permissions settings page in the previous version and choose individual permissions for a user, group, or cross-site group. In Windows SharePoint Services version 3, only named permission levels can be assigned. |
Although you can create your own permission levels and even alter all permission levels except for Full Control and Limited, you will likely find these built-in levels to be adequate for most business scenarios. You may want to provide all users with some level of access to the data on your site.
| Tip | If anonymous access has been enabled on the authentication provider in SharePoint Central Administration and has not been denied via Administration policy, anonymous users can then be granted some access to the entire site or to individual lists on a case-by-case basis. This provides the central Administrator with the option to decide whether to grant anonymous access for each Web application before its site administrators can begin to turn on this option. |
| Tip | You will also find an option to provide all authenticated users with a default level of access on each site’s Add Users page. Adding users is covered later in this section. |
After all users and groups are assigned to various permission levels, it is possible and even likely that someone will be associated at various levels with more than one permission level. Rather than enforcing the most restrictive permission level, all associated rights are aggregated and the cumulative list of unique rights apply. This can only be overridden by policies created in SharePoint Central Administration.
In the following exercise, you will change the permissions for a child site from inheriting permissions from its parent site to using unique permissions. You will then add users representing Wide World Importers buyers to the child site with Contribute permission.
OPEN the Buyer child site created in the first exercise from the address bar of your browser: http://wideworldimporters/buyers. If prompted, type your user name and password, and click OK.
BE SURE TO verify that you have sufficient rights to alter the site’s permissions. If in doubt, see the Appendix on page 435.
1. On the Site Actions menu, click Site Settings to display the Site Settings page.
2. In the Users and Permissions area, click Advanced permissions to display the Permission page.
Notice that Site Permissions is selected in the left nav. This view shows the permission levels that have been assigned to the groups associated with this site. Because this child site is inheriting permissions from its parent, you see the SharePoint groups from the parent site listed.
3. On the Actions menu, click Edit Permissions to establish unique permissions for this site.
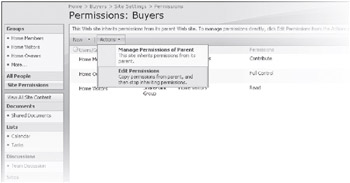
4. Click OK to confirm the change.
Notice how this page has changed. You now have check boxes next to each group, and there are additional menu options. You would select the Inherit Permissions menu option to return to using the permissions of the parent site.
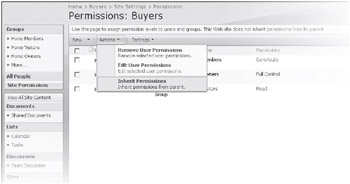
| Important | Editing a SharePoint group affects the membership of all sites, lists, folders, and items that are using that Sharepoint group. |
5. On the New menu, click New Group to display the New Group page.
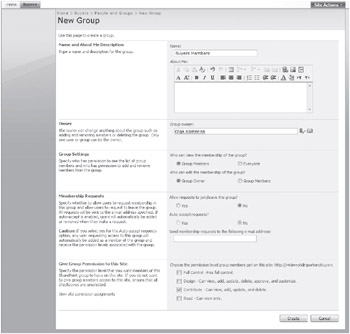
6. Type a name, such as Buyers Members, into the Name textbox.
7. Optionally, type a description of the new group in the About Me textbox.
8. Select the user or group that will own this group. It defaults to you, this example uses Olga Kosterina.
9. Leave the default settings for Group Settings and Membership Requests.
10. Select the Contribute permission level check box.
11. Click Create to add the new group to the People and Groups page for the Buyers Members SharePoint group.
Bill Malone is Wide World Importers’ head buyer, so he needs to be associated with the Full Control permission level. Everyone in a Windows group called Buyers in this exercise needs to be added and associated with the Contribute permission level. All other SharePoint groups need to be removed.
12. On the New menu, click Add Users to display the Add Users - Buyers page.
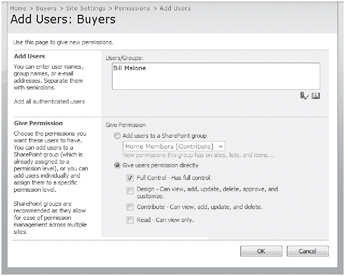
13. In the Users/Groups text area, type the name of a user to whom to grant Full Control. This exercise uses Bill Malone.
14. Select the Give users permission directly option button.
15. Select the Full Control check box. If e-mail has been enabled for your SharePoint installation, you can optionally send a message to Bill notifying him that he now has Full Control of this site.
16. Click OK to add the user’s (e.g., Bill’s) permissions to the site.
17. On the New menu, click Add Users to display the Add Users - Buyers page.
18. In the Users/Groups text area, type the name of a group to whom to grant Contributor permissions. This exercise uses Buyers.
| Important | Typically, you add users and Windows groups by using a format such as domainname\username or domainname\groupname, but your computer name cannot be anticipated here. Fortunately, Windows SharePoint Services searches your computer for users and Windows groups that match even if the proper naming convention isn’t provided. |
19. Select the Add users to SharePoint Group option button.
20. From the drop-down list, click Buyers Members [Contribute].
21. Click OK to add the permissions for the group (e.g., Buyers Windows) to the SharePoint group.
22. On the left nav, click Site Permissions to return to the Permissions page.
23. Select the check boxes beside all three parent site SharePoint groups. On the Actions menu, click Remove User Permissions.
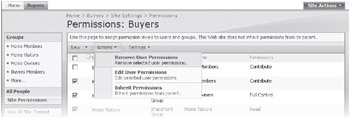
24. In the confirmation dialog box, click OK to apply the change. Clicking Cancel would discard the removal request.
| Tip | It is wise to associate every user in the various child sites in a site collection with at least the Reader permission level in the top-level site. Users will be unable to use custom site templates and list templates imported into a site collection unless they are associated with one of the built-in permission levels in the top-level site. |
CLOSE the browser.
EAN: N/A
Pages: 201