Extra Credit
|
| < Day Day Up > |
|
Let's reacquaint ourselves with our ordered instruction list from earlier in the chapter:
<ol> <li>Chop the onions.</li> <li>Saute the onions for 3 minutes.</li> <li>Add 3 cloves of garlic.</li> <li> Cook for another 3 minutes.</li> <li>Eat.</li> </ol>
Unstyled and in the absence of any CSS, this would appear in a browser as shown back in Figure 8-2. Just like any other structured markup example found within this book, an ordered list makes for an easily styled set of elements when CSS is added to the mix.
We know that, because we're using the proper structure here for this list, browsers that don't support CSS, or have it disabled, will display the list properly as well.
Let's get a little fancy and customize the numbers that appear before each instruction item.
Identify the Parts
So that we can access each list item and replace its number with something a little more stylish, we'll need to add an id to each <li> tag. We'll also add an id to the whole ordered list so that we can make specific style rules for this list and not all <ol>s:
<ol > <li >Chop the onions.</li> <li >Saute the onions for 3 minutes.</li> <li >Add 3 cloves of garlic.</li> <li > Cook for another 3 minutes.</li> <li >Eat.</li> </ol>
Now that we've identified everything, we'll have complete control, stylistically, over each element in the list. It's also worth mentioning that by adding a unique id to each list item here, we've lost the ability to rely on an ordered list's "automatic numbering" advantage. If we needed to add a new step in the middle of the others, we'd need to change the id values of the steps that follow. Just a disclaimer.
Custom Numbers
Our first step for creating custom numbers for our list is to turn off the default generated numbers that will appear by using the list-style-type property on the #recipe element:
#recipe { list-style-type: none; } Figure 8-9 shows our list with the numbers turned off by the preceding rule.
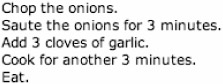
Figure 8-9: Our ordered list with numbers turned off with CSS
Now that we've prevented the numbers from being generated, we can add our own graphic numbers instead. In Photoshop (or your favorite image editor), we can create five GIF images, one for each number. Figure 8-10 shows the five numbers I've created, using the Prensa typeface and red for the color.
![]()
Figure 8-10: Five GIF images to be used for our ordered list
Adding the Numbers to the CSS
Because of their larger size, we'll need to add some margins and padding around each list item in order to give enough room for the number image to show through as a background. We'll also add a light gray border to the bottom of each instruction.
We can use the descendent selector #recipe li to apply these rules to all <li> items within #recipe. This saves us from having to repeat these shared values on each number id.
#recipe { list-style-type: none; } #recipe li { padding: 10px 50px; margin-bottom: 6px; border-bottom: 1px solid #ccc; } With all the preceding values being applied to all <li> items within our list, we can now add each unique number image to its corresponding id:
#recipe { list-style-type: none; } #recipe li { padding: 10px 50px; margin-bottom: 6px; border-bottom: 1px solid #ccc; } #one { background: url(ol_1.gif) no-repeat 6px 50%; } #two { background: url(ol_2.gif) no-repeat 2px 50%; } #three { background: url(ol_3.gif) no-repeat 3px 50%; } #four { background: url(ol_4.gif) no-repeat 0px 50%; } #five { background: url(ol_5.gif) no-repeat 6px 50%; } You'll notice that the position values differ slightly for each image in respect to their horizontal placement. This is due to the fact that each of these images is variable in width because of the particular font I'm using. To compensate, we nudge each image to the right as necessary to get the dots of each number to line up just right.
Including "6px 50%" will place the image 6 pixels from the left and 50 percent from the top, essentially centering it vertically.
The Results
Figure 8-11 shows the final results as viewed in a typical browser, with each image showing through on the left of each item. Gray lines are drawn at the bottom of each instruction to further provide separation.
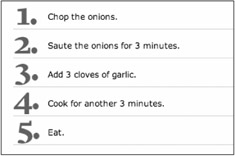
Figure 8-11: Our unordered list styled with custom number images
With a few images and CSS rules, we took a structured, ordered list and gave it some customized style—proving once again that we can keep nonessential images out of the markup for easy updates later on.
|
| < Day Day Up > |
|
EAN: 2147483647
Pages: 119