12.7. Web Parts
| Web Parts allow your users to reconfigure sections of your site to meet their own needs and preferences. Many information providers allow the user to pick which content they want displayed and in which column to display it. Web Parts allow you to provide that functionality with drag-and-drop "parts" of your page. 12.7.1. Create a New SiteTo learn about Web Parts , create a new web site (call it WebParts) and copy the SitePersonalization web site from the beginning of this chapter (not the Themes web site you just completed). Set the Welcome page as the start page and make sure you can log in with an account you created previously (or, alternatively, set CreateAccount as the start page and create a new account to work with). 12.7.2. Web Parts ArchitectureWeb Parts are created and managed on top of personalization using the WebPartManager control to manage the interaction of Web Parts, and normal ASP UI Controls to create the user-managed interface. 12.7.3. Creating ZonesA page that uses Web Parts is divided into zones : areas of the page that can contain content and controls that derive from the Part class (Part controls). They can also contain consistent UI elements (header and footer styles, border styles, etc.) known as the chrome of the control. It is typical (though certainly not required) to organize these zones using tables. To see a simple example of Web Parts at work, follow these steps:
Set the HeaderText property on the first Web Part control to News. 12.7.4. Adding Controls to ZonesDrag a Label control into the zone. The normal ASP.Label control is automatically wrapped in a Web Part control, and its title is set to Untitled, as shown in Figure 12-51. Figure 12-50. Web Parts Zones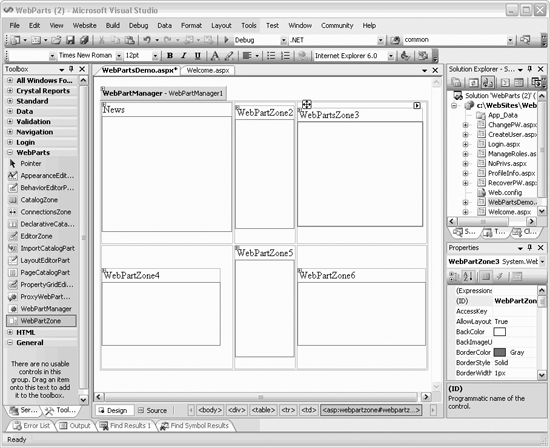 Figure 12-51. Label Web Part Switch to Source view and set the Title property of the label to Today's News and the text to <br/>New Translation of In Search Of <em>Lost Time</em> Sets English World On Fire.
Switch back to Design view and drag a ListBox control into WebPartZone3. Set the header text for the WebPartZone to Sponsors. Click on the ListBox, and then on its smart tag and then click on Edit Items to open the ListItems Collection Editor. Add a few items to the ListBox. Back in Source view, set the Title property to Our Sponsors. (This control, like the Label control, does not inherently have a Title property, so IntelliSense will complain, but as the note above explains, all will be well.) Add a link in the LoggedInTemplate in Welcome.aspx, to take the user to your new page and run the program. Login using one of the accounts you set up previously and click on the link to the new Web Parts page. You should see two Web Parts, as shown in Figure 12-52. Figure 12-52. Two Web Parts visible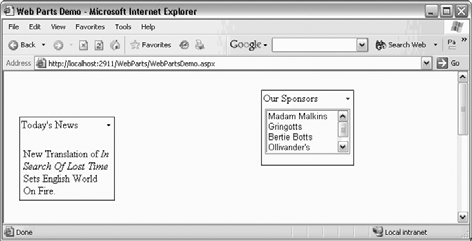 12.7.5. Minimizing and RestoringClick on the tag next to the title and a menu appears allowing you to minimize or close the Web Part, as shown in Figure 12-53. Figure 12-53. Minimize or Close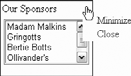 If you choose Minimize, the Web Part is minimized to its title, and the minimize tag offers the choices of Restore or Close, as shown in Figure 12-54. Figure 12-54. Restore or close Exit the application. Start it again, sign back in, and navigate back to these pages. Aha! The minimized zone remains minimized. Each individual's personalized Web Parts are automagically persisted through the personalization database.
|

EAN: 2147483647
Pages: 162