Section 15.2. Creating a Web Form
15.2. Creating a Web FormTo create the simple Web Form that will be used in the next example, start up Visual Studio .NET and select File Figure 15-1. Creating a new web site Visual Studio creates a folder named ProgrammingCSharpWeb in the directory you've indicated, and within that directory it creates your Default.aspx page (for the User interface), Default.aspx.cs (for your code), and a Data directory (currently empty but often used to hold .mdb files or other data-specific files).
Figure 15-2. Saving a solution 15.2.1. Code-Behind Files
Let's take a closer look at the .aspx and code-behind files that Visual Studio creates. Start by renaming Default.aspx to HelloWeb.aspx. To do this, close Default.aspx, and then right-click its name in the Solution Explorer. Choose Rename and enter the name HelloWeb.aspx. That renames the file, but not the class. To rename the class, right-click the . aspx page and choose View Code in the code page, then rename the class HelloWeb_aspx . You'll see a small line next to the name. Click it and you'll open the smart tag that allows you to rename the class. Click "Rename `Default_aspx' to `HelloWeb_aspx'" and Visual Studio ensures that every occurrence of Default_aspx is replaced with its real name, as shown in Figure 15-3. Figure 15-3. Renaming the class Unfortunately, (at least in Beta) the name of the class isn't changed in HelloWeb.aspx, so go back to the HelloWeb.aspx file and change the page directive's ClassName attribute to HelloWeb_aspx : <%@ Page Language="C#" CompileWith="HelloWeb.aspx.cs" ClassName="HelloWeb_aspx " %>Within the HTML view of HelloWeb.aspx, you see that a form has been specified in the body of the page using the standard HTML form tag: <form runat="server"> Web Forms assumes that you need at least one form to manage the user interaction, and creates one when you open a project. The attribute runat="server" is the key to the server-side magic. Any tag that includes this attribute is considered a server-side control to be executed by the ASP.NET framework on the server. Within the form, Visual Studio has opened div tags to facilitate placing your controls and text. Having created an empty Web Form, the first thing you might want to do is add some text to the page. By switching to HTML view, you can add script and HTML directly to the file just as you could with classic ASP. Adding the following line to the body segment of the HTML page will cause it to display a greeting and the current local time: Hello World! It is now <% = DateTime.Now.ToString() %> The <% and %> marks work just as they did in classic ASP, indicating that code falls between them (in this case, C#). The = sign immediately following the opening tag causes ASP.NET to display the value, just like a call to Response.Write( ). You could just as easily write the line as: Hello World! It is now <% Response.Write(DateTime.Now.ToString()); %> Run the page by pressing F5 (or save it and navigate to it in your browser). You should see the string printed to the browser, as in Figure 15-4. Figure 15-4. Hello World from ASP.NET 2.0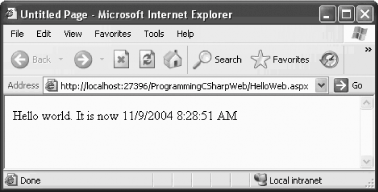
Figure 15-5. You'll see this if you start debugging before you have a Web.config file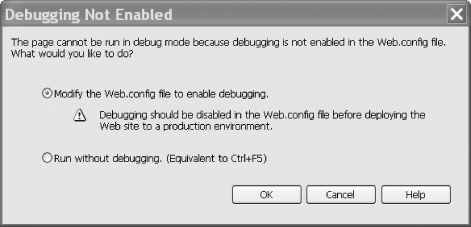 |
 New Web Site. In the New Web Site menu, choose C# as your language, and choose ASP.NET Web Site as the template to use. Finally, locate your web site somewhere on your disk (at the bottom of the dialog), as shown in Figure 15-1.
EAN: 2147483647
Pages: 180