CSLA.Security
| Tip | You may already have a similar database, or you may be using LDAP or some other mechanism to validate and group your users. If so, you can skip the creation of this database and alter the data access methods in the BusinessIdentity object implementation to use your security data store instead of this one. |
Obviously, it's possible to get much more complex with security, but we'll keep it simple here so that it's easier for you to adapt these concepts to fit into your own environment. This philosophy extends to storing our password values in a text field within the database. Normally, we'd use a one-way hash to convert the password into a numeric value, so that no one could look into the table to get anyone 's password.
| Tip | We'll be writing our code in this book to work with SQL Server 2000. If you have a different database, you can adapt the table structures and stored procedures to fit your environment. |
Some versions of VS .NET include the concept of a Database project . This type of project can be useful anytime developers must work with databases, and especially when they're working with stored procedures. The scripts to create the database, its tables, and its stored procedures are kept in the Database project, outside of the database itself. This makes it very easy to use source control or other tools against these scripts.
At the same time, the script files in the project can easily be applied to our database by right-clicking them in the Solution Explorer window and choosing Run. That will run the script against the database to which the project is linked, updating the database with any required changes.
Database projects work with SQL scripts, and it's often easier to use the Server Explorer tool within VS .NET to create and edit databases, tables, and stored procedures directly, because we can do all our work using graphical design tools. The trouble is that this approach doesn't easily allow us to use source control or to share the database design scripts with other developers.
The ideal, therefore, is to use a combination of Server Explorer to create and edit our database objects and a Database project to maintain our SQL scripts, enabling source control and database design sharing. That's what we'll do here. The Database project is available in the code download associated with this book.
| Tip | Use of a Database project isn't required to use SQL Server or for this book. You can use the tool or approach of your choice to create the databases described in this chapter and in Chapter 6. If your version of VS .NET doesn't support Database projects, or if you're using a database server that isn't supported by Database projects, you'll find SQL Server scripts to create the database and tables in the code download for the book. |
Creating the Database
The one thing a Database project requires before it can do anything else is a link to the database on which it will operate . We'll create ours using Server Explorer in VS .NET, so right-click the Data Connections entry and choose Create New SQL Server Database. This brings up a dialog that asks us to enter our server name, the new database name, and a user ID and password to use. Enter an appropriate server name along with other valid data, as shown in Figure 5-12.
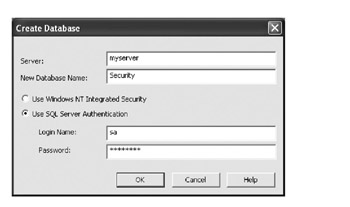
Figure 5-12: Creating the database
Depending on your options, you may be prompted to provide security information to log into the database, but the end result, as shown in Figure 5-13, should be that the database is created and listed in Server Explorer.
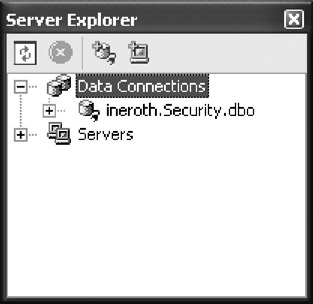
Figure 5-13: The new database shown in the Server Explorer window
Adding Tables
As stated previously, our database will have two tables: one for the list of users and the other for the list of roles for each user.
Users Table
The Users table will have just two columns , for storing the user ID and password, respectively. In Server Explorer, open the node for our Security database, right-click Tables, and choose New Table. This will bring up a designer in VS .NET where we can define the columns, keys, and other information about the table.
Add columns called Username and Password , both as type varchar with length 20. Make sure that the Allow nulls option isn't checked for either column ”we don't want empty values in this table. Then, select the Username column and set it as the primary key. (This can be done by clicking the key icon on the toolbar or by right-clicking the column and choosing the Set Primary Key option.) Save the designer by choosing File ![]() Save Table1, at which point you'll be prompted to provide a meaningful name for the table. Enter Users as shown in Figure 5-14.
Save Table1, at which point you'll be prompted to provide a meaningful name for the table. Enter Users as shown in Figure 5-14.
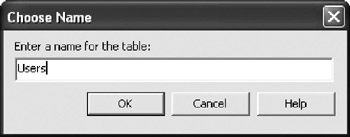
Figure 5-14: Naming the Users table
Roles Table
We'll do pretty much the same thing to create the Roles table, which will associate a list of roles with a specific user. There's a one-to-many relationship from Users to Roles . Right-click the Tables entry for our database and choose New Table. This table will have two columns: Username and Role . Once again, both are varchar s of length 20, and neither should allow nulls.
Select both columns at the same time, and set them together as the primary key. This will ensure that there are never duplicate roles for the same user.
We'll also want to add an index for the Username column to speed up the login process. When we log in a user, we'll first retrieve the user's record from the Users table, and then we'll retrieve the user's list of roles from the Roles table. This index will speed up that second step. Adding an index is done by right-clicking and choosing the Indexes/Keys menu option or by clicking the appropriate icon on the toolbar. We can then click the New button to add a new index for Username as shown in Figure 5-15.
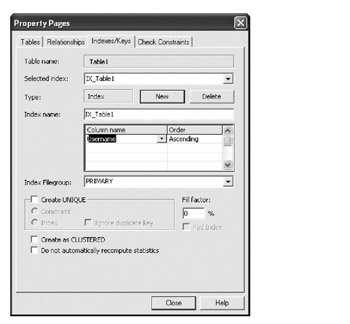
Figure 5-15: Adding an index on the Username column
Now save the table and give it the name Roles . At this stage, we can add a relationship between our two tables by clicking the Relationships icon on the toolbar and setting up a one-to-many relationship as shown in Figure 5-16.
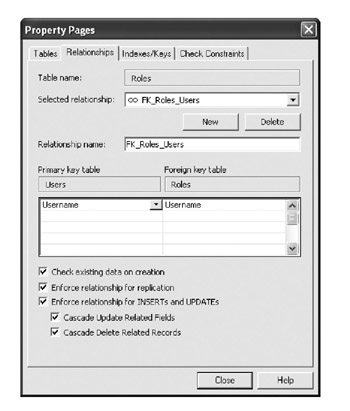
Figure 5-16: Setting up a one-to-many relationship between Users and Roles
With this done, save the table again. You'll get a warning dialog indicating that this will also update the Users table, which makes sense since we're creating a cross-table relationship.
| Tip | I'm intentionally oversimplifying this database, acting under the assumption that most organizations already have data stores containing their list of users and their associated roles. You can adapt the data access code we'll write in the BusinessIdentity class to use your own specific data store. If you do opt to use the security database we're discussing here, you may wish to add a separate table that contains a list of available roles, and then use it to create a many-to-many relationship between users and roles. I've opted to avoid that here for simplicity. |
Adding a Stored Procedure
Ideally, all data access should be handled through stored procedures. In SQL Server, stored procedures are precompiled, so they offer superior performance over the dynamic SQL statements that we might write in our code. Additionally, stored procedures offer extra security, because we can avoid giving our users access to any tables ”all they need is access to the stored procedures to do their work. This helps us to control exactly what can be done to the data in the database.
In our case, the application needs to verify that it has a valid username and password combination. If the combination is valid, the application needs a list of the roles to which the user belongs. We can provide both functions from within a single stored procedure.
Under the node for our database in the Server Explorer window is an entry for Stored Procedures. Right-click it and choose New Stored Procedure. This will bring up a stored procedure designer in VS .NET where we can write the code for the stored procedure.
Our stored procedure will return two distinct result sets. The first will contain the Username in the case that the supplied username and password combination is valid. The second will contain a list of the roles to which the user belongs.
| Tip | We could create two stored procedures to perform these operations separately. By doing them in a single stored procedure, however, we're able to have the application make a single call to the database to get all the data it needs. We'll see how to use ADO.NET to process multiple result sets as we implement BusinessIdentity a little later on. |
Enter the following code into the designer:
CREATE PROCEDURE Login ( @User varchar(20), @pw varchar(20) ) AS SELECT Username FROM Users WHERE Username=@User AND Password=@pw; SELECT R.Role FROM Users AS U INNER JOIN Roles AS R ON R.UserName = U.UserName WHERE U.Username = @User and U.Password = @pw RETURN
The data access code within BusinessIdentity will use this stored procedure to populate itself with data.
Configuring Database Permissions
The last thing we need to do here is set up permissions so that the user account under which our server-side DataPortal code runs can access the Login stored procedure. We discussed the various security options earlier, so your circumstances may vary from what is shown in this book.
In our case, we'll be using integrated security to talk to the database, and we'll be using anonymous login to IIS. This means that all database access will be done under the ASP.NET user account, so this account needs access to the Security database and the Login stored procedure.
Unfortunately, security is one of the few areas where the Server Explorer window doesn't help. Instead, we need to use the Enterprise Manager tool for SQL Server to manage the security permissions on a database, or else you can use the following SQL statement (changing SERVER to the name of your server):
If Not Exists (SELECT * FROM master.dbo.syslogins WHERE loginname = N'SERVER\ASPNET') EXEC sp_grantlogin N'SERVER\ASPNET' EXEC sp_defaultdb N'SERVER\ASPNET', N'master' EXEC sp_defaultlanguage N'SERVER\ASPNET', N'us_english' GO If Not Exists (SELECT * FROM dbo.sysusers WHERE name = N'SERVER\ASPNET' AND uid < 16382) EXEC sp_grantdbaccess N'SERVER\ASPNET', N'SERVER\ASPNET' GO
To do this graphically, open Enterprise Manager and navigate to the Security database. Under the database is a node for Users, on which we can right-click and choose New Database User. As shown in Figure 5-17, select the ASPNET user and click OK.
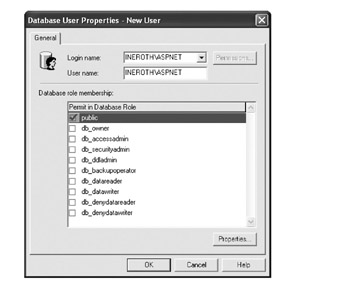
Figure 5-17: Setting security for the ASPNET user
If the ASPNET user isn't listed as an option in this dialog, you'll need to add the ASP.NET account as a general user of SQL Server. This is done under the Security node for the database server, which has a Logins node. You can right-click Logins and choose New Login to add a new user account to SQL Server. This dialog allows you to select users from the Windows security environment, including the ASP.NET account.
Once the user has been added to the Security database, the ASP.NET account will be listed under the Users node. However, while the account has access to the database, it has no access to any of the objects within the database, so it can't do anything at this point. We need to allow it to execute the Login stored procedure.
Double-click the ASPNET user entry to bring up its properties window, and then click the Permissions button. This brings up a window, as shown in Figure 5-18, where we can specify what objects the account can access within the database. Select the option to give the account EXEC access to the Login stored procedure.
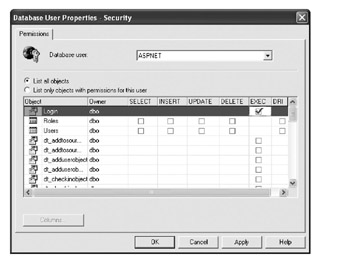
Figure 5-18: Allowing the ASPNET user to execute the Login stored procedure
The ASP.NET account can now run this stored procedure, which means that our BusinessIdentity code (running under ASP.NET) will be able to retrieve the data it requires. This change in access rights can also be accomplished with the following SQL:
Grant Execute On Login To "SERVER\ASPNET"
Creating the Database Project
The Security database is complete at this point. However, all its information is "locked away" within the SQL Server RDBMS where we created it. If we want to share the database structure or include the structure in source control, we should create a Database project in VS .NET.
Adding a Database project to our solution is simply a matter of selecting File ![]() Add Project. The Database project type is located under the Other Projects option in the left pane. Name the project SecurityDB , click OK, and you'll be prompted to choose the database to which this project will be linked. Choose the database we just created, and you should find that the project is listed in Solution Explorer as shown in Figure 5-19.
Add Project. The Database project type is located under the Other Projects option in the left pane. Name the project SecurityDB , click OK, and you'll be prompted to choose the database to which this project will be linked. Choose the database we just created, and you should find that the project is listed in Solution Explorer as shown in Figure 5-19.
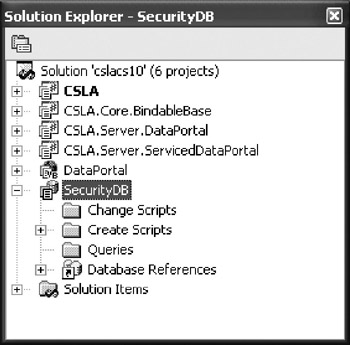
Figure 5-19: The SecurityDB Database project in Solution Explorer
By default, the project includes folders where we can place SQL scripts to change or create database objects, and a folder where we can place query scripts. If we have a preexisting database with tables and stored procedures, we can drag and drop them from Server Explorer into the folders of this project, and SQL scripts will be automatically created. That's what we'll do in this case, since we already have our tables and stored procedures in the database.
| Tip | This feature requires that the client tools for SQL Server be installed on the development workstation. Remember that this step isn't crucial to the running of the sample code in this book. |
We can just drag the Tables node from Server Explorer to the Create Scripts folder in the SecurityDB project. As shown in Figure 5-20, this will bring up a dialog (after possibly asking for login information) where we can select which database objects are to be scripted. In our case, we want all of them scripted, so select that option.
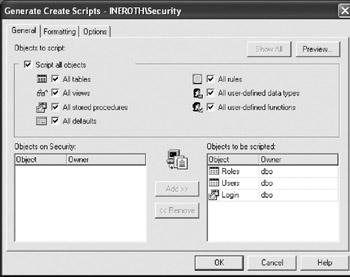
Figure 5-20: The scripting filter dialog in Visual Studio .NET
When we click OK, VS .NET will confirm that we want to script the objects to the Create Scripts folder, and then the scripts will be created. This is illustrated in Figure 5-21. The result is a series of script files in our project.
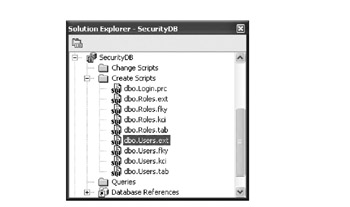
Figure 5-21: The SQL script files in the SecurityDB database project
These files are now all subject to source control and can be shared with other developers. To re-create the database on a new server, simply highlight all the script files in the Solution Explorer window, right-click them, and choose the Run On menu option. We'll be prompted for the database server on which the scripts should be run, and they'll be executed against that server.
Providing Test Data
In a production application, we'd create administrative tools to allow a user to add, remove, and edit users and their roles. For our testing purposes, we'll simply use the built-in capabilities of VS .NET to edit the tables to enter some simple test data.
This can be done right from Server Explorer. Just navigate to the Users table under our database connection object, right-click, and choose Retrieve Data from Table. This will bring up a VS .NET designer where we can view and edit the data in the table.
Add some usernames and passwords for testing purposes, and then open the Roles table for editing and associate your users with roles. The following screenshots show an example that we'll use in our sample application, starting in Chapter 6. We have a set of users and passwords such as those listed in Figure 5-22.
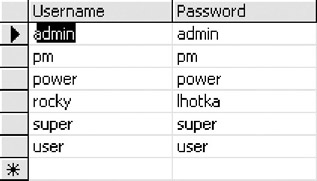
Figure 5-22: Example users and passwords in the Users table
And we have a set of roles associated with those users such as those listed in Figure 5-23.
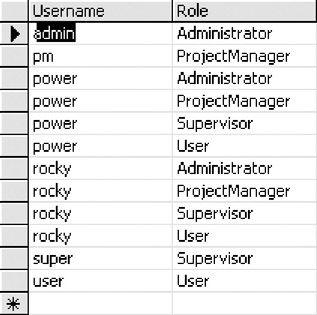
Figure 5-23: Example roles assigned to users
Notice that we have a power user who is a member of all roles, while the other users have more limited roles. When we build our example application, we'll use these roles to control which users can perform which functions. Since we have several users in different roles, we can use them for testing purposes.
BusinessIdentity
Now that the Security database has been created, we can move on to create our principal and identity objects. The core of the security mechanism is really the identity object, since this is what encapsulates the concept of a user. It's a read-only concept, in that the identity object isn't intended to allow the user to edit their username, password, or roles. To fit into the .NET security framework, an identity object must implement the IIdentity interface.
We'll implement our custom BusinessIdentity object as a regular business object by having it inherit from ReadOnlyBase . This will result in a read-only business object that can be populated with data by using our existing DataPortal mechanism. It will also implement the IIdentity interface, so that it works with the .NET security infrastructure.
Add a new class to the CSLA project and name it BusinessIdentity . This class will be implementing security functionality and interacting with the database, so we can use some namespaces to make that easy:
using System; using System.Collections; using System.Security.Principal; using System.Data; using System.Data.SqlClient;
We also want this class to be in the CSLA.Security namespace, rather than CSLA :
namespace CSLA.Security { public class BusinessIdentity { } } Creating a Business Object
To make BusinessIdentity into a business object, we must make it [Serializable()] , have it inherit from ReadOnlyBase , and have it implement a private constructor:
[Serializable()] public class BusinessIdentity : ReadOnlyBase { #region Create and Load private BusinessIdentity() {} // prevent direct creation #endregion } Business objects have other obligations as well. Specifically, they need to provide static methods through which the object can be created, and they must implement the appropriate DataPortal_xyz() methods. In the case of a read-only object, this means overriding DataPortal_Fetch() . They must also implement a nested Criteria object that can be passed to the DataPortal_Fetch() method.
Criteria Class
The Criteria class contains the information needed to load the object from the database. For this object, that means the Username and Password fields (which will be provided by the UI) that must be validated against the database.
To create a nested Criteria class, we must declare it inside the BusinessIdentity class, but in all other respects it's just a normal class. To keep things orderly, we'll implement it within the Create and Load region and mark it as [Serializable()] so that it can be passed by value via remoting:
#region Create and Load [Serializable()] private class Criteria { public string Username; public string Password; private Criteria(string username, string password) { Username = username; Password = password; } } private BusinessIdentity() {} // prevent direct creation #endregion As you can see, the class includes public variables, which is typically a Bad Thing because the data is externalized, breaking encapsulation. In this case, however, we're merely passing the object between our business object and itself, so the coding simplicity that comes from marking the variables as public is worth it. Otherwise, we'd have to implement Property methods that did nothing but expose the value ”extra code for no value in this case.
Technically, there's no need for a parameterized constructor either, but having it simplifies our code in BusinessIdentity quite a lot, so it's worth implementing.
Creation Methods
Now that we have a Criteria class nested within BusinessIdentity , we can create a static method to allow client code to create an instance of BusinessIdentity . This flows from the class-in-charge scheme that we discussed in Chapter 2.
In the particular case of BusinessIdentity , the only valid client code will be our BusinessPrincipal object. Identity objects are always contained within principal objects, so we don't want the UI or arbitrary business object code creating an identity object by themselves ; they must go through the BusinessPrincipal object.
To make sure this works, we'll scope our static method as internal , so it won't be available outside the CSLA project. Given our private constructor as well, this ensures that the object can't be created by either UI or business code. Add the method to the same region:
internal static BusinessIdentity LoadIdentity( string userName, string password) { return (BusinessIdentity)DataPortal.Fetch( new Criteria(userName, password)); } The method accepts a username and password as parameters, and then uses them to create a new Criteria object. This Criteria object is then passed to the Fetch() method of the client-side DataPortal , which in turn calls the server-side DataPortal object's Fetch() method, which in turn calls our object's DataPortal_Fetch() method.
The DataPortal mechanism returns a fully populated BusinessIdentity object, which we then return as a result of this static method. We'll see how this is called when we implement the BusinessPrincipal class.
DataPortal_Fetch
Though we've now created the static method to load our object with data, we haven't yet implemented a meaningful DataPortal_Fetch() method. As it stands, the server-side DataPortal will execute the DataPortal_Fetch() we implemented in ReadOnlyBase , which simply returns an error. To implement our own data access code, we need to override this method.
First, though, we need some instance variables in our class into which we can load the data we'll be retrieving:
[Serializable()] public class BusinessIdentity : ReadOnlyBase, IIdentity { string _username = string.Empty; ArrayList _roles = new ArrayList(); These variables will store the information that we'll get from our data access code. If the username and password combination was valid, then we have the username value to put into _username . We'll also have a list of roles to which the user belongs that we can use to populate the _roles ArrayList object. Now we can implement the DataPortal_Fetch() method itself:
#region Data access protected override void DataPortal_Fetch(object criteria) { Criteria crit = (Criteria)criteria; _roles.Clear(); using(SqlConnection cn = new SqlConnection(DB("Security"))) { cn.Open(); using(SqlCommand cm = cn.CreateCommand()) { cm.CommandText = "Login"; cm.CommandType = CommandType.StoredProcedure; cm.Parameters.Add("@user", crit.Username); cm.Parameters.Add("@pw", crit.Password); using(SqlDataReader dr = cm.ExecuteReader()) { if(dr.Read()) { _username = crit.Username; if(dr.NextResult()) while(dr.Read()) _roles.Add(dr.GetString(0)); } else _username = string.Empty; } } } } #endregion The Criteria object is passed in as a parameter of type object , so we first cast it to a variable specific to our Criteria object's data type:
Criteria crit = (Criteria)criteria;
Then we open a connection to the database:
using(SqlConnection cn = new SqlConnection(DB("Security"))) { cn.Open(); Notice here the use of the DB() method that we implemented in ReadOnlyBase to retrieve the connection string for the database. We have a using block to ensure that the connection is closed regardless of whether we get any errors. We can then call the Login stored procedure by setting up and executing a SqlCommand object:
SqlCommand cm = cn.CreateCommand(); cm.CommandText = "Login"; cm.CommandType = CommandType.StoredProcedure; cm.Parameters.Add("@user", crit.Username); cm.Parameters.Add("@pw", crit.Password); using(SqlDataReader dr = cm.ExecuteReader()) The processing of the SqlDataReader is also in a using block, so that we're sure to close the object when we're done. The first thing we do is see if the username and password matched and returned a row of data:
if(dr.Read()) { _username = crit.Username; If so, we store the username into our object for later reference. On the other hand, if no record was returned, we take a different route to indicate that the user isn't valid by setting the _username field to an empty string:
else _username = string.Empty;
If the user is valid, we also need to retrieve the roles for the user. This is done by moving to the next result set from SQL Server (remember that our stored procedure returns two result sets) and copying its values into our ArrayList :
if(dr.NextResult()) while(dr.Read()) _roles.Add(dr.GetString(0));
For performance reasons, all of this is done using a SqlDataReader rather than a DataSet object. A DataSet object is loaded from a data reader object, so if we'd used a DataSet , our data would have taken the following path :
Database data reader DataSet BusinessIdentity
As it is, we avoid copying the data an extra time by using the data reader directly:
Database data reader BusinessIdentity
Thanks to this approach, retrieving a BusinessIdentity object should be at least as fast as retrieving a DataSet with the same data.
At the end of the DataPortal_Fetch() method, we've populated our object with appropriate data from the database. The DataPortal mechanism then returns the BusinessIdentity object back to the client code ”our BusinessPrincipal object in this case.
Implementing IIdentity
To operate properly within the .NET security infrastructure, our BusinessIdentity class must implement the IIdentity interface, which exposes some of the data in our object:
[Serializable()] public class BusinessIdentity : ReadOnlyBase, IIdentity
This forces us to implement the properties defined by the interface. These are described in Table 5-6.
| Property | Description |
|---|---|
| IsAuthenticated | Returns a bool indicating whether this identity was successfully authenticated |
| AuthenticationType | Returns a string indicating the type of authentication used to authenticate the identity |
| Name | Returns a string containing the name of the authenticated user |
Given the variables we've already defined and loaded in our object, these are easily implemented:
#region IIdentity bool IIdentity.IsAuthenticated { get { return (_username.Length > 0); } } string IIdentity.AuthenticationType { get { return "CSLA"; } } string IIdentity.Name { get { return _username; } } #endregion Each property defined on the interface is implemented here by returning the appropriate value from our data. In the case of AuthenticationType , we return the value "CSLA" to indicate that the identity was authenticated using our custom, table-based scheme.
Exposing the Roles
There's one last bit of information in our object that we have yet to make available: the list of roles for the current user. As we mentioned in Chapter 3, the IsInRole() method exists on the IPrincipal interface rather than on IIdentity , so we somehow need to make the list of roles available to our BusinessPrincipal object. This can be done by exposing our own IsInRole() method at internal scope, so it's not available to UI or business object code:
internal bool IsInRole(string role) { return _roles.Contains(role); } The IsInRole() method that we'll implement in BusinessPrincipal can make use of this method in its implementation.
That completes the BusinessIdentity object, which is our first business object based on the framework. We can now move on to create the BusinessPrincipal object that will manage BusinessIdentity .
BusinessPrincipal
The principal object's role is to provide the start point for .NET security queries. It implements the IPrincipal interface, which consists of the IsInRole() method and an Identity property to provide access to the underlying identity object. IsInRole() can be used from any of our code, in the UI or in business objects, to determine whether the current user belongs to any given role.
It's also the job of the principal object to manage the login process. Our UI code will get the username and password from the user, and provide them to the BusinessPrincipal object, which will manage the process of finding out whether the username and password combination is valid. Most of the hard work in this regard was done by our custom BusinessIdentity object, but BusinessPrincipal does include some interesting code that enables it to integrate properly with the .NET security infrastructure.
In the CSLA project, add a new class named BusinessPrincipal . During its implementation, we'll be interacting with the security and threading infrastructure of the .NET Framework, so use these namespaces:
using System; using System.Security.Principal; using System.Threading;
As with BusinessIdentity , we want this class to be in the CSLA.Security namespace. We'll also make the class [Serializable()] , so that it can be passed by value via remoting:
namespace CSLA.Security { [Serializable()] public class BusinessPrincipal : IPrincipal { } } Implementing IPrincipal
To help with implementing IsInRole() and Identity , we'll declare a variable to hold a reference to our BusinessIdentity object:
[Serializable()] public class BusinessPrincipal : IPrincipal { BusinessIdentity _identity; #region IPrincipal IIdentity IPrincipal.Identity { get { return _identity; } } bool IPrincipal.IsInRole(string role) { return _identity.IsInRole(role); } #endregion Notice how the IsInRole() method simply delegates the call to the IsInRole() method that we implemented in BusinessIdentity . This allows the BusinessIdentity object to maintain all user-specific data, and it enables us to implement the IsInRole() method as required by IPrincipal .
Of course, we haven't yet implemented any code to get hold of a BusinessIdentity object. That will be handled by the login process.
Login Process
The process of logging in has two parts : integrating with .NET security and creating the BusinessIdentity object.
To integrate properly with .NET security, we must insert our new BusinessPrincipal object as the thread's CurrentPrincipal . (We discussed the relationship between the principal and identity objects in Chapter 3; these are standard .NET security concepts that are common to all applications.) Unfortunately, the process of setting the principal object for our thread is a bit complex, and I'll try to explain it in some detail to make it clear.
Once that's done, however, we can take the username and password provided by the UI and use them to create a BusinessIdentity object. We've already implemented the details behind that process, so we know that it will result in a BusinessIdentity object that will indicate whether the username and password combination was valid.
The entire process will be launched from the UI by calling a static method named Login() :
#region Login process public static void Login(string username, string password) { new BusinessPrincipal(username, password); } #endregion This method looks a bit odd, since it's creating an instance of our BusinessPrincipal object and not doing anything with the result. That's all right, though, because our constructor will be ensuring that the current thread's CurrentPrincipal property points to the new BusinessPrincipal object.
All the interesting work happens in the private constructor. This is where we do the following:
-
Create the BusinessPrincipal object.
-
Set our BusinessPrincipal as the current thread's principal object, thus making it the active security context.
-
Attempt to set our BusinessPrincipal as the default object for threads created in the future (which can fail if this has ever been done in our application domain before).
-
Load the BusinessIdentity object with the user's identity and roles.
Insert the constructor into the Login Process region:
private BusinessPrincipal(string username, string password) { AppDomain currentdomain = Thread.GetDomain(); currentdomain.SetPrincipalPolicy(PrincipalPolicy.UnauthenticatedPrincipal); IPrincipal oldPrincipal = Thread.CurrentPrincipal; Thread.CurrentPrincipal = this; try { if(!(oldPrincipal.GetType() == typeof(BusinessPrincipal))) currentdomain.SetThreadPrincipal(this); } catch { // failed, but we don't care because there's nothing // we can do in this case } // load the underlying identity object that tells whether // we are really logged in, and if so will contain the // list of roles we belong to _identity = BusinessIdentity.LoadIdentity(username, password); } The first step is to get a reference to our current application domain. Each application domain has a security policy that controls how any thread in the domain gets its principal object. Since we're implementing custom security, we want the policy to avoid doing any automatic authentication, so we set the value to use an UnauthenticatedPrincipal :
AppDomain currentdomain = Thread.GetDomain(); currentdomain.SetPrincipalPolicy(PrincipalPolicy.UnauthenticatedPrincipal);
Obviously, the BusinessPrincipal will be authenticated in the end , but this setting avoids the potential overhead of doing Windows authentication first, only to discard that result as we perform our own authentication.
The next step is to get a reference to the old principal object, and then set the thread with our new BusinessPrincipal :
IPrincipal oldPrincipal = Thread.CurrentPrincipal; Thread.CurrentPrincipal = this;
At this point, any code running on our thread will rely on our BusinessPrincipal to provide all security information about the user's identity and roles.
The next bit of code is potentially a bit confusing. Though we've set our current thread to use the right principal object, it's possible that other threads will be created within this application domain in the future. Ideally, they'd automatically get this same BusinessPrincipal object when they're created. That's what this code does:
try { if(!(oldPrincipal.GetType() == typeof(BusinessPrincipal))) currentdomain.SetThreadPrincipal(this); } catch { // failed, but we don't care because there's nothing // we can do in this case } The thing is, this can only happen once during the lifetime of an application domain. For a Windows Forms application, this means we can only set it once each time the application is run. For a Web Forms application, the rules are more complex. We can get a new application domain anytime ASP.NET resets our website, and this happens anytime Web.config is changed, or a new file is copied into the directory, or ASP.NET detects that our website has deadlocked or is having trouble.
Because we can't always know what the UI code might have done previously, we can't assume that this code will work. If it doesn't work, there's not a whole lot we can do. If it was of critical importance, we could perhaps raise an error that forces the application domain itself to terminate, kicking the user out of the application entirely. This would only work in a Windows UI, however. In a Web Forms UI, we're running in an application domain created by ASP.NET, and this code is almost guaranteed to fail.
Due to these issues, if this causes an error, we simply ignore it and continue with our processing. At this point, it's up to the business developer to realize that she's running in a presecured environment, and she'll have to ensure manually that any new threads created for this user get the same BusinessPrincipal object.
| Tip | In reality, this is almost never an issue, since most server-side code is single-threaded. The only time we're likely to be spinning up extra threads is on a Windows Forms client, and in that case the application domain default should be set to our BusinessPrincipal . |
The final step in the process is to create the BusinessIdentity object. This is easily done by calling the static method we implemented earlier:
_identity = BusinessIdentity.LoadIdentity(username, password);
This illustrates how virtually all of our business objects are created. We call the static method on the class, which returns a fully populated business object for our use. In this case, the resulting BusinessIdentity object will contain information to indicate whether the user was successfully authenticated. If so, it will contain the username and the list of roles for the user.
At this point, our custom, table-based security infrastructure is complete. Any of our UI or business object code can now use code similar to the following to log into the system:
// Login (done once at the beginning of the app) CSLA.Security.BusinessPrincipal.Login("username", "password"); Then we can determine whether the user is in a given role anywhere in our code:
if(System.Threading.Thread.CurrentPrincipal.IsInRole("role")) { // They are in the role } else { // They are _not_ in the role } We'll make use of this capability as we implement our sample application in Chapters 7 through 10.
EAN: 2147483647
Pages: 111
If you may any questions please contact us: flylib@qtcs.net