The Animation Tools and Interface
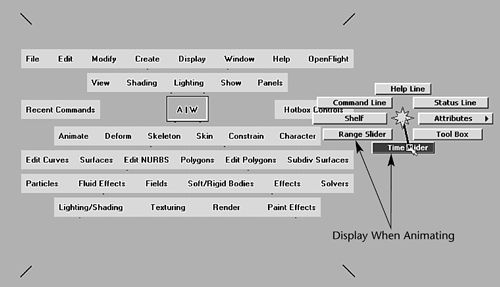
| Before jumping into the animation process, you should review the interface and tools for animation in Maya. The following sections help you get familiar with the interface so that you can find the attributes and functions you need for animation. Setting Up an AnimationBefore you create any animation in a scene, you need to configure some standard settings. Two components of Maya's user interface are specific to animation: the Range Slider and the Time Slider. To make sure they are displayed, click Hotbox | Hotbox Controls to open a marking menu with several options for the user interface (see Figure 11.1). Use this marking menu to display the Range Slider and Time Slider in your Maya interface. Figure 11.1. Use the Hotbox to quickly toggle displaying parts of the user interface.
The Range Slider and Animation PreferencesFigure 11.2 shows the Range Slider with its controls. The Range Slider sets the total length of the animation in frames. You can also use the Range Slider to temporarily limit the range of playback and set the playback start and end frames. In the figure, frames 0 120 are focused on. After this segment has been edited, you can move the Range Slider to another focus area or pull it out to show the entire animation. Figure 11.2. Use the Range Slider to control animation length and limit playback to specific ranges.
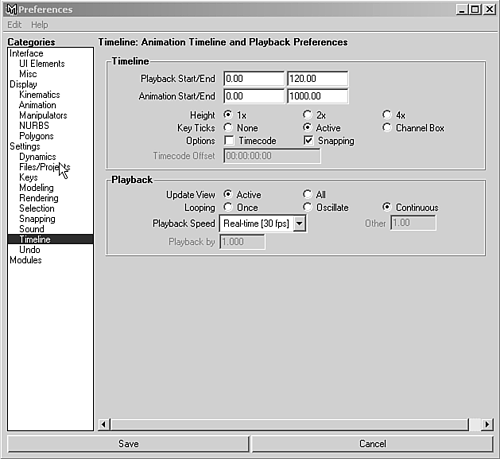
Another way to control settings for your animation is to use the Preferences dialog box. To open it, click the Animation Preferences button at the far right of the Range Slider (refer to Figure 11.2) or choose Window | Settings/Preferences | Preferences on the menu. Before making any changes, reset all the settings in the Preferences dialog box to their defaults (Edit | Restore Default Settings). Feel free to hide the Shelf and Toolbox to minimize clutter in the Maya interface. As shown in Figure 11.3, you use the Preferences dialog box to change values for the animation timeline and playback. You can also set the total time for your animation, the size of the timeline (the Time Slider), and other related features. Figure 11.3. Use the Preferences dialog box to specify the length of your animation and the playback speed in the viewports.
Specifying the Frame RateSpecifying the frame rate is the first aspect of setting up your animation. The frame rate affects the length and fluidity of your animation. By default, Maya sets your animation to Film, which plays at 24fps. Every second of your animation is, therefore, made up of 24 frames. You can see that a few minutes of animation quickly adds up to thousands of rendered images! note For animation that will be put on videotape, typically you use 30fps in the United States and 25fps in other countries. The National Television Standards Committee (NTSC) is a 30fps standard developed in North America for television broadcasting. Western European and other countries use Phase Alternate Line (PAL), which has a 25fps standard. Render resolutions are also different for the two formats. Setting the RangeThe range of an animation determines the total length in frames. When determining the range, you need to decide how long you want the animation to last in seconds. Then, multiply the animation's length in seconds by the frame rate (in this case, 30fps). The animation you create in this chapter will be 4 seconds long, so you use this calculation:
The Time SliderThe Time Slider is a vital part of the animation interface in Maya. Figure 11.4 illustrates its available functions. You can use the Time Slider to play your animation, to set it to a particular frame, and even to see animation keys and where they are placed. Figure 11.4. The Time Slider and its controls.
Click in the Time Slider area and drag left and right to "scrub" the animation back and forward in time. A black vertical line indicates the current frame. When keys have been set for the currently selected object, thin vertical red lines appear in the Time Slider area to indicate the times for those keys. In the playback controls, buttons for going forward one key or back one key are available to easily hop from key to key. |
EAN: 2147483647
Pages: 198


