| Maya offers an innovative solution to character animation called Trax, which enables you to simplify repetitive motions and build libraries of movements. Trax is Maya's version of what's known as nonlinear animation. Nonlinear animation mimics the approach taken by computer-based video editors, in which a timeline is displayed and footage appears as bars that can be placed, moved, copied, and layered across this timeline to compose a TV program. With Trax, if you have a character animated to applaud, you can save this bit of animation as a clip. Then, any time the character should applaud, you simply layer this clip over the other animation that's already applied to this character. Regardless of whether the character is running, hopping, or standing still, the hands clap where specified. An additional method of using Trax involves poses. Instead of using collections of animation, you simply use still poses and blend them as needed. You can blend any set of poses or animations in Trax. Your library of poses and animation clips resides in the Visor. Tutorial: Repeating the Walk Using Trax Now that the character takes a single step between frames 30 and 70, you could just repeat these steps in Maya to make him walk a few more strides, but that would be tedious and boring. Instead, take a look at the Trax Editor, a way to use animation "clips" to create repetitive motion in Maya. On the DVD  Chapter_12\ch12tut05.wmv |
On the DVD  Chapter_12\ch12tut04end.mb |
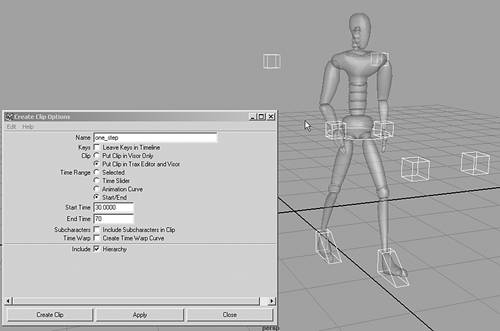
Select the control objects for the hands, knees, feet, and waist. Choose Hotbox | Animate | Create Clip | option box. Reset the settings, and change the name to one_step. Then, change the Time Range option to Start/End, set the Start Time to 30, and set the End Time to 70. Clear the Subcharacters check box, and click the Create Clip button, as shown in Figure 12.20. Figure 12.20. Creating a clip of a single walk cycle. 
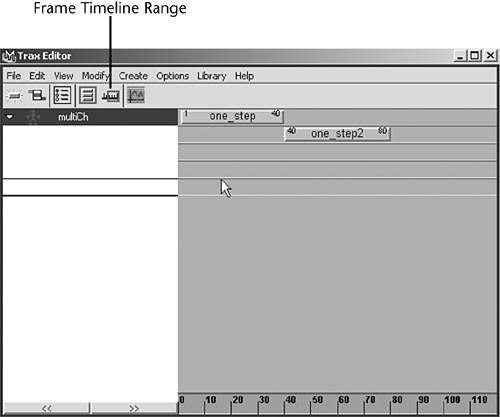
Open the Trax Editor (Hotbox | Window | Animation Editors | Trax Editor), and you see the clip you created. When you created the clip, it also created a character set, which is required of anything Trax works on. A character set is a group of related objects that are animated together usually a character and its skeleton, IK handles, and other related nodes. The automatically created character set in this tutorial is given the default name "multiCh." Scrub the Time Slider, and notice that animation now exists for the character only in frames 30 to 70. By creating a character set and a Trax clip, all the character's animation is moved to the Trax clip. In the Trax Editor, click the second button from the right the Frame Timeline Range button. Now, you can see the clip in the context of all 120 frames. Click on the clip and drag it to frame 1. Now, play back the animation, and see the walk cycle begin at frame 1. Right-click in the space to the right of the animation clip in Trax. Choose Library | Insert Clip | one_stepSource. A new clip, a copy of the original named one_step2, appears below the original in the Trax Editor. Drag the clip to the right side of the original clip and make it start where the first one ends, as shown in Figure 12.21. Drag the animation, and see the walk happen twice in a row but restarting from the same position each time! Figure 12.21. The motion clip you created is now in the clip library, and right-clicking in the Trax Editor allows you to easily insert the animation. 
Right-click on the new clip in the Trax Editor and select the Relative Clip check box. Now, play back the animation, and see the walk continue. Insert one more copy of one_stepSource, as in step 5, and set the new clip to Relative mode. Now, play back the animation, and see 120 frames of walking. tip Another method of extending time for a single clip in the Trax Editor is to place your cursor near the edge of the clip. A handle appears, and you can pull the clip out to an extended amount of time as a loop. Be sure to right-click on the clip after extending it, and select the Relative Clip check box, as in step 6 of this tutorial. At this point, you can render a playblast or a full movie of the character walking. As you might surmise, you could now create libraries of other motions and mix them in using Trax to make complicated animation. So far, however, you've only touched on the methods Maya uses for character body motion. Next, you turn to facial animation, where characters can really come alive. On the DVD  Chapter_12\ch12tut05end.mb |
|

