| 
 | In your open Office application, select the Tools menu and select Speech, Speech Recognition (or select Tools, Speech in some Office applications). |
 | Read the information in the Welcome to Office Speech Recognition dialog box and click Next. |
 | The Microphone Wizard Welcome page opens, providing useful information about adjusting your microphone. Read it, and click Next. |
INTRODUCTION If you like to dictate letters and memos, you'll be pleased to learn that Office supports speech recognition in all its applications. Before you can use this feature, however, you must set it up. You can do so in any Office application or by double-clicking the Speech icon in the Windows XP Control Panel. (In this task, you'll set it up from within Excel.) Before you begin, you'll need to connect a microphone and some speakers to your PC (refer to the instructions that came with those components for help). |
TIP Adjusting the Microphone's Sensitivity Double-click the Volume icon in the system tray (on the far right end of the taskbar, to the left of the time) to open a window that enables you to increase or decrease the microphone's sensitivity. |
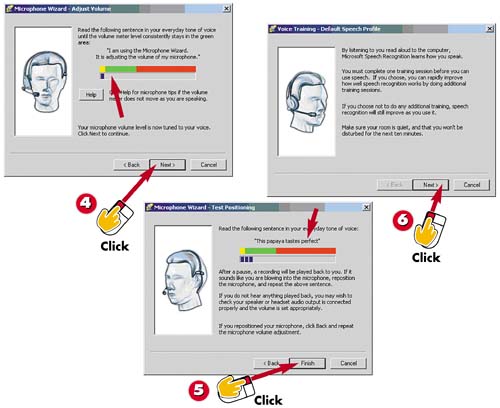
 | Repeat the text featured in the Adjust Volume page in a normal tone of voice until the volume meter level is consistently in the green. When you're finished, click Next. |
 | Read the Test Positioning sentence aloud. If the playback recording sounds distorted, reposition the mic, click Back and repeat; otherwise, click Finish. |
 | The Voice Training Default Speech Profile page opens and says that you must complete at least one training session before using the Speech Recognition feature. Click Next. |
HINT Mistakes and Stops If Office stops highlighting text while you are reading, you probably missed a word, read too quickly, or pronounced something incorrectly. Simply take a couple of breaths and begin again where the highlighting left off. If you don't recognize a word in the text or aren't sure how to pronounce it, you can skip it by clicking the Skip Word button. To stop for a moment (for example, to answer the phone), click the Pause button. (A Resume button appears for you to click when you are ready to continue.) |
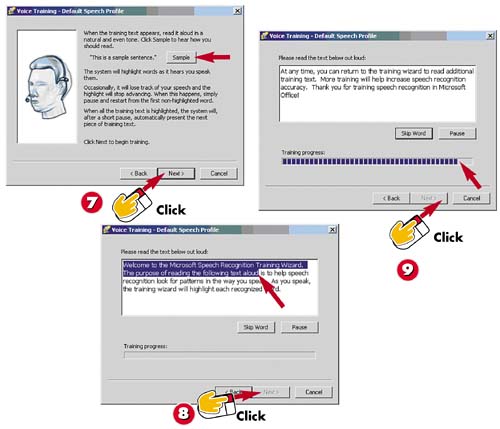
 | The Voice Training Wizard coaches you to read the training text in subsequent pages in a clear, natural tone. Click Sample to hear an example, and then click Next. |
 | Read the displayed text aloud; the text you've read will become highlighted as you go. When finished, click the Next button that activates. |
 | Continue to read the displayed text aloud, moving through each passage. (Notice that the Training Progress bar moves as you proceed.) Click Next. |
TIP Getting More Training Click the More Training button in the screen in step 11 to read additional passages aloud, which will make the speech-recognition feature more accurate. |
TIP Setting Up Multiple Speech Profiles Other people who use your computer can set up their own speech-recognition profiles. To do so, they must select Tools, Speech to activate the Language bar, click the Tools button in the Language bar, and select Options from the list that appears to open the Speech Properties dialog box. There, they click the New button to initiate a new speech profile. After multiple speech profiles are set up, you can choose your own by selecting Tools, Current User, and the appropriate username. |
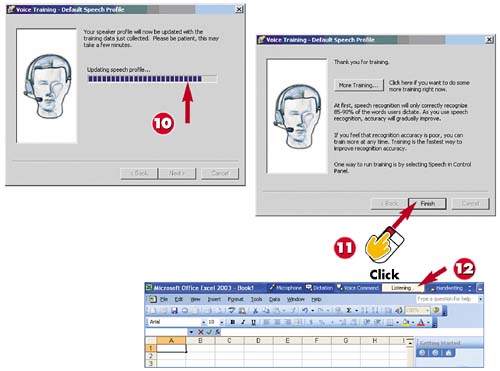
 | After you finish reading all the passages, your speech profile is updated. |
 | Click the Finish button. |
 | The Voice Training Wizard closes. A Language bar is added to the active application window's title bar, which you can click and drag to other locations on your desktop. |
TIP Displaying the Language Bar If the Language bar isn't visible, open the Tools menu and select Speech. If the Tools button on the Language bar isn't visible, click the Options button in the Language bar and select Speech Tools. |
TIP Adding Words To add a word to the Speech Recognition dictionary, select Tools, Add/Delete Word(s) from the Language bar. Type the word, click the Record Pronunciation button, and say the word to add it to the dictionary. Click the Close button when finished. |
|