Localizing ASP.NET Applications
Up to this point you have see the process for localizing a Windows application, so now you will learn about localizing your Northwind Web application. There are several ways to localize a Web application. For the purpose of this chapter, though, you will concentrate on using your satellite assemblies and controlling localization through the web.config file.
First, you can use satellite assemblies just as you did with the Windows application. This solution is best when the same information is being presented in different languages. Alternatively, you can direct users to different Web sites depending on their language. This is usually the best situation when there is a lot of content that needs to be localized. By directing users to the specific pages based on their culture, the formatting looks good, and the pages are easier to maintain in the different languages.
What Culture Is the User Using?
The culture of a user's machine that is requesting a Web page is contained in the Request object in the UserLanguages property. This is an array, and element zero will always be the primary culture of the user. To demonstrate this, let's open the NorthwindWeb application and modify the Employee List page. Add a label to the page and call it lblCulture, then switch to the code view and enter the following at the end of the Page_Load method:
Dim c As New Globalization.CultureInfo(Request.UserLanguages(0)) lblCulture.Text = c.DisplayName
Run the application and you should get a value in the label that describes both the language and the localized version of the language in that language. In my case, the label text is English (United States). As you can see, detecting the user's language is pretty easy. But how do you change this culture for the application?
Setting Globalization in the Web.Config
To change the language for an entire Web application, you will use the globalization tag of the web.config file. The globalization tag has the attributes shown in Table 13-5.
| Attribute | Purpose |
|---|---|
| requestEncoding | Character set used to read Request information |
| responseEncoding | Character set used to encode Response information |
| fileEncoding | Specifies the character set used to encode the application's Web pages |
| culture | The default culture for incoming requests |
| uiCulture | Specifies the culture to be used when rendering Web pages |
Let's modify your globalization tag in the web.config file. Currently, the tag reads as follows:
<globalization requestEncoding="utf-8" responseEncoding="utf-8" />
Modify this tag so that it reads as follows:
<globalization requestEncoding="utf-8" responseEncoding="utf-8" uiCulture="ru-RU" culture="ru-RU" />
Now, before you run the application again, go back and modify the code that you put in the Page_Load event so it reads as follows:
lblCulture.Text = _ Threading.Thread.CurrentThread.CurrentCulture.NativeName
Run the application again and the screen should look like Figure 13-5.
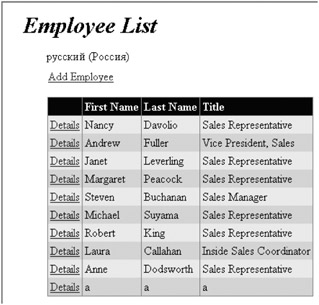
Figure 13-5: The Employee List screen, showing the web.config language
I just picked Russian because it has some cool characters, but you can do this with any language. The NativeName property specified in the previous code returns the localized name of the language. Notice also that you accessed the CurrentThread to determine the language. Using this method allows you to ignore the user's language and just set one language for the entire application. This is what you need to do to test your application with foreign languages. Now you will implement the satellite assemblies.
Implementing the Satellite Assemblies
This requires a little bit of work, but not too much. First, copy the en-US, es-ES, and fr-FR folders from the NorthwindTraders project (the folders that contain the .resx files) to the \bin folder of the NorthwindWeb project (if you installed it in the default location, this will be c:\inetpub\wwwroot\northwindweb\bin). After you have copied these folders, the directory structure should look like that in Figure 13-6.
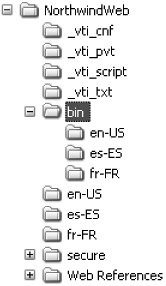
Figure 13-6: The NorthwindWeb folder structure
Go into each of these three folders (once you have copied them) and delete the .dll file and .resources file. Rename the .resx files to NorthwindWeb.[culture].resx where [culture] is the culture-specific information. Run ResGen on each of the .resx files so that you have one .resources file per .resx file in each folder. Next, run Assembly Linker on each of the .resources files. This will be the same command as you ran before, but the output file name will be NorthwindWeb.Resources.dll. Use the following AL command to do this:
Al /out:NorthwindWeb.Resources.dll /c:[culture] /embed:NorthwindWeb.[culture].resources,NorthwindWeb.[culture].resources
Once you are done with this step, each folder should have three files: a .resx, .resources, and .dll file (again, you can delete the .resx and .resources files from these folders). Next, let's alter the web.config globalization tag so the culture and uiCulture attributes read es-ES. Lastly, you need to edit the code. Add the code in Listing 13-2 to the Page_Load method of the EmployeeDetails.aspx page after the IsPostBack check.
Listing 13-2: EmployeeDetails Page_Load Method Additions
Dim locRes As New Resources.ResourceManager("NorthwindWeb", _ GetType(NorthwindWeb.EmployeeDetails).Module.Assembly) Me.lblCourtesy.Text = locRes.GetString("COURTESY") Me.lblFirstName.Text = locRes.GetString("FIRST_NAME") Me.lblLastName.Text = locRes.GetString("LAST_NAME") Me.lblTitle.Text = locRes.GetString("TITLE") Me.lblReportsTo.Text = locRes.GetString("REPORTS_TO") Me.lblBirthDate.Text = locRes.GetString("BIRTH_DATE") Me.lblHireDate.Text = locRes.GetString("HIRE_DATE") Me.lblHomePhone.Text = locRes.GetString("HOME_PHONE") Me.lblExtension.Text = locRes.GetString("EXTENSION") Me.lblAddress.Text = locRes.GetString("ADDRESS") Me.lblCity.Text = locRes.GetString("CITY") Me.lblRegion.Text = locRes.GetString("REGION") Me.lblPostal.Text = locRes.GetString("POSTAL_CODE") Me.lblCountry.Text = locRes.GetString("COUNTRY") Me.lblNotes.Text = locRes.GetString("NOTES") Me.lblSelectedTerritories.Text = locRes.GetString("SELECTED_TER") Me.lblAvailableTerritories.Text = locRes.GetString("AVAILABLE_TER") Me.btnSave.Text = locRes.GetString("OK") There is one last change that you will make, and this is mostly to demonstrate date formats. Change the code that sets the dates in the txtBirthDate and txtHireDate textboxes so that it reads as follows:
txtBirthDate.Text = .BirthDate.ToString("D") txtHireDate.Text = .HireDate.ToString("D") You will probably need to widen the textboxes that hold the dates. When you run the application and navigate to the Employee Details page, you should see a screen similar to Figure 13-7.
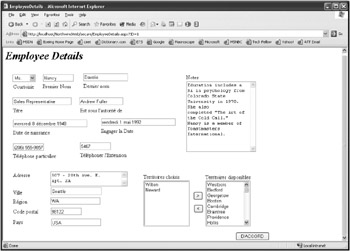
Figure 13-7: The Employee Details form localized in Spanish
I have taken the liberty of expanding the labels to be able to contain all of the necessary information. You can also change the web.config file to work with French or English now. Notice the dates also—they will be in the format of the local language thanks to the date format.
EAN: 2147483647
Pages: 148