More Advanced Table Enhancements
| Believe it or not, after all the work you've done, you're finally getting to the table elements that were introduced in HTML 4.01. There are many improvements in the way that you define table columns and rows, which I'll cover in the following sections. Grouping and Aligning ColumnsOne of the table enhancements offered in HTML 4.01 is the capability to render tables incrementally, rather than having to wait for all of the data in the table to load. This is accomplished, in part, by defining the columns of the table with the <colgroup> and <col> elements. These elements enable the web page author to create structural divisions of table columns, which then can be enhanced visually through the use of style sheet properties. The <colgroup>...</colgroup> element is used to enclose one or more columns in a group. The closing </colgroup> tag is optional in HTML 4.01, but it's required by the XHTML 1.0 standard. This element has two attributes:
Suppose that you have a table that measures 450 pixels in width and contains six columns. You want each of the six columns to be 75 pixels wide. The code looks something like the following: <table border="1" width="450"> <colgroup span="6" width="75"> </colgroup> Now you want to change the columns. Using the same 450-pixel-wide table, you make the first two columns 25 pixels wide, and the last four columns 100 pixels wide. This requires two <colgroup> elements, as follows: <table border="1" width="450"> <colgroup span="2" width="25"> </colgroup> <colgroup span="4" width="100"> </colgroup> What if you don't want all the columns in a column group to be the same width or have the same appearance? That's where the <col> element comes into play. Whereas <colgroup> defines the structure of table columns, <col> defines their attributes. To use this element, begin the column definition with a <col> tag. The end tag is forbidden in this case. Instead, you should use the XHTML 1.0 construct for tags with no closing tag and write the tag as <col />. Going back to your 450-pixel-wide table, you now want to make the two columns in the first column group 75 pixels wide. In the second column group, you have columns of 50, 75, 75, and 100 pixels, respectively. Here's how you format the second column group with the <col> tag: <table border="1" width="450"> <colgroup span="2" width="75" /> </colgroup> <colgroup> <col span="1" width="50" /> <col span="2" width="75" /> <col span="1" width="100" /> </colgroup> Now apply this to some real code. The following example shows a table that displays science and mathematics class schedules. Start by defining a table that has a one-pixel-wide border and spans 100% of the browser window width. Next, you define the column groups in the table. You want the first column group to display the names of the classes. The second column group consists of two columns that display the room number for the class, as well as the time that the class is held. The first column group consists of one column of cells that spans 20% of the entire width of the table. The contents of the cell are aligned vertically toward the top and centered horizontally. The second column group consists of two columns, each spanning 40% of the width of the table. Their contents are vertically aligned to the top of the cells. To further illustrate how colgroup works, I'm going to use the style attribute and backgroundcolor property to set each of the column groups to have different background colors. Finally, you enter the table data the same way that you normally do. Here's what the complete code looks like for the class schedule, and the results are shown in Figure 8.28: Input <html> <head> <title>Grouping Columns</title> </head> <body> <table border="1" width="100%" summary="Grouping Columns"> <caption><b>Science and Mathematic Class Schedules</b></caption> <colgroup width="20%" align="center" valign="top" style="background-color: #fcf"></colgroup> <colgroup span="2" width="40%" valign="top" style="background-color: #ccf"></colgroup> <tr> <th>Class</th> <th>Room</th> <th>Time</th> </tr> <tr> <td>Biology</td> <td>Science Wing, Room 102</td> <td>8:00 AM to 9:45 AM</td> </tr> <tr> <td>Science</td> <td>Science Wing, Room 110</td> <td>9:50 AM to 11:30 AM</td> </tr> <tr> <td>Physics</td> <td>Science Wing, Room 107</td> <td>1:00 PM to 2:45 PM</td> </tr> <tr> <td>Geometry</td> <td>Mathematics Wing, Room 236</td> <td>8:00 AM to 9:45 AM</td> </tr> <tr> <td>Algebra</td> <td>Mathematics Wing, Room 239</td> <td>9:50 AM to 11:30 AM</td> </tr> <tr> <td>Trigonometry</td> <td>Mathematics Wing, Room 245</td> <td>1:00 PM to 2:45 PM</td> </tr> </table> </body> </html> Output Figure 8.28. The class schedule with formatted column groups.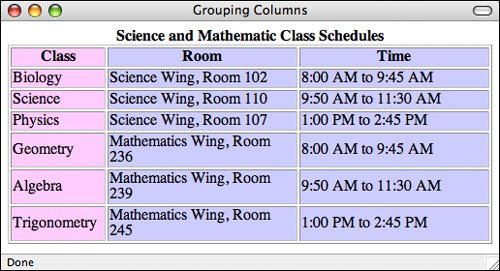 Grouping and Aligning RowsNow that you know how to group and format columns, let's turn to the rows. You can group the rows of a table into three sections: table heading, table footer, and table body. You can apply Cascading Style Sheet properties to emphasize the table heading and table footer, and give the body of the table a different appearance. The table header, footer, and body sections are defined by the <thead>, <tfoot>, and <tbody> elements, respectively. Each of these elements must contain the same number of columns. The <thead>...</thead> element defines the heading of the table, which should contain information about the columns in the body of the table. Typically, this is the same type of information that you've been placing within header cells so far today. The starting <thead> tag is always required when you want to include a head section in your table, as is the closing </thead> tag under XHTML 1.0. The head of the table appears right after the <table> element or after <colgroup> elements, as the following example shows, and must include at least one row group defined by the <tr> element. I'm including style attributes in the row grouping tags to illustrate how they are used. The table is formatted as follows: Input <table border="1" width="100%" summary="Science and Mathematic Class Schedules"> <caption><b>Science and Mathematic Class Schedules</b></caption> <colgroup width="20%" align="center" valign="top"> <colgroup span="2" width="40%" valign="top"> <thead style="color: red"> <tr> <th>Class</th> <th>Room</th> <th>Time</th> </tr> </thead> The <tfoot>...</tfoot> element defines the footer of the table. The starting <tfoot> tag is always required when defining the footer of a table. The closing <tfoot> tag was optional in HTML 4.01, but it's required for XHTML 1.0 compliance. The footer of the table appears immediately after the table heading if one is present, or after the <table> element if a table heading isn't present. It must contain at least one row group, defined by the <tr> element. A good example of information that you could place in a table footer is a row that totals columns of numbers in a table. You must define the footer of the table before the table body because the browser has to render the footer before it receives all the data in the table body. For the purposes of this example, we'll include the same information in the table head and the table footer. The code looks like this: Input <tfoot style="color: blue"> <tr> <th>Class</th> <th>Room</th> <th>Time</th> </tr> </tfoot> After you define the heading and footer for the table, you define the rows in the table body. A table can contain more than one body element, and each body can contain one or more rows of data. This might not seem to make sense, but using multiple body sections enables you to divide up your table into logical sections. I'll show you one example of why this is rather cool in a little bit. The <tbody>...</tbody> element defines a body section within your table. The <tbody> start tag is required if at least one of the following is true:
The following example contains two table bodies, each consisting of three rows of three cells each. The body appears after the table footer, as follows: Input <tbody style="color: yellow"> <tr> <td>Biology</td> <td>Science Wing, Room 102</td> <td>8:00 AM to 9:45 AM</td> </tr> <tr> <td>Science</td> <td>Science Wing, Room 110</td> <td>9:50 AM to 11:30 AM</td> </tr> <tr> <td>Physics</td> <td>Science Wing, Room 107</td> <td>1:00 PM to 2:45 PM</td> </tr> </tbody> <tbody style="color: grey"> <tr> <td>Geometry</td> <td>Mathematics Wing, Room 236</td> <td>8:00 AM to 9:45 AM</td> </tr> <tr> <td>Algebra</td> <td>Mathematics Wing, Room 239</td> <td>9:50 AM to 11:30 AM</td> </tr> <tr> <td>Trigonometry</td> <td>Mathematics Wing, Room 245</td> <td>1:00 PM to 2:45 PM</td> </tr> </tbody> </table> Put all the preceding together and you get a table that looks like that shown in Figure 8.29. Output Figure 8.29. The class schedule with a head, two bodies, and a foot.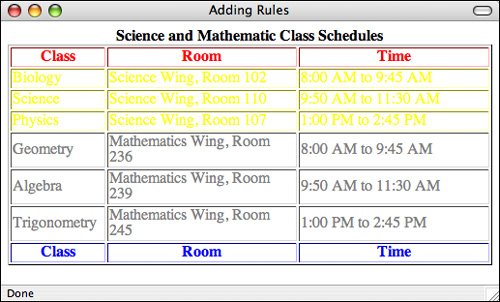 The frame and rules AttributesIn the preceding example, it's not really clear where the column groups and row groups begin and end. You can use the frame and rules attributes of the <table> element to selectively control table borders. The frame attribute affects how the external border of the table is rendered. You can specify one of several different values to define which sides of the external border are visible:
The rules attribute is somewhat similar to the frame attribute, except that it defines the rules that appear between the cells within a table. The following values apply to the rules attribute:
Now let's alter the borders in the table so that your column groups and row groups stand out better. You'll draw a border around the Class Schedule table, but you'll place the border only along the top and bottom of the table by applying frame="hsides" to the <table> tag. Inside the table, you'll separate the heading and footer from the two body sections (one table body for the Science subjects and one table body for the Math subjects). You'll also separate the Subject column group and the Room/Time column group. All this is accomplished by using rules="groups" with the <table> element. You need to modify only one line in your code to accomplish all of this now. The revised table element appears as follows, and Figure 8.30 shows the results: <table border="1" width="100%" frame="hsides" rules="groups">Figure 8.30. The class schedule with rules added.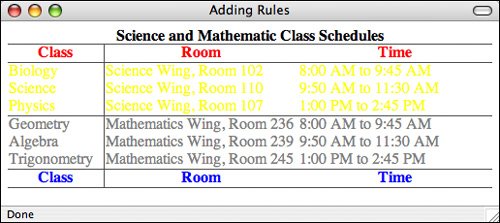 |
EAN: 2147483647
Pages: 305