| In order for other people on the Internet to see your pages, you have to upload them to your Web host's server. One easy way to do that is with an FTP program, like WS_FTP for Windows (see below), or Fetch for Macintosh (see page 358). Many Web page editors offer publishing features as well. (AOL members can either use AOL's rather awkward FTP tools, or an FTP program like those described here.) To define a new FTP site's properties: 1. | In the Connect to Remote Host window (which appears upon launching WS_FTP Pro), click Create Site, or click the Connection Wizard button in WS_FTP's toolbar (Figure 23.3).
Figure 23.3. If you didn't enter information about your Web host's FTP server when you launched the program, or to enter information about a new server, click the Connection Wizard button in the main WS_FTP window. 
| 2. | In the WS_FTP Connection Wizard boxes, name your connection so you can find it in the list, choose the type of connection (Figure 23.4), specify the name of the FTP server (ask your Web host if you're not sure), and enter your user name and password. Click Next for each screen and click Finish when you're done.
|
Figure 23.4. Follow the instructions in the series of windows that appear. For example, in this window, you have to choose what sort of connection you want to create. If you have any doubts, contact your Web host. 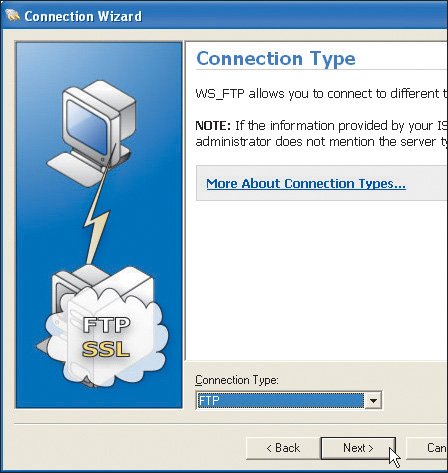
To transfer files to the server with WS_FTP (for Windows): 1. | Connect to the Internet and open WS_FTP.
| 2. | Click Connect in the upper-left corner of WS_FTP's main window (Figure 23.5).
Figure 23.5. To connect to your Web host's FTP server, click the Connect button in WS_FTP's main window. Then choose your site in the Site Manager window. 
| 3. | Choose your site in the list and click Connect. The server is accessed.
| 4. | On the right side of the window, navigate to the directory on the server to which you want to upload files.
| 5. | On the left side of the window, navigate to the directory on your hard disk that has the files you want to upload.
| | | 6. | Select the desired files in the left frame and click the right-pointing arrow in the middle of the screen (Figure 23.6). The files are transferred (Figure 23.7).
Figure 23.6. In the left part of the window (shown), select the files from your hard disk that you want to upload. In the right part of the window (shown in Figure 23.7), select the destination directory on the server. Then click the right-pointing arrow in the middle to transfer the files. 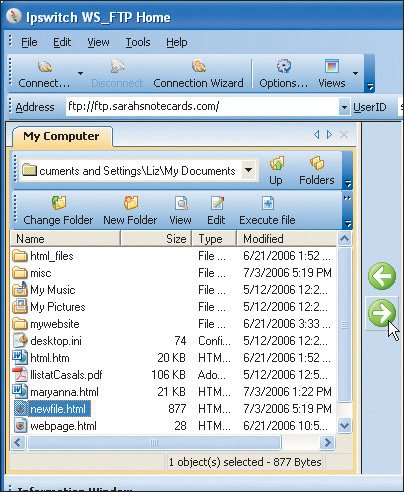
Figure 23.7. The newly transferred file appears in the frame on the right side of the window. 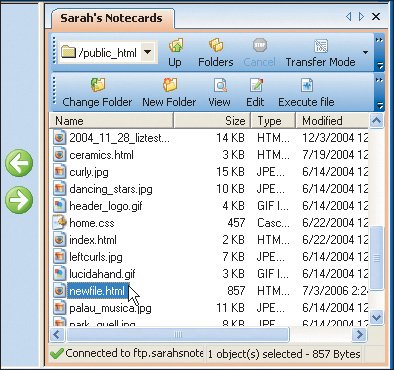
| 7. | Click Disconnect to close the connection to the server.
|
 Tips Tips
You can find WS_FTP's home page at www.ipswitch.com/products/ws_ftp/. (X)HTML, CSS, CGI, and JavaScript files should be transferred in ASCII mode. All other files, including images, sounds, and videos should be transferred in Binary mode. WS_FTP knows how to transfer most common Web files. You can define additional types in the ASCII Filenames tab that appears when you press the Options button in the toolbar. There are many other file transfer programs for Windows besides WS_FTP. Do a search at CNET's shareware site (www.shareware.com) if you'd prefer to use some other program. They all work pretty much the same way.
Fetch is the leading FTP client for Macintosh. It was recently upgraded to include native support for Mac OS X 10.4 (Tiger) but there are older versions that run on earlier systems. To transfer files to the server with Fetch (for the Mac): 1. | Open your Internet connection.
| 2. | Open Fetch.
| 3. | Choose File > New Connection.
Figure 23.8. Choose File > New Connection to give Fetch the information about your Web host's server. 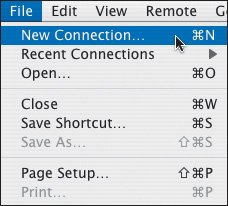
| 4. | In the New Connection window, enter the server name in the Hostname box, your user name in the Username box, the way you want to connect in the Connect using menu (ask your Web host if you're not sure), your password in the Password box, and, if desired, the path to the directory where you plan to save the Web pages in the Initial folder box (Figure 23.9).
Figure 23.9. Enter the name of your Web host's server, your account username and password, and the initial folder that you want to see. Click Connect (not shown). 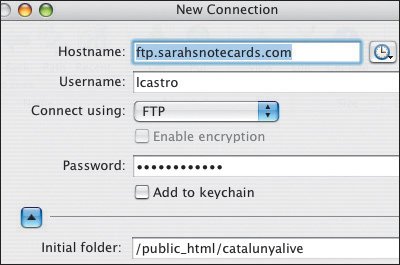
| 5. | Click OK to open the connection. Fetch will make the connection to the server you requested and open the designated directory (or the top directory if you haven't specified one).
| 6. | If necessary, navigate to the directory where you wish to place your Web files.
| 7. | Click the Put button or press Command-U (Figure 23.10).
Figure 23.10. Make sure the proper directory on the server (where you want to transfer the files) is showing in the window bar before transferring the files (here, catalunyalive). Click the Put button, or press Command-U. 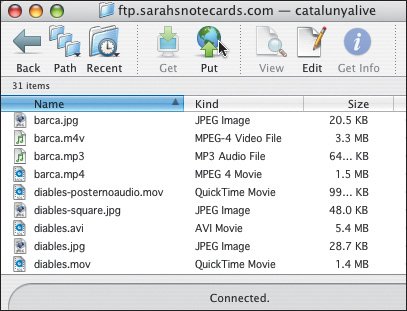
| | | 8. | In the dialog box that appears, choose the files that you wish to transfer to the server. Select multiple files holding down the Shift key. Select multiple non-contiguous files holding down the Command key. When you have selected all the files you wish to transfer, click the Put button (Figure 23.11).
Figure 23.11. Select the desired file from your computer. You can change the name that it will have on the server if you like (with the Put as box). Then click Put. 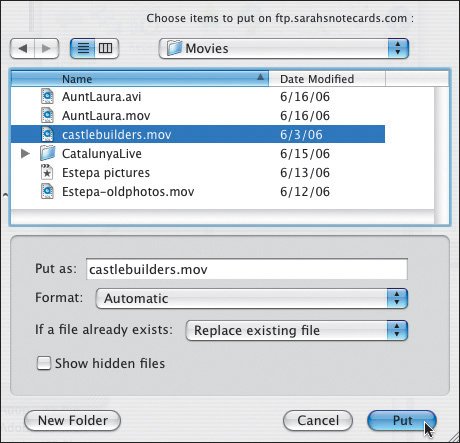
| | | 9. | Click OK. The files are transferred to the server and maintain the hierarchy they had on the local system (Figure 23.12).
Figure 23.12. The chosen files are uploaded to the desired directory. 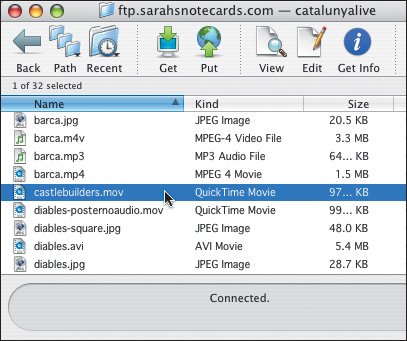
|
Tips Fetch used to belong to Dartmouth University but was bought back by its principal engineer, Jim Matthews (thanks to winnings from a stint on the television show, Who Wants to Be a Millionaire?). You can find Fetch's Web site, complete with upgrades, documentation, and support at http://fetchsoftworks.com. (X)HTML, CSS, CGI, and JavaScript files should always be transferred as Text (in ASCII mode). Any other file, including images, sound, and video, should be transferred as Raw Data. Fetch's Automatic option in the Format menu will automatically upload these typical kinds of Web files in the proper format. You can use Fetch for secure FTP by choosing SFTP in the Connect using box in Figure 23.9. You can resize the main window so that it shows more files at one time. Just click and drag the bottom-right corner. Relative URLs (see page 37) are maintained when you transfer a folder to the server. Absolute URLs (see page 36), must be updated to reflect the files' new locations. In version 4.0.3 of Fetch, the program would convert characters from the default MacRoman character set to ISO-8859-1. If you use Fetch 4 and save your document as anything other than MacRoman (see pages 46 and 333), it's better to turn this feature off (Customize > Preferences > Misc and then uncheck Translate ISO Characters). If you do use this feature, your files' meta tags should specify the ISO 8859-1 character set, not MacRoman (see page 330). Fetch 5 does not have this feature.
|