4.8. Connect to a Business Object
Note: Unless you are writing a simple web application, you should really encapsulate all your business logic into components and then bind your UI controls (such as the GridView) to the business objects.
A well-designed system uses different tiers for different operations (such as a three-tier architecture). For example, programmers frequently encapsulate their business logic in classes separate from those that handle interactions with the user. In ASP.NET 2.0, you can expose your data-aware classes to data-bound controls (such as the GridView) tHRough the ObjectDataSource control. Doing so will allow changes to be made to either layer (business logic or UI) without affecting the other. 4.8.1. How do I do that? To illustrate how you can bind a GridView control to an object through the ObjectDataSource control, you will create a class that encapsulates your data access logic and then use an ObjectDataSource control to bind to it. You will then bind the GridView control to the ObjectDataSource control. When you're finished, you'll have a three-tier application. Launch Visual Studio 2005 and create a new web site project. Name the project C:\ASPNET20\chap04-ObjectDataSource. Add a new App_Code folder to your project by right-clicking the project name in Solution Explorer and then selecting Add Folder App_Code Folder (see Figure 4-45). App_Code Folder (see Figure 4-45). Figure 4-45. Adding an App_Code folder to the project. 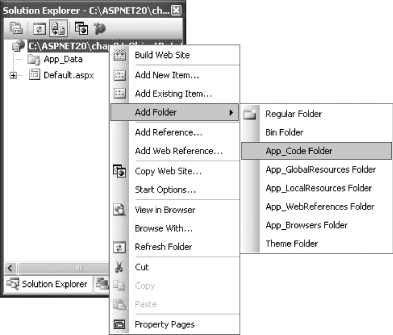
Add a Web.config file to the project by right-clicking the project name in Solution Explorer and then selecting Add New Item Web Configuration File. Add the following connection string to Web.config: <connectionStrings> <add name="pubsConnectionString" connectionString="Data Source=.\SQLEXPRESS;Initial Catalog=pubs; Integrated Security=True" providerName="System.Data.SqlClient" /> </connectionStrings>
Right-click the App_Code folder and select Add New Item.... Select Class and name it Authors.vb. Code Authors.vb as shown in Example 4-9. The Authors class contains a single methodgetAuthors( )which returns a data set. Example 4-9. Authors.vb Imports System.Data.SqlClient Imports System.Data Imports Microsoft.VisualBasic Public Class Authors Public Function getAuthors( ) As DataSet Dim conn As New SqlConnection( _ ConfigurationManager.ConnectionStrings _ ("pubsConnectionString").ConnectionString) Dim adapter As New SqlDataAdapter( _ "SELECT au_id, au_fname, au_lname FROM Authors", conn) Dim ds As New DataSet adapter.Fill(ds, "Authors") Return ds End Function End Class
Tip: Remember to save the Authors.vb file before proceeding to the next step.
Add a GridView control to the default Web Form. In the GridView Tasks menu, select <New data source...> (see Figure 4-46). Figure 4-46. Selecting a new data source 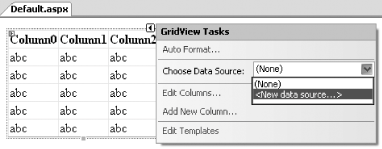
Choose Object as the data source in the window that opens (see Figure 4-47). Use the default ID of ObjectDataSource1 for the data source. Click OK. Figure 4-47. Select Object as the data source 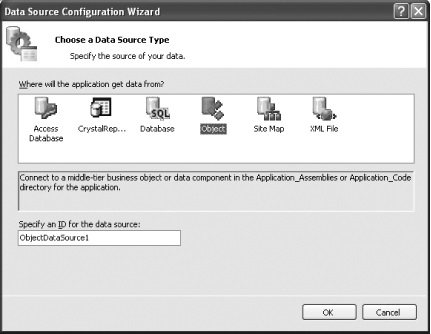
In the drop-down listbox, select Authors as the business object (see Figure 4-48). Click Next. You are essentially binding the ObjectDataSource control to the Authors class. Figure 4-48. Selecting the object for the ObjectDataSource control 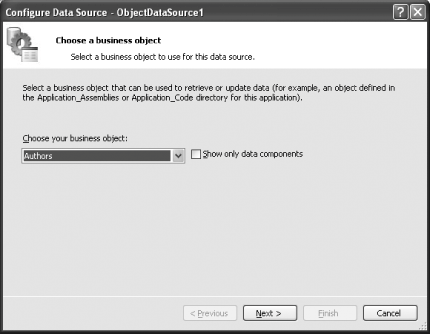
In the SELECT tab, select the "getAuthors( ), returns DataSet" method (see Figure 4-49). Click Finish. Figure 4-49. Selecting the method to bind to the SELECT tab 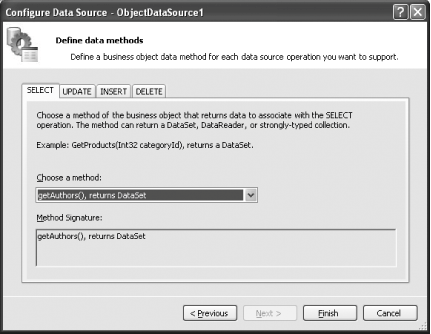
To test the application, press F5. You should now see the GridView control populated with records from the Authors table.
Note: If you don't see the getAuthors( ) method, be sure to save your Authors.vb class file first.
4.8.2. What about... ...editing the rows in the GridView control through the ObjectDataSource control? You can also use the GridView control to update the rows through the ObjectDataSource control. Add a new method, updateAuthors( ), to the Authors class, as shown in Example 4-10. Example 4-10. updateAuthors( ) Public Sub updateAuthors(ByVal au_id As String, _ ByVal au_fname As String, _ ByVal au_lname As String) Dim conn As New SqlConnection( _ ConfigurationManager.ConnectionStrings _ ("pubsConnectionString").ConnectionString) Dim adapter As New SqlDataAdapter( _ "SELECT au_id, au_fname, au_lname " & _ "FROM Authors WHERE au_id=@au_id", conn) Dim ds As New DataSet adapter.SelectCommand.Parameters.Add( _ "@au_id", SqlDbType.NVarChar, 11).Value = au_id adapter.Fill(ds, "Authors") With ds.Tables(0).Rows(0) .Item("au_fname") = au_fname .Item("au_lname") = au_lname End With Dim cb As New SqlCommandBuilder(adapter) adapter.Update(ds, "Authors") End Sub
Click on the Configure Data Source . . . link in the ObjectDataSource Tasks menu of the GridView control (see Figure 4-50). Figure 4-50. Configuring the ObjectDataSource control 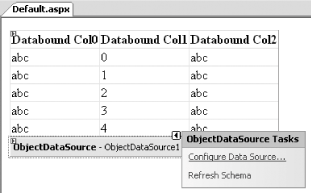
Click Next, and in the UPDATE tab, select the updateAuthors( ) method (see Figure 4-51). The use of the updateAuthors( ) method is to update the changes made to the GridView back to the database. Click Finish.
Tip: Likewise for inserting and deleting records, you just need to add new methods to the Authors class and then select them in the INSERT and DELETE tabs.
Figure 4-51. Selecting a method for the UPDATE tab 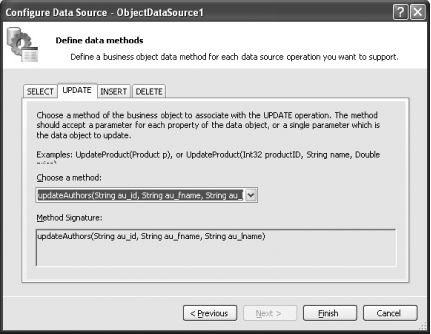
Tip: Note that the updateAuthors( ) method has parameters that are the same as the columns displayed in the GridView control.
On the GridView control, check the Enable Editing checkbox (see Figure 4-52) so that the GridView will display the Edit links in the leftmost column. Figure 4-52. Enabling the GridView control to be edited 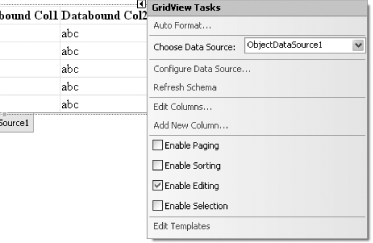
Press F5 to test the application. The GridView control is now editable with the changes passed to the updateAuthors( ) method for updating (see Figure 4-53).
Figure 4-53. Updating a row in the GridView control via the ObjectDataSource control 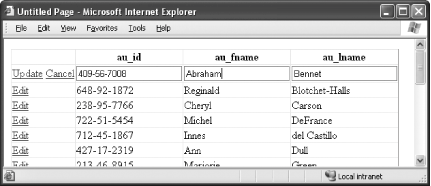
...using a data component together with the ObjectDataSource control? Instead of encapsulating the data access logic within a class, it would be easier if Visual Studio automatically generated all the required logic for standard data access tasks such as selecting, inserting, deleting, and updating. In fact, you can do so using a data component. Using the same project, right-click the project name in Solution Explorer and select Add New Item.... Select Web Form, and name the form Default2.aspx. Right-click the project name in Solution Explorer and select Add New Item.... Select Dataset, and name the data set Dataset.xsd. You will be prompted to save the data set in the special App_Code directory. Click Yes (see Figure 4-54). Figure 4-54. Saving the XSD file in the App_Code folder 
The Data Component Configuration Wizard window will appear. Click Next. Use the project's existing connection string (pubsConnectionString, saved in Web.config). Click Next (see Figure 4-55). Figure 4-55. Choosing the connection string to use 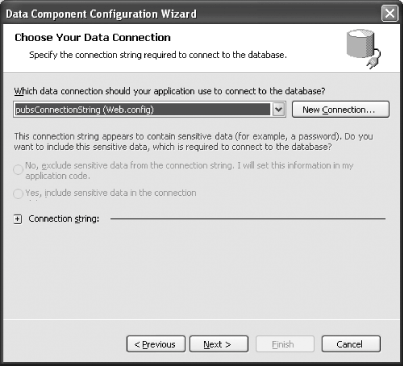
In the next window, select the "Use SQL statements" option. Click Next (see Figure 4-56). Figure 4-56. Selecting how the data component will access the database 
In the box "What data should the table load?", enter the following SQL statement: SELECT au_id, au_fname, au_lname FROM Authors
Click the Advanced Options... button and check all three checkboxes (see Figure 4-57). Essentially, you want the Insert, Update, and Delete statements to be generated automatically. You would also use optimistic concurrency to prevent updating conflicts. Click OK and then Next. Figure 4-57. Generating all the required SQL statements 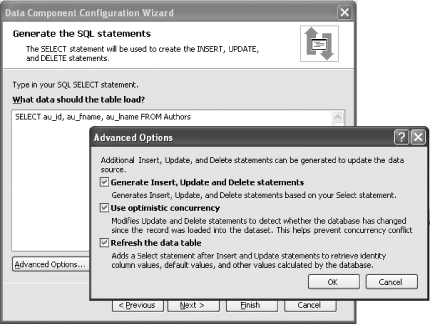
In the next window, check the three checkboxes (see Figure 4-58). In this step, you are selecting the methods to be exposed by the data component. Use the default values and click Next and then Finish. Figure 4-58. Generating the methods 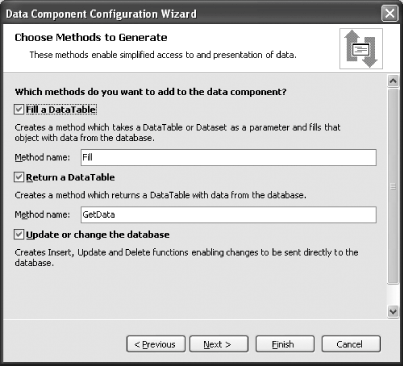
Save the project. Configure the GridView control to use a new data source (see Figure 4-59). Figure 4-59. Configuring the GridView control to use a new data source 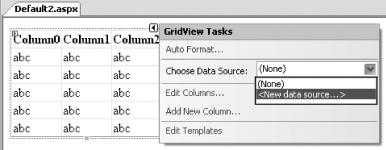
In the next window, select Object as the data source and use the default name of ObjectDataSource1 as the ID of the data source. Click OK. Select the business object DataSetTableAdapter.authorsTableAdapter (see Figure 4-60). This table adapter is autocompiled based on the data set you added earlier (Dataset.xsd). Click Next. Figure 4-60. Choosing a business object 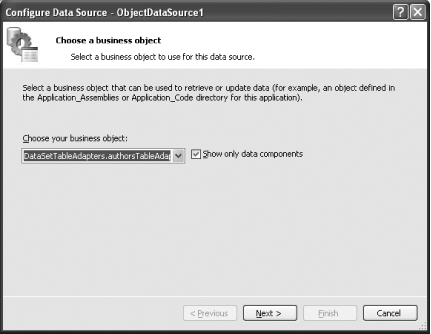
The SELECT, UPDATE, INSERT, and DELETE tabs will all have a method assigned to them (see Figure 4-61). Click Finish. Figure 4-61. Choosing methods for the various operations 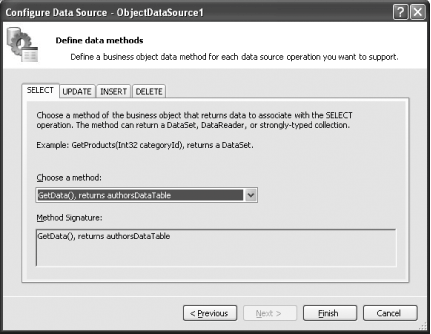
Finally, check the Enable Editing and Enable Deleting checkboxes in the GridView Tasks menu (see Figure 4-62).
Tip: Due to a design decision made by Microsoft, you need to set the ReadOnly attribute of the au_id field of the GridView control to false, like this (in Source View):
<asp:BoundField ReadOnly="false" HeaderText="au_id" DataField="au_id" SortExpression="au_id"> </asp:BoundField>
Note: This is because, by default, the GridView control assumes that primary keys are not updateable, whereas the data component allows primary keys to be updated. Thus the GridView control will not pass primary keys' values to the data component. So when you try to update the GridView control, you will get an error stating that the ObjectDataSource control could not find an Update method with the correct parameters.This behavior might change in the final release of Visual Studio 2005.
Figure 4-62. Enabling the GridView control for editing and deleting 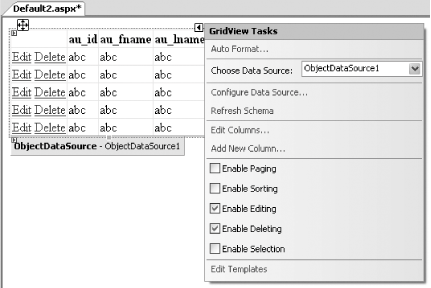
Press F5 to test the application. You will now be able to edit and delete records in the GridView control.
4.8.3. Where can I learn more? To learn more about data access in .NET using ADO.NET, check out the following article: http://msdn.microsoft.com/library/default.asp?url=/library/en-us/vbcon/html/vbconFundamentalDataConceptsInVisualStudioNET.asp. To learn what is new in ADO.NET 2.0, check out the MSDN site at http://msdn.microsoft.com/data/DataAccess/Whidbey/default.aspx. If you are not familiar with data components, refer to this link for an introduction: http://msdn.microsoft.com/library/default.asp?url=/library/en-us/vbcon/html/vbconadonetdatasetcreationinvisualstudionet.asp. |