Not-So-Obscura Camera Technique
| Again, there's enough to say about filming technique to fill a whole book or two, and many authors have. That said, here are a few things I've learned as I've gotten more and more involved in video and filmmaking. As I said before, zooming in or out alters the focus of your scene (the field of view changes along with the size of the subject). Here's a technique for keeping your subject in focus:
When you zoom in with tape rolling, your subject will stay in perfect focus with none of the flickering and twitching auto focus would have caused.
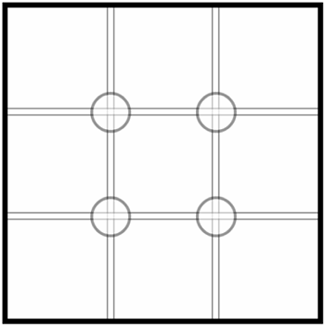
An added benefit of manual focus is more control over depth of field, so you can blur an object in the foreground purposely, or focus tightly on something in the foreground with the background blurred. Experiment with these effects; they can give your video a more professional look. You should think about editing as you shoot, and make sure you get enough coverage (different types of shots) to stitch together the scene you envision. A common and effective style is to set up a scene with a wide shot (one from a distance), then cut to medium, then to close-up, and alternate between medium and close-up from that point, maybe going to a wide shot at the end of the scene. When you shoot on location, capture a few minutes of ambient noise and visuals. Shoot signs, buildings, doorways, windows, cars, people, and everything else, from various angles. Using editing tricks you'll learn a little later, these snippets might be just what you need to make a sequence really shine. Keep your composureIn still photography and paintings, it has long been accepted that you should center the subject in the frame. This is a bit of an oversimplification. A better rule is to imagine a tic-tac-toe grid over your subject and use the four line intersections to position the focal point.
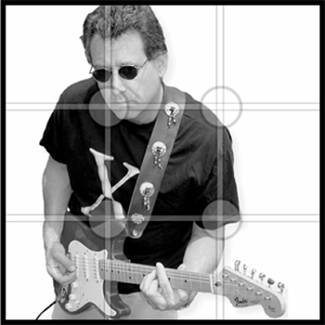
Cinematographers call this composition and it's yet another thing to think about as you plan and shoot your video. It's often more interesting to compose a picture (or frame) with the focal point off-center, like this:
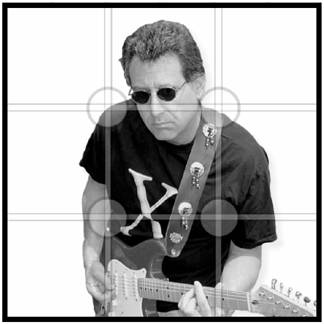
A composition with the subject plopped right in the middle, like this, can be dull:
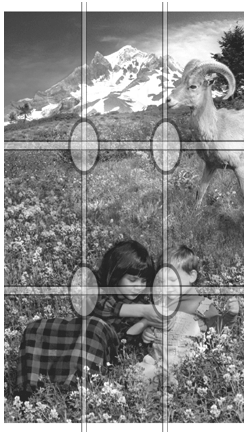
Our good friend, artist Sharon Steuer, created a fantasy composition for my wife and me. Notice that at least two focal points are near corners and none are smack dab in the middle in this example:
We've all seen pictures where a kid sticks his fingers up behind somebody's head like horns, or where it looks like something in the background is growing out of the subject. This happens when you ignore the background when setting up a shot. In filming, as in still photos, pay attention to the background and its relation to your subject. In a studio setting you can adjust the background or the lights, but in more casual settings, the solution might be to reposition the camera or shoot from a different angle. Camera angle is another weapon in your arsenal the camera's position relative to your subject. The corny old method of walking around framing the shot through a rectangle formed by your thumbs and index fingers actually works. You can go high-tech by using your camcorder's LCD screen for the same purpose, but I don't feel the LCD gives you much control over the framing of the shot. Plus, you don't get to look like you're Cecil B. De Mille. Vertical camera angle also has an impact. You might want to have a stool handy: Stand on it to shoot slightly downward or sit on it for an upward angle. You'll find scenes of kids or dogs are much more interesting if you're down at their eye level, rather than hovering above them shooting downward. While you're thinking about your coverage, try to get additional takes from different angles and distances if you can reshoot scenes. When you edit your movie, you can use clips from different perspectives to create compelling result. For long scenes like a graduation or a recital, move around and film portions of the event from different locations. If you can have two or three takes of a scene, you can also pick and choose portions of each clip to avoid flubbed lines (or save the outtakes for a blooper reel, if your sense of humor follows that bent). You can learn a lot about camera position and movement by watching TV and movies. Turn down the audio, ignore the story line, and concentrate on where the camera is and what it's pointed at (a.k.a. the "cinematography"). One last bit of advice before we move along to the editing phase. Before you start to record the real thing, record a short test shot and play it back with your headphones on so you can hear it, too. I just know you'd hate to record 30 minutes of award-winning footage and then find out that the microphone wasn't completely plugged in and you have no sound, or that your finger was covering the lens, or, well, you get the picture. |