Where No Cube Has Gone Before
We begin this chapter by taking our cubes where they have not gone before, to the SQL Server Analysis Services server. Up to this point, when we have worked with dimensions and measures, it has been as definitions in the Business Intelligence Development Studio. This environment is great for creating and refining these objects. Unfortunately, dimensions and measures cannot do much when they only exist here. To put them to work, we must deploy them to an Analysis Services server.
Our Analysis Services projects in the Business Intelligence Development Studio contain several properties that control deployment of the content of a project. Once these properties are set correctly, deploying the project content is a snap. All it takes is one selection from a Context menu.
Alternatively, we can turn the entire definition of the project into an XML for Analysis (XML/A) script. This is done using the Analysis Services Deployment Wizard. As the script is generated by the Deployment Wizard, we have the ability to change some of the configuration information, such as server names and credentials, so the scripts function on different servers. Your environment may require slightly different configurations for development, quality assurance, and production. Once the script is generated with the appropriate configuration settings, it can be loaded into a SQL Server Management Studio query window and executed on an Analysis Services server.
Deploying and Processing
We need to complete two steps before our cubes become useful. First, we need to deploy the structures to the Analysis Services database. Second, we need to process those structures in the Analysis Services database.
Deploying
Deploying is the first step to creating a useful Analysis Services structure. When we deploy an Analysis Services project, we move that project's definition from the development environment to a server environment. In a development environment, the developer is the only one who has access to the objects in a project. In the server environment, those objects are exposed to any users with the appropriate access rights.
The objects in a project cannot reside on an Analysis Services server on their own. They must be contained within an Analysis Services database. The name of the database is specified in the project definition. If the specified database is not present, it is created as part of the deployment process.
Deploying a project results in an exact copy of that project's measures and dimensions on the server. Deploying a project does not result in any members being placed in those dimensions or any facts being placed in those measures. For this to happen, we need to process the Analysis Services database.
Processing
Processing is the procedure that pumps the database full of the good stuff.
When an Analysis Services database is processed, it reads data from its data source. Dimensions are populated with members. Measures are populated with facts. Then the aggregates for all the combinations within the dimensional hierarchy are calculated.
Dimensions are processed first. Data is read from the dimension tables in the data source and used to create dimension members. After all of the dimension members are loaded, map files that contain all of the possible dimension and hierarchy member combinations are created. These map files are used for calculating aggregates.
Measures are processed after the dimension processing is complete. Data is read from the fact tables in the data source and used to create measures. The map files are used to insure that aggregations are created for the entire cube. Data for calculated members is also determined at this time.
When processing is complete, the Analysis Services database is ready for analysis to begin.
Deploying from the Business Intelligence Development Studio
We first look at the steps necessary to deploy from the Business Intelligence Development Studio. This method is certainly the most straightforward of our two options. However, as we see shortly, it does not provide the flexibility of the Analysis Services Deployment Wizard.
We begin with an Analysis Services project in the Business Intelligence Development Studio. Several properties of this project must be set before the deployment can take place. These properties are found on the Deployment page of the Project Property Pages dialog box shown in Figure 9-1.
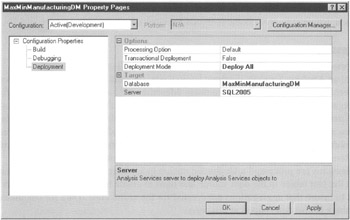
Figure 9-1: The Project Property Pages dialog box
Let's go through the properties starting at the bottom of the dialog box and working our way to the top. The server property contains the name of the SQL Server Analysis Services server where the project is to be deployed. The database property is the name of an Analysis Services database. This database is created on the server, if it does not already exist there.
The Deployment Mode property controls how the project is deployed; either all of the project is deployed or only the changed objects are deployed. The Transactional Deployment property determines whether the project is deployed as a single transaction or as multiple transactions. If the project is deployed as multiple transactions, the deploying is done in one transaction and each processing operation done as part of the deployment is done in its own transaction.
The Processing Option parameter establishes what cube processing is done as part of the deployment. If Default is selected, the deployment includes whatever processing is necessary to bring the deployed objects to a fully processed state. If Do Not Process is selected, no processing is done. If Full is selected, all of the data is deleted from the deployed objects and all values are reloaded or recalculated.
The information entered on the Deployment page of the Project Property Pages dialog box is stored in two different configuration files. These files are located in the bin folder inside of the folder created for your project. The configuration settings are stored in the {project name}.deploymentoptions file. The deployment target settings are stored in the {projectname}.dep]oymenltsti'gets file.
Once the properties on the Deployment page are set, we can perform the actual deployment. This can be done by selecting Build | Deploy {project name} from the Main menu or by right-clicking the project entry in the Solution Explorer window and selecting Deploy from the Context menu. The progress of the deployment is displayed in the Output window and the Deployment Progress window as shown in Figure 9-2.
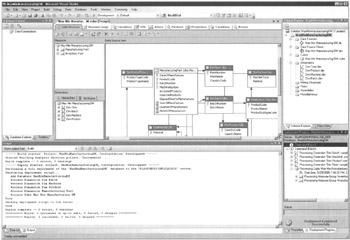
Figure 9-2: Deploying an Analysis Services project from the Business Intelligence Development Studio
The Business Intelligence Development Studio begins the deployment by creating a script. This script contains commands to create the specified Analysis Services database, if necessary, and to create each of the objects in the project. If the appropriate processing option is selected for the project, the script also includes commands to process each object. This script is then executed on the specified server. We see what one of these scripts looks like in the next section of this book.
Learn by Doing—Deploying the MaxfVtinManufacturingDM Project Using the Business Intelligence Development Studio
Features Highlighted
-
Deploying an Analysis Services project using the Business Intelligence Development Studio
-
Using the Browse window in the SQL Server Management Studio to browse the content of a cube
Business Need To have an OLAP cube we can finally put to use, we must deploy and process this project.
Steps
-
Open the Business Intelligence Development Studio.
-
Open the MaxMinManufacturingDM project.
-
Select Project | MaxMinManufacturingDM Properties from the Main menu. The MaxMinManufacturingDM Property Pages dialog box appears.
-
On the Deployment page, enter the name of a test or development server running SQL Server 2005 Analysis Services for Server. (Do not perform this or any other Learn By Doing activity on a server used for production operations!)
-
MaxMinManufacturingDM should already be entered for Database.
-
Click OK to exit the MaxMinManufacturingDM Property Pages dialog box.
-
Select Build | Deploy MaxMinManufacturingDM from the Main menu. Monitor the progress of the deployment in the Output and Deployment Progress windows until the Deployment Completed Successfully message appears.
-
To prove that we actually did something, we use the SQL Server Management Studio to browse the cube in our newly created Analysis Services database. Open the SQL Server Management Studio.
-
Select Analysis Services for Server Type and connect to the Analysis Services server where you deployed the project.
-
Expand the entry for this server in the Object Explorer window, and then expand the Databases folder under this server.
-
Expand the entry for the MaxMinManufacturingDM database, and then expand the Cubes folder under this database.
-
Right-click the Max Min Manufacturing DM cube and select Browse from the Context menu. You see a Browse window as shown in Figure 9-3.
-
Expand the Measures entry in the Browser window. Drag the Total Products calculated member and drop it on Drop Totals or Detail Fields Here. You see the total products calculated for the entire cube.
-
Expand the Dim Product entry in the Browser window. Drag the Product Type Name attribute and drop it on Drop Row Fields Here. You see the total products calculation spread across each of the product types.
-
Expand the Dim Time entry in the Browser window. Drag the onthOfManufacture dimension and drop it on Drop Column Fields Here. You see the total products calculation spread across the product types and months of the year. You can see now that the Browser is a pivot table. This is shown in Figure 9-4.
-
Drag the Product Subtype Name attribute and drop it immediately to the right of the Product Type Name column in the pivot table. This creates a lower level in the pivot table rows. Expand the Mythic World product type to view its product subtypes. This is shown in Figure 9-5.
-
Drag the YearOfManufacture dimension and drop it to the left of the MonthOfManufacture heading in the pivot table. This is shown in Figure 9-6.
This creates a higher level in the pivot table columns. Expand 2003 to view its months. This is shown in Figure 9-7.
Note We are able to skip levels in the hierarchy when we use the Browse window. In this example, we use the year and month levels of the time dimension without using the quarter level.
-
Drag the MonthOfManufacture heading off of the pivot table until the mouse pointer includes an X as shown in Figure 9-8. Drop the heading any time the mouse pointer includes the X and this dimension is then removed from the pivot table.
-
Continue to experiment with the Browse window as long as you like.
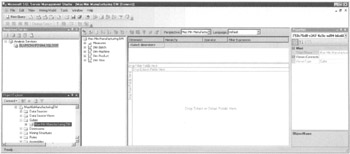
Figure 9-3: The Browse window in the SQL Server Management Studio
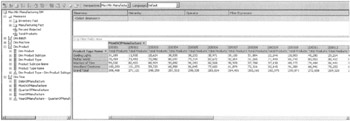
Figure 9-4: Browsing the Max Min Manufacturing DM cube
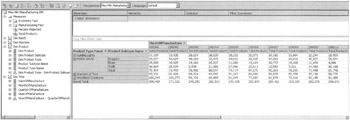
Figure 9-5: Two levels of rows in the Browse window
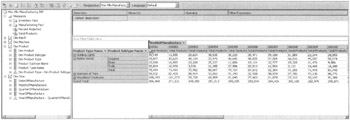
Figure 9-6: Adding a column level to the Browse window
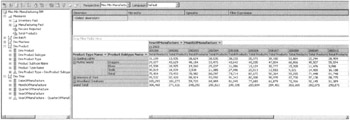
Figure 9-7: Two levels of rows and columns in the Browse window
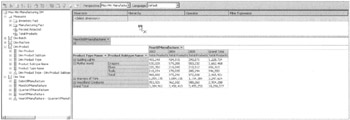
Figure 9-8: Dragging an item off the Pivot table
Congratulations, you have just created and browsed your first bit of honest-to-goodness Business Intelligence (BI). It only took us nine chapters to get here! SQL Server 2005 greatly simplifies the creation of business intelligence, but it still takes some work. Don't worry, this gets easier and goes faster each time you repeat the process from here on. Besides, we look at a shortcut you may be able to use when building some of your cubes in the section "Partitions and Storage Options."
Deploying from the Analysis Services Deployment Wizard
Deploying the Analysis Services project from the Business Intelligence Development Studio works great when we have access to the target Analysis Services server. At times, however, this may not be the case. And, at other times, we need to make changes to the configuration of the project when it is moved from the development environment into production. Fortunately, we have a second method for deploying that handles both of these needs: deploying from the Analysis Services Deployment Wizard.
The Analysis Services Deployment Wizard can deploy a project directly to a database server just like the Business Intelligence Development Server. However, it can also examine the definition of a project and create an XML for Analysis (XML/A) script that can re-create the items on a server. The XML/A script is written to a file. It is up to us to execute that file on the server to complete the deployment.
To use the wizard, we need to develop an Analysis Services project in the Business Intelligence Development Studio. Once the project is developed, we need to perform a build operation on the project to create the files necessary for the wizard. This is done by selecting Build | Build {roject name}from the Main menu. Once the project builds successfully, it is ready to deploy.
The wizard is a standalone program, separate from the Business Intelligence Development Studio. The Analysis Services Deployment Wizard is launched from the SQL Server 2005 entry in the Windows Start menu. To launch the wizard, select Start | All Programs | Microsoft SQL Server 2005 |Analysis Services | Deployment Wizard.
After the welcome page, the wizard prompts you for the path and name of an Analysis Services database file on the Specify Source Analysis Services Database page shown in Figure 9-9. This database file is created when we build the Analysis Services project. It has a file extension of asdatabase and is located in the bin folder inside of the folder created for your project (for example, C:\…\Myproject\bin\ My AnalSrvcsProj.asdatabase).
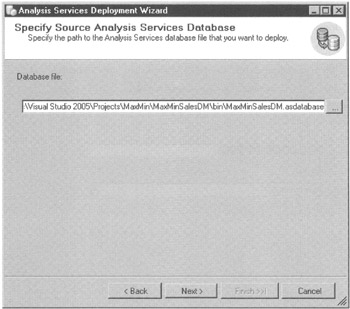
Figure 9-9: The Specify Source Analysis Services Database page of the Analysis Services Deployment Wizard
The Installation Target page, shown in Figure 9-10, asks for the Analysis Services server and Analysis Services database this project is to be deployed to. Remember, the wizard does not do the deploy, it only creates a script for the deploy. Therefore, the wizard does not need access to the server you specify.
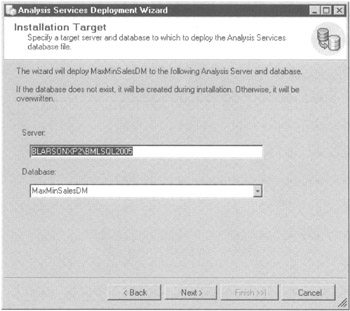
Figure 9-10: The Installation Target page of the Analysis Services Deployment Wizard
The Specify Options for Partitions and Roles page enables us to determine how partitions and security entities are to be handled by the deployment. We discuss partitions in the section "Partitions" in this chapter and in the section "Cube Security" in Chapter 10. This page asks us to specify whether existing objects are overwritten or retained. Therefore, it only applies to situations where we are deploying updates to an existing database. The Specify Options for Partitions and Roles page is shown in Figure 9-11.
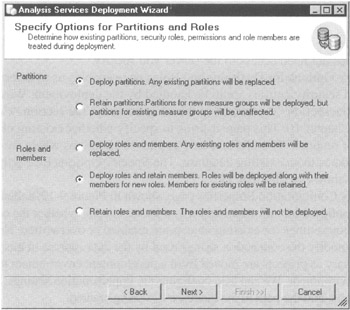
Figure 9-11: The Specify Options for Partitions and Roles page of the Analysis Services Deployment Wizard
The Specify Configuration Properties page, shown in Figure 9-12, collects a number of pieces of configuration information. First, it lets us specify whether the configuration and optimization settings for existing objects are retained or overwritten. Next, it enables us to modify the connection strings used by the data sources in this project. This may be necessary as projects are moved from a development environment to a production environment. We can also configure the impersonation settings, error log file locations, and the path to the database file being created.
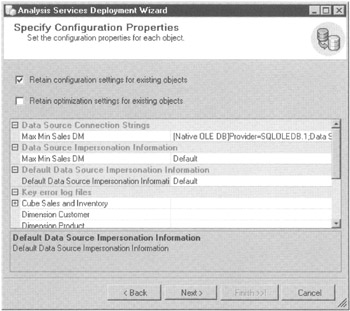
Figure 9-12: The Specify Configuration Properties page of the Analysis Services Deployment Wizard
The Data Source Impersonation Information entry specifies the Windows credentials that are to be impersonated by this data source while accessing the underlying database. The Default Data Source Impersonation Information entry specifies the Windows credentials that are impersonated if the data source's impersonation is set to default. Somewhere in this chain, we need an actual set of credentials to use during data processing. For this reason, you may need to select the service account for either the Data Source Impersonation Information or the Default Data Source Impersonation Information to deploy and process the script correctly.
The Select Processing Options page lets us select the type of processing we would like to occur as part of the deployment. It also enables us to configure the writeback options. We discuss writeback in the section "Writeback." This page also lets us choose whether the processing is done in one transaction or in multiple transactions. This page is shown in Figure 9-13.
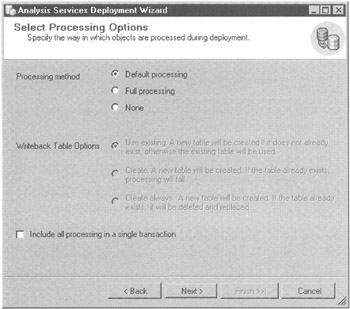
Figure 9-13: The Select Processing Options page of the Analysis Services Deployment Wizard
The Confirm Deployment page, shown in Figure 9-14, is where we start the deployment process, either deploying to a server or creating a deployment script. The Create Deployment Script check box enables us to create a deployment script, rather than having the wizard deploy directly to the server. We need to specify the path and name if the script file option is selected.
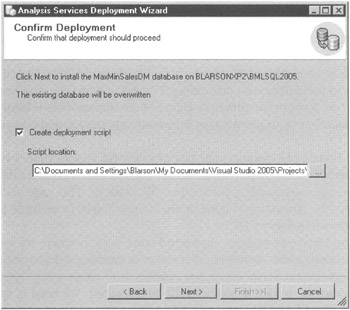
Figure 9-14: The Confirm Deployment page of the Analysis Services Deployment Wizard
Clicking Next on the Confirm Deployment page causes the wizard either to deploy the project to the server or to create the deployment script. Once either of these processes is completed, the page appears similar to Figure 9-15. The Deploying Database page is followed by the Deployment Complete page, which confirms the deployment process, or at least the script generation, is complete.
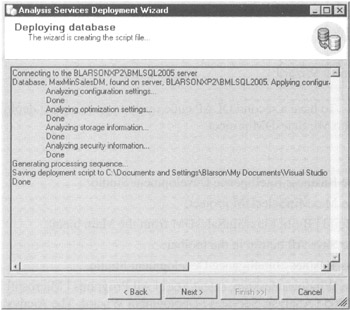
Figure 9-15: The Deploying Database page of the Analysis Services Deployment Wizard
If a script is generated by the wizard, we need to execute that script on the SQL Server 2005 Analysis Services server. If the server is not directly connected to the development environment where it was created, the script file can be copied and transferred as needed. When the script is in a location that can be accessed by the Analysis Services server, it can be opened and executed in the SQL Server Management Studio.
After starting the SQL Server Management Studio, select File | Open | File from the Main menu or use the Open File button in the toolbar to load the deployment script. Loading the script causes the SQL Server Management Studio to open an XMLA query window and to connect to the target Analysis Services service. Once the script is loaded, the SQL Server Management Studio appears similar to Figure 9-16.
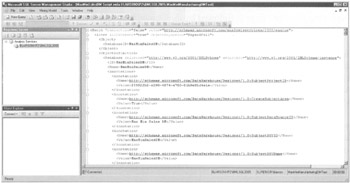
Figure 9-16: The Deployment Script loaded in a SQL Server Management Stuclio XMLA Query window
Execute the script using the Execute button in the toolbar. The script creates all of the items in your project and performs processing as you instructed in the Deployment Wizard. When the script is completed, you can see the query executed successfully message below the query window.
Learn By Doing—Deploying the MaxMinSalesDM Project Using the Analysis Services Deployment Wizard
Feature Highlighted
-
Deploying an Analysis Services project using the Analysis Services Deployment Wizard
Business Need To have a second OLAP cube ready to go, we must deploy and process the MaxMinSalesDM project.
Steps
-
Open the Business Intelligence Development Studio.
-
Open the MaxMinSalesDM project.
-
Select Build | Build MaxMinSalesDM from the Main menu.
-
Click the Save All button in the toolbar.
-
Close the Business Intelligence Development Studio.
-
From the Windows desktop, select Start | All Programs | Microsoft SQL Server 2005 | Analysis Services | Deployment Wizard. The Analysis Services Deployment Wizard Welcome page appears.
-
Click Next. The Specify Source Analysis Services Database page of the wizard appears.
-
Click the ellipsis button (…). The Open dialog box appears.
-
Browse to the location of the bin directory under the MaxMinSalesDM project. Select the MaxMinSalesDM.asdatabase file and click Open. Click Next. The Installation Target page of the wizard appears.
-
Enter the name of a test or development server running SQL Server 2005 Analysis Services for Server. (Do not perform this or any other Learn By Doing activity on a server used for production operations!)
-
MaxMinSalesDM should already be entered for Database. Click Next. The Specify Options for Partitions and Roles page of the wizard appears.
-
Leave the default settings on this page. Click Next. The Specify Configuration Properties page of the wizard appears.
-
Click the word "Default" under the Default Data Source Impersonation Information. An ellipsis (…) button appears. Click the ellipsis button. The Impersonation Information appears.
-
Select Use the Service Account and click OK. Ignore the warning message.
-
Click Next. The Select Processing Options page of the wizard appears.
-
Leave the default settings on this page. Click Next. The Confirm Deployment page of the wizard appears.
-
Check Create Deployment Script. Click the ellipsis (…) button. The Save As dialog box appears. Browse to a folder that is accessible from the test or development Analysis Services server you are using. Enter MaxMinSalesDM Script.xmla for the filename. Click Save, and then click Next. The Deploying Database page of the wizard appears as the wizard creates the deployment script.
-
When the script creation is done, click Next. The Deployment Complete page of the wizard appears. Click Finish.
-
Open the SQL Server Management Studio and connect to the Analysis Services server.
-
Click the Open File button in the toolbar. The Open File dialog box appears.
-
Browse to the location where you created the MaxMinSalesDM Script.xmla file. Select this file and click Open. The script is loaded into an XMLA Query window and the Connect to Analysis Services dialog box appears.
-
Enter the server name and appropriate credentials for the Analysis Services server, and then click Connect.
-
Click the Execute button in the toolbar.
-
The SQL Server Management Studio executes the script and creates the MaxMinSalesDM Analysis Services database.
-
When the Query Executed Successfully message appears below the Query window, right-click the Databases folder entry in the Object Explorer window and select Refresh from the Context menu. The MaxMinSalesDM database appears in the Object Explorer window. Feel free to browse the MaxMinSales cube, just as we did with the Max Min Manufacturing DM cube.
EAN: 2147483647
Pages: 112