The SQL Server Management Studio
As we have seen in the previous section, we use the Business Intelligence Development Studio to develop OLAP structures. We use another tool to manage our relational and OLAP databases during day-to-day operations. This is the SQL Server Management Studio.
The SQL Server Management Studio User Interface
The SQL Server Management Studio (formerly known as the Enterprise Manager in SQL Server 2000) has a user interface similar to the Business Intelligence Development Studio. It has the same type of window states (floating, dockable, and so forth) and it features a tabbed work area. Let's take a quick look at the SQL Server Management Studio, so we have some familiarity with it when it is time to use this tool for managing databases.
The SQL Server Management Studio is found on the Start menu under Microsoft SQL Server 2005 as shown in Figure 5-23. When the SQL Server Management Studio starts up, it attempts to connect to the last server we were working with. The Connect to Server dialog box is displayed as shown in Figure 5-24. To connect to the server, we need to provide logon credentials, if necessary, and then click. Connect. We can also enter the SQL Server Management Studio without connecting to a server by clicking Cancel.

Figure 5-23: SQL Server Management Studio on the Start menu
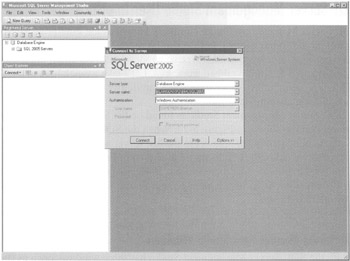
Figure 5-24: Connecting to a server on startup
The SQL Server Management Studio Windows
By default, the SQL Server Management Studio has three windows open as shown in Figure 5-25. The Registered Servers and Object Explorer windows are on the left side and the Summary window is a tabbed document inside the Designer window. As with the Business Intelligence Development Studio, additional windows can be displayed when needed using the View menu or the toolbar.
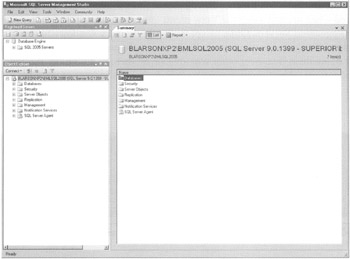
Figure 5-25: The SQL Server Management Studio Default window layout
The Registered Servers, Object Explorer, and Summary windows function similarly to the dockable windows in Business Intelligence Development Studio. We can make them float over other windows or set them to auto hide. We can have them form tabbed groupings with other dockable windows or set them to be tabbed documents in the Designer window. The SQL Server Management Studio windows use the same menus, the same docking guides, and the same drag-and-drop functionality.
Registered Servers Window The Registered Servers window provides an area for us to create a list of the servers we access frequently. Servers are added to the window by right-clicking anywhere in the window and selecting New | Server Registration… from the Context menu as shown in Figure 5-26. This displays the New Server Registration dialog box shown in Figure 5-27.
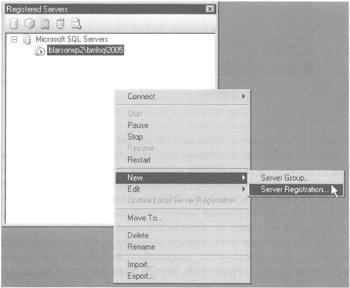
Figure 5-26: Registering a new server
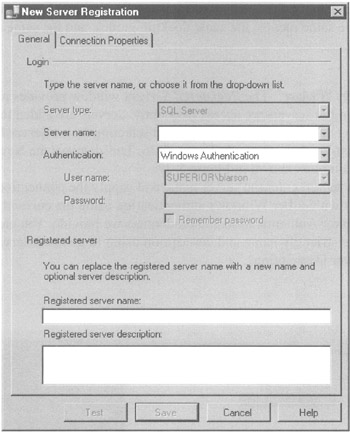
Figure 5-27: The New Server Registration dialog box
To register a server, enter the server name and supply the connection information. We can connect with either Windows authentication using the currently logged-in user or SQL Server Authentication and credentials we provide. You can also give this server a user-friendly name and description using Registered Server Name and Registered Server Description.
We can use the Test button to make sure we can connect to the new server using the specified authentication method and credentials. Finally, we can use the Connection Properties tab to modify the connection properties for the new server. This includes the capability to create an encrypted connection with the server. Clicking Save adds the new server to the Registered Servers window. When a server entry is highlighted in the Registered Servers window, the Context menu provides an option for editing the properties for the selected server.
If we have a number of servers to register and manage, we can organize those servers in server groups. These server groups appear as folders in the Registered Servers window as shown in Figure 5-28. We can add a server to a server group by right-clicking on that group folder and selecting New | Server Registration… from the Context menu. (As you can see in Figure 5-28, the SQL Server Management Studio can be used to manage SQL Server 2000 servers, as well as SQL Server 2005 servers.)
In addition to server groups, the Registered Servers window also groups servers by server type: Database Engine, Analysis Services, Reporting Services, SQL Server Mobile, and Integration Services. The Registered Servers window has toolbar buttons for each type of server as shown in Figure 5-29. We can view all the registered servers of a particular server type by clicking on the toolbar button for that server type. In Figure 5-29, the Analysis Services toolbar button has been clicked to show the registered Analysis Services. The type of server currently being displayed in the Registered Servers window is shown at the top of the tree view.
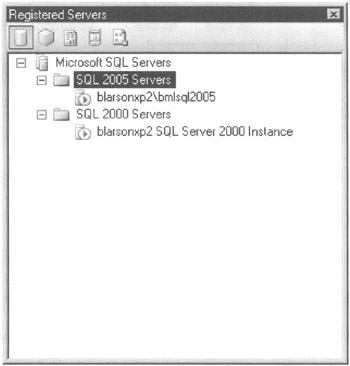
Figure 5-28: Server groups in the Registered Servers window
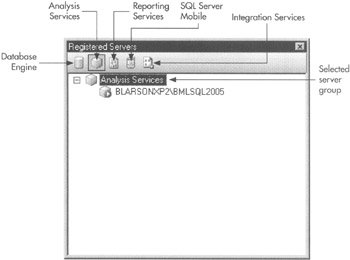
Figure 5-29: Server types in the Registered Servers window
Object Explorer Window The Object Explorer window lets us view and manage the objects on a particular server. These objects are displayed in a tree view as shown in Figure 5-30. In most cases, objects are managed by right-clicking on an object to display its Context menu, and then selecting the appropriate action from the Context menu. We discuss the various objects in the Object Explorer window, as we work with them, in future chapters.
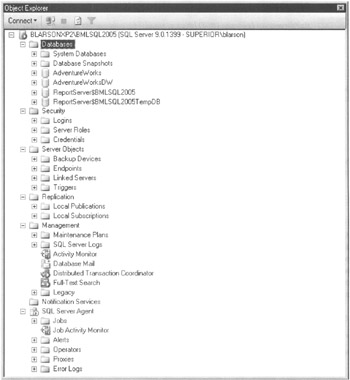
Figure 5-30: The Object Explorer window
When the SQL Server Management Studio first opens, the Object Explorer window displays objects for the default server. We can add other servers to the Object Explorer window by double-clicking on that server's entry in the Registered Servers window. You can also right-click on a server in the Registered Servers window and select Connect | Object Explorer from the Context menu. The servers appear one below the next in the Object Explorer window's tree view.
Summary Window The Summary window provides a brief overview of the entry currently selected in the Object Explorer window. If the selected entry is a folder, the Summary window shows the contents of that folder. If the selected entry is an object, the Summary window shows the current status of that object.
Query Windows One of the functions of the SQL Server Management Studio is the creation and execution of queries. These queries may be Transact-SQL for relational databases, MDX or XMLA for Analysis Services databases, DMX for data mining, or SQL Mobile for hand-held devices. Each type of query has its own specific type of query window. We discuss how to use these query windows throughout the rest of this book.
| Definition | Multidimensional Expression (MDX) language provides the programming language for OLAP Cube navigation and over 50 mathematical functions for calculating cube measures. It can be called and used in the relational database language of Transact-SQL. |
| Definition | Data Mining Expression (DMX) language is a new language in SQL Server 2005, which provides the commands to easily set up data mining. It can be called and used in the relational database language of Transact-SQL. |
| Definition | XML for Analysis Services (XMLA) is an open, XML-based standard protocol for interacting with Microsoft SQL Server 2005 Analysis Services data over an HTTP connection, such as an intranet or the Internet. XMLA uses the Simple Object Access Protocol (SOAP). |
To create and execute queries, we need to open a query window of the appropriate type. This is done using the query buttons on the toolbar. These buttons are shown in Figure 5-31. The New Query button opens the default type of query window for the selected database. We can also select the specific type of query window we want to open by selecting the appropriate toolbar button. We can also open a query window by selecting the appropriate option under File on the Main menu or by using the Context menu for objects in the Registered Servers and Object Explorer windows. Figure 5-32 shows the SQL Server Management Studio with a SQL Server Query window open in the designer area.
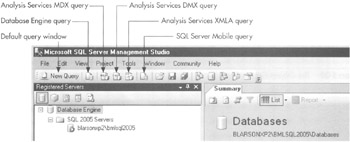
Figure 5-31: The New Query Toolbar button
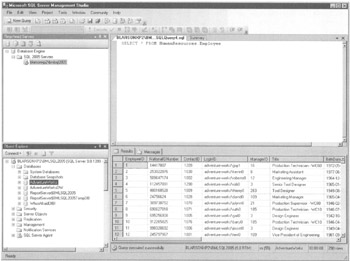
Figure 5-32: The SQL Server Management Studio with a SQL Server Query window
The SQL Server Management Studio Projects
The SQL Server Management Studio enables us to create solutions and projects to manage and store our queries. Three types of projects are supported: SQL Server scripts, Analysis Services scripts, and SQL Mobile scripts. A script is simply one or more queries. The SQL Server Management Studio includes a Solution Explorer window and a Properties window to help us manage our solutions and projects. They function in much the same manner as the Solution Explorer window and Properties window in the Business Intelligence Development Studio.
Figure 5-33 shows the same query as Figure 5-32; however, this time it is part of a solution and a project.
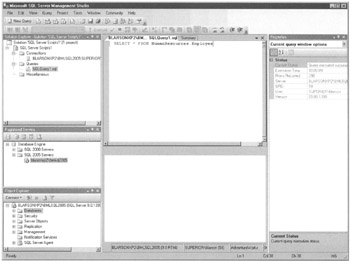
Figure 5-33: The SQL Server Management Studio with a solution and a project
EAN: 2147483647
Pages: 112