Section 5.5. Configuring Apache
5.5. Configuring ApacheAt first glance, configuring Apache can appear to be an intimidating process. The configuration file (httpd.conf) contains almost 1000 lines. The directives that actually configure Apache are buried deep among lines of comments, and while those comments are usefuland deserve some serious and thoughtful considerationthey do help foster the myth that Apache configuration is a process best undertaken by administrative gurus. Fortunately, this simply isn't the case: Apache's configuration directives are actually quite easy to understand. The flexibility of the available directives assures that the end result of your configuration can be as complex or as simple as your needs dictate. 5.5.1. Configuring the Apache Server using the HTTP Configuration ToolWhether you've installed the server via the RPM system, or have taken the plunge and decided to configure and build the server from source, Fedora Core offers a set of graphical tools that can lessen the intimidation factor faced by those configuring Apache servers. The other major distributions also offer graphical tools: SuSE rolls the Apache configuration into its YaST2 tool , and Mandriva offers a configuration tool in its Drak suite . As we've mentioned, Linux has matured to the point that most tasks can be achievedat least in a fundamental waywith a strong set of graphical tools. In the case of Fedora, that tool is the HTTP configuration tool . To launch the HTTP configuration tool, select Desktop > System Settings > Server Settings > HTTP. Warning: The HTTP configuration tool makes direct edits to httpd.conf . Consequently, you should decide early on whether you'll use the tool, or edit the configuration file manually. If you choose to manually edit first, then tweak with the HTTP configuration tool later, your initial manual edits will be overwritten by the tool. In fact, manual edits to the file at any point in the process will be overwritten by subsequent use of the HTTP configuration tool. Figure 5-3. The HTTP configuration tool.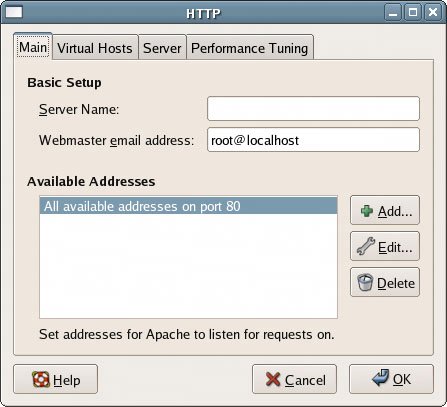 The Main tab of the HTTP configuration tool, displayed in Figure 5-3, provides the means by which you'll set several critical parameters for your server. The first field on this screen is Server Name. If your server will be live on the Internet, the Server Name text box should contain the fully qualified domain name of the server such as www.mycompany.com. If, on the other hand, the server will be used only internally for testing and development, you can assign any recognizable name you choose in this text field. You can also assign an email address for the server's Webmaster. You should enter a the address of a working email account. Below these two fields is the Available Addresses section, where you can define the IP addresses and ports Apache listens on for incoming requests. Listening to all available addresses on port 80 is the default behavior for the Apache server. If you'd prefer to specify the specific addresses and/or ports for your server configuration, use the Add…, Edit… and Delete buttons to manage this list. Note: Port 80 is the default port for HTTP traffic; 443 is the default for HTTPS traffic. To send an HTTP request to another port, you must add :port-number to the server name in the URL. Entering http://www.mycompany.com:1024/ into your Web browser will send a request to mycompany.com's server's port 1024. Configuring Apache to listen only to certain IP address and port combinations is especially useful when running multiple Websites from the same server. You might enter one site's IP address and only allow traffic on port 80, but for another site, you may have two entries: one for port 80, and one for 443. Figure 5-4. Defining a virtual host. The Virtual Hosts tab of the HTTP configuration tool, shown in Figure 5-4, allows an administrator to create a virtual host, which is basically a Website that's hosted by your server. Virtual hosting makes it possible to serve requests for many Websites from the one server. To manage the list of virtual hosts, use the Add…, Edit…, and Delete buttons. Figure 5-5. Setting virtual host options.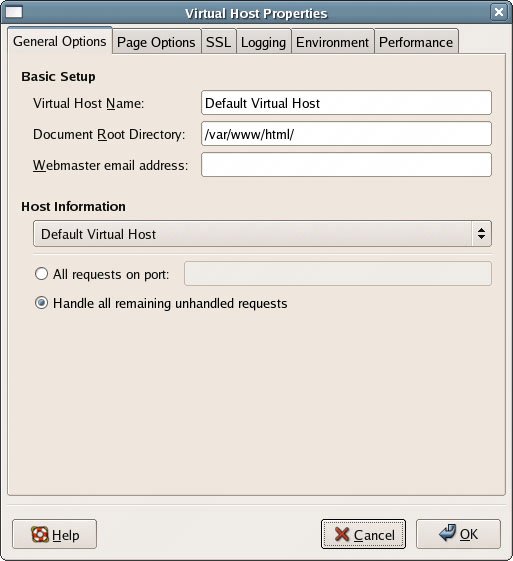 As you can see in Figure 5-5, several options are offered when adding or editing a virtual host. In the General Options tab, the administrator can specify whether this is an IP based Virtual Host, a Name based Virtual Host, or a Default Virtual Host via the Host Information drop-down list. Let's take a look at each of these options:
In the Basic Setup section, you can give your virtual host a name (this can be anything), and tell it where to find files. You can also enter the Webmaster's email address; again, this should be a working email address. Figure 5-6. Virtual host site configuration options.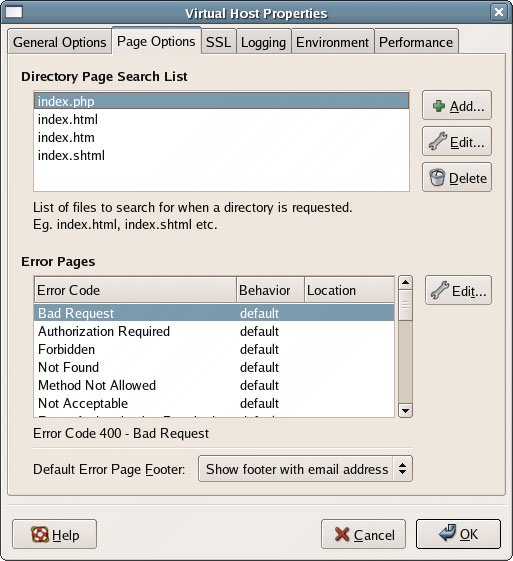 As shown in Figure 5-7, the Page Options tab provides the means to define both the default documents for a directory, and the error handling pages for a site. In the Directory Page Search List, you can define the names and levels of precedence of the default pages for your directories. Normally, when you request a page from http://www.mycompany.com/example/, the server that runs www.mycompany.com will scan the directory example for the first file in this list. If the first file in the list isn't found, a search will be run for the second document in the list. Error page handling for the virtual server is configured in the bottom half of the dialog. If you've taken the time to create custom error pages, you can direct the server to use these pages for specific error types: simply click the Edit… button in the right-hand pane. If you choose to use default error pages, you can specify how the footer on those pages appears: either with the Webmaster's email address, without the email address, or not at all. Figure 5-7. Virtual host SSL options.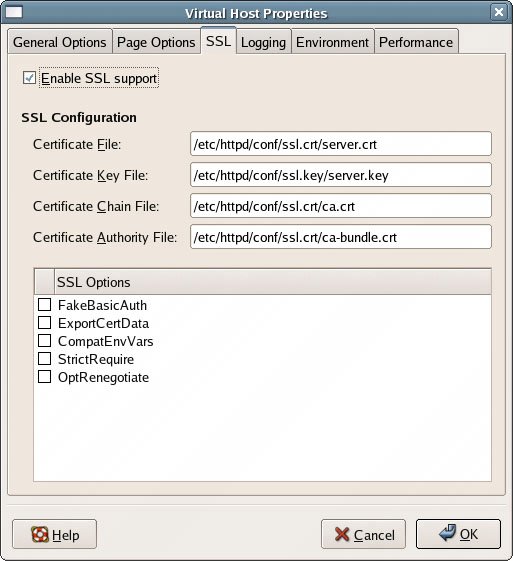 The HTTP configuration tool provides the means by which you can set up HTTPS communication with SSL, as shown in Figure 5-7. We'll be looking at SSL later in this chapter. Figure 5-8. Virtual host Logging options.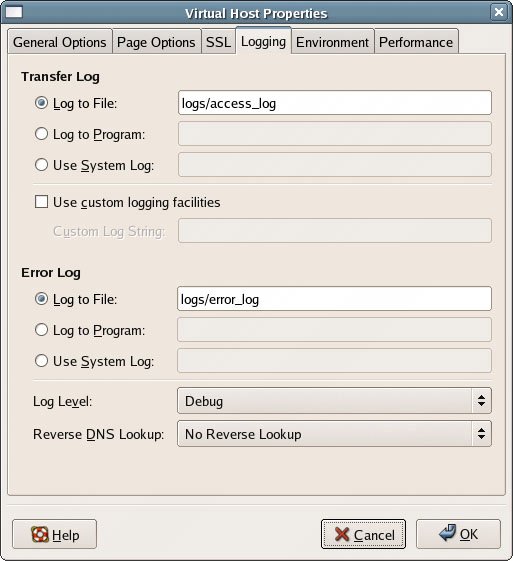 The Logging tab depicted in Figure 5-8 provides options for configuring the way in which the transfer (or access) and error logs are handled: you can specify a directory to which they'll be written, select a custom logging tool, or write them to a system log. Importantly, the logging configuration also allows you to customize two other options. Log Level will determine which error messages are actually written to the logs. The log levels are listed in order of detail, from the very verbose Debug, through to Emergency, which will only log system failures. If you choose a more verbose logging level, you'll need to pay special attention to the size of the resulting logs, as disk space may become an issue. If, on the other hand, you choose a log level that's listed higher in the drop-down, the logging level will be much lighter, though you may not have all the details necessary to resolve a problem with the server. Choosing the correct log level is always a fine balance between having too much detail and not enough. Finally, the logging options allow you to specify whether reverse or double-reverse DNS lookups should be performed. An example of a reverse lookup is a reverse dictionary lookup, in which a word would be found on the basis of its definition, rather than the other way around. Normally, DNS is used to translate domain names into IP addresses, so a reverse DNS lookup is used to lookup a domain name that corresponds with an IP address. A double-reverse DNS lookup not only looks up the domain name, but also performs a regular DNS lookup to ensure that the original IP address is returned. If either reverse or double-reverse DNS lookups are enabled, domain names, instead of IP addresses, will appear in your sever logs. While this may be more user friendly, it also puts load on the server. It's recommended that you switch this functionality off if you anticipate your server experiencing heavy loads. Figure 5-9. Virtual host environment variable options.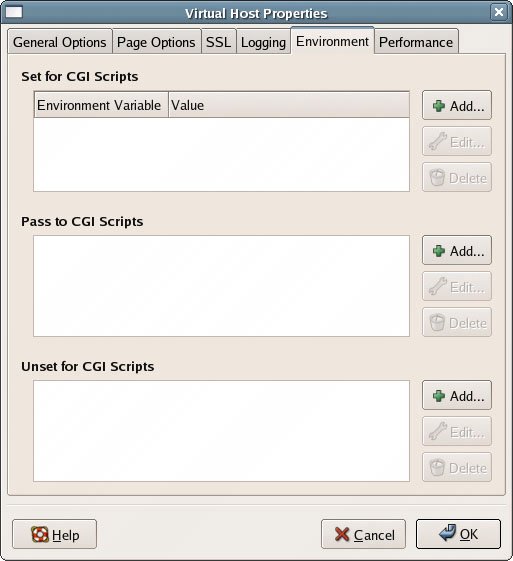 As shown in Figure 5-9, a full set of server environment variables can be defined for your virtual host. This may be necessary if you want to utilize CGI programs within your pages. Figure 5-10. Virtual host directory options.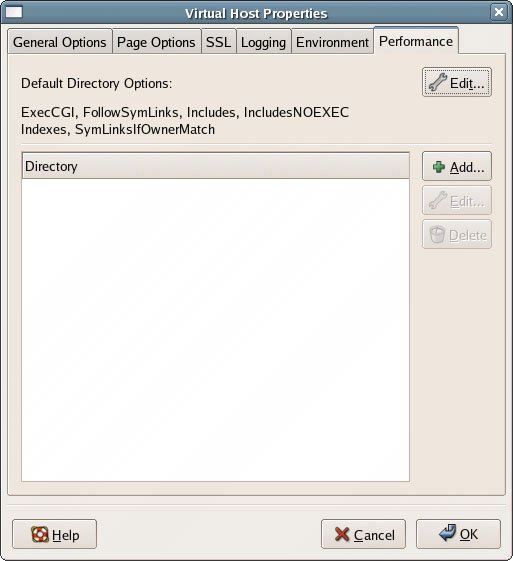 The last of the virtual host configuration tabs, Performance, is shown in Figure 5-10. It allows you to toggle Apache's directory options on and off for the entire site; simply click the Edit… button toward the top of the dialog to use this functionality. You can also set these options for specific directories. The options are:
To change the options for a specific directory, click the Add… button to bring up the Directory Options screen shown in Figure 5-11. Figure 5-11. Changing a directory's options.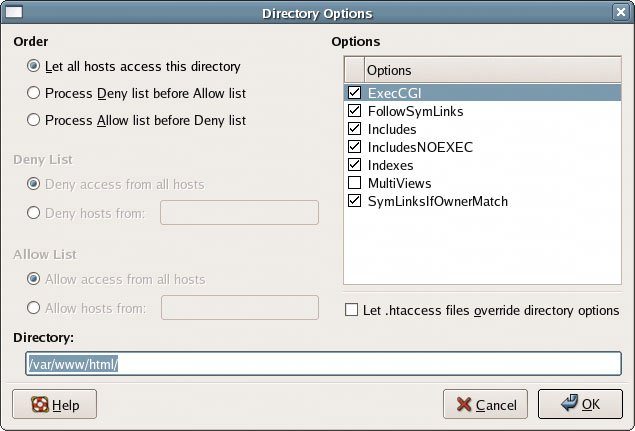 Enter the name of a directory in the text field toward the bottom of the dialog, then select the options you want from those listed in the right pane of the resulting window. You can also restrict access to this directory via the Deny and Allow lists . Select the Process Deny list before Allow list option from the Order options at left; both the Deny List and Allow List fields will become enabled. Use the Deny hosts from and Allow hosts from fields to configure the IP addresses from which your virtual server will either accept or deny requests. Finally, we can choose whether we want to allow these options to be overridden in .htaccess files, which we'll discuss in detail very soon. Figure 5-12. Changing the server configuration options.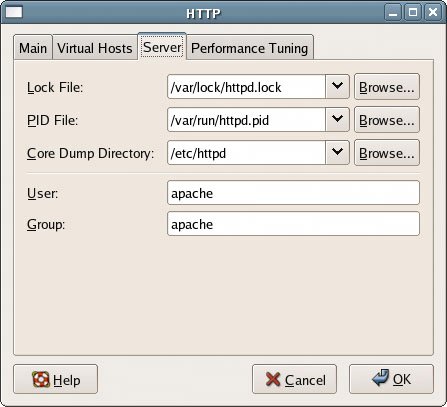 The Server tab of the HTTP configuration tool , shown in Figure 5-12, offers several lower-level configuration options for your server. The first is the Lock File, created when the service starts up. The presence of this file prevents other instances of the server from starting up. The PID File provides process ID information to the system. The Core Dump Directory is the location to which a core file will be written in the event of a server crash. The core file will then contain a wealth of debugging information that may point you to the cause of the crash. The Server tab also provides the facility to define the server user and group. While these can be set to any existing user and group on the system, it's generally a good idea to leave them in the default configuration. The user and group defined in the Server tab were created at the time your server was installed, whether via the RPM packages or from source. If you choose a user other than the default, you'll need to make sure the user and group exist on the system, or create them prior to changing the defaults in the Server tab. Figure 5-13. Changing the performance tuning options. The final tab in the HTTP configuration tool, shown in Figure 5-13, provides several performance tuning options . These include the number of simultaneous server connections, the connection timeout in seconds, the maximum number of simultaneous requests per connection, and whether or not to allow persistent connections. By default, Apache will allow 150 connections simultaneously, each of which may make up to 100 requests, generating up to 15,000 requests at once. While this figure may seem large, the fact is that most serverseven those with three- or four-year-old processors and minimal RAMcan handle this default. You can increase or decrease this number for your system by changing either the maximum connection number, or the maximum requests per connection. In most cases, reducing or increasing the acceptable number of requests per connection is the preferred adjustment. Note: Performance tuning in Apache can be an art unto itself. However, it's easy to provide some rough guidelines for your server, based on the age of the machine, the amount of RAM, and the speed of the connection to which the server is attached. Let's take three scenarios as examples:In the first scenario, the appropriate connection settings in Apache might be:The second scenario, on the other hand, might best support these conditions:The second machine has more RAM, so it's capable of handling more connections. As a result, the connection timeout can be slightly longer, too. However, because of the connection speed, it may not handle persistent connections, or high numbers of requests per connection, very well.The third machine can easily handle the default settings:Additionally, because of the higher connection speed, it may be acceptable to allow persistent connections on this machine. As you can see, there's a lot of trial and error involved in properly adjusting Apache's performance settings. When the server is configured to your needs, click OK in the HTTP configuration tool, and restart the server using the method of your choice. 5.5.2. Further Configuration with .htaccess and httpd.confWhat happens if you have some special requirements for your serverconfigurations that should apply only to specific directoriesor you need to quickly lock down directory access to all but a handful of users? In such cases, you can write directives into an .htaccess file, creating configurations on a directory-by-directory basis . The .htaccess file is often referred to as a distributed configuration file . In some cases, .htaccess files can make the maintenance and configuration of your server much easier. An .htaccess file is a smaller and more targeted version of httpd.conf . It can contain any directive that's allowed in the global httpd.conf file. For example, the following are equivalent: httpd.conf (excerpt)
/var/www/html/.htaccess (excerpt)
Directives in an .htaccess file apply to the directory in which the file is found and to all the subdirectories it contains. So, if this .htaccess file was located in /var/www/html, it would affect the configuration of /var/www/html, /var/www/html/navigation, /var/www/html/styles, and so on. .htaccess files can also be used to restrict access to certain directories . For example, if we wanted to restrict access to /var/www/html/testing/admin, we could use the following .htaccess file like so: /var/www/html/testing/admin/.htaccess
When used in this way, the .htaccess file will tell Apache that the user needs to enter a username and password for a member of the group admins. As specified in this example by the AuthUserFile and AuthGroupFile directives, username and password will be checked against the /etc/httpd/htpasswd file, then the user's membership will be checked in /etc/httpd/groups. The /etc/httpd/htpasswd file is maintained using the htpasswd tool. [root@swinetrek kermit]# htpasswd -c /etc/httpd/htpasswd kermit New password: Re-type new password: Adding password for user kermit [root@swinetrek kermit]# htpasswd /etc/httpd/htpasswd misspiggy New password: Re-type new password: Adding password for user misspiggy [root@swinetrek kermit]# You must use the -c option when adding the first user. This tells htpasswd to create the password file. An example of the file produced by htpasswd is shown below. /etc/httpd/htpasswd
The /etc/httpd/groups file must be maintained manually, though a text editor. It's a pretty simple file: groups are listed at the beginning of each line, and the members of each group follow. /etc/httpd/groups
If you attempt to set this up in the default installation of Apache in Fedora Core, nothing will happen. By default, Apache is not configured to allow .htaccess files, but it's fairly simple to set this up in httpd.conf. To allow .htaccess configuration in a directory, open the HTTP configuration tool and go to the Virtual Hosts tab. Select the virtual host you'd like to have make use of .htaccess files and click Edit… to bring up the Virtual Host Properties dialog. Switch to the Performance tab, click Add… and enter the directory you'd like to protect. You'll need to enter the name of the directory as it appears in your server's filesystem, which will most likely mean prefixing the name of the directory with /var/www/html. Check the Let .htaccess files override directory options checkbox, and click OK to save your changes. Alternatively, you can make the changes to http.conf directly. Open httpd.conf and add the following directives to the end of the file. httpd.conf (excerpt)
The AllowOverride directive instructs Apache to process .htaccess files within the specified directory, but the AuthConfig argument limits the directives that are allowed within the .htaccess file to those related to authorization. Other available arguments include:
The .htaccess file isn't a panacea, though. There are some caveats to its use, including the performance hit created by the use of .htaccess files. When the AllowOverride directive allows the use of .htaccess files, the server will search every directory in the server filesystem for .htaccess files. While this may not create a real performance issue on servers handling a modest number of requests, it can cause serious performance slowdowns on high-traffic production servers. Further, the server will be required to find all the .htaccess files in higher-level directories. This means that if you're using an .htaccess file in the /var/www/html/testing/admin server directory, Apache will look for /var/www/html/.htaccess, /var/www/html/testing/.htaccess and /var/www/html/testing/admin/.htaccess. In effect, the use of .htaccess files creates three checks for a single page request. Again, the performance hit on high-traffic production servers can be significant. Given that, why would you use distributed configuration files at all ? Well, there are some legitimate uses. If, for example, you're providing hosting services for several users on a single machine via virtual hosts, .htaccess files can allow users to customize their individual server environments within the limitations you've created in the httpd.conf file. With some careful planning, and an understanding of the httpd.conf directives, your Apache server will provide an environment that's secure, flexible, and easy to maintain. That planning will also minimize the work required of the server to meet your users' needs. |
EAN: 2147483647
Pages: 92
- A View on Knowledge Management: Utilizing a Balanced Scorecard Methodology for Analyzing Knowledge Metrics
- Measuring ROI in E-Commerce Applications: Analysis to Action
- Technical Issues Related to IT Governance Tactics: Product Metrics, Measurements and Process Control
- Managing IT Functions
- The Evolution of IT Governance at NB Power