| Tab stops determine the horizontal position of the insertion point when you press  . . By default, a blank document includes tab stops every half inch. They appear as tiny gray marks on the bottom of the ruler (Figure 51). You can use the ruler or Tabs dialog to set tabs that override the defaults. Figure 51. Default tab stops appear as tiny gray lines on the ruler. 
Word supports five kinds of tabs (Figure 52): Figure 52. Word's five tab stops in action. In order, they are: right, bar, left, center, decimal. Examine the ruler to see how they're set. 
Left tab aligns tabbed text to the left against the tab stop. Center tab centers tabbed text beneath the tab stop. Right tab aligns tabbed text to the right against the tab stop. Decimal tab aligns the decimal point (or period) of tabbed numbers beneath the tab stop. When used with text, a decimal tab works just like a right tab. Bar tab is a vertical line that appears beneath the tab stop.
Word also supports four types of tab leaders (Figure 53)characters that appear in the space otherwise left by a tab: none, periods, dashes, and underscores. Figure 53. Word's tab leader options: none, dotted, dashed, and underscore. 
 Tips Tips
Tabs are a type of paragraph formatting; they apply to an entire paragraph. Tabs are often used to create simple tables. When trying to align text in a simple table, use tabs instead of spaces. Tabs always align to tab stops. Text positioned with space characters may not align properly due to the size and spacing of characters in a font. It's a good idea to display nonprinting characters when working with tabs (Figure 54) so you can distinguish tabs from spaces. Nonprinting characters are discussed in Chapter 2. Figure 54. Displaying nonprinting characters enables you to see the tab characters. 
To set tab stops with the ruler 1. | Use the tab marker menu at the far-left end of the ruler (Figure 55) to choose the type of tab stop that you want to set.
Figure 55. Use the tab stop menu, which is new in Word 2004, to choose the type of tab you want to set. 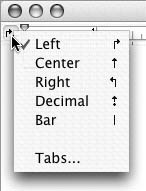
| 2. | Click on the ruler where you want to position the tab stop to set it there.
| 3. | Repeat steps 1 and 2 until all desired tab stops have been set (Figure 52).
|
Tip
To move a tab stop with the ruler 1. | Position the mouse pointer on the tab stop that you want to move.
| 2. | Press the mouse button and drag the tab stop to its new position. When you release the mouse button, the tab stop is moved.
|
Tip
To remove a tab stop from the ruler 1. | Position the mouse pointer on the tab stop that you want to remove.
| 2. | Press the mouse button and drag the tab stop down into the document. Then you release the mouse button, the tab stop disappears.
|
To open the Tabs dialog Use one of the following techniques: Choose Format > Tabs (Figure 25). Click the Tabs button in the Paragraph dialog (Figures 41 and 45). Choose Tabs from the tab stop menu on the ruler (Figure 55).
To set tab stops with the Tabs dialog 1. | Open the Tabs dialog (Figure 56).
Figure 56. The Tabs dialog. 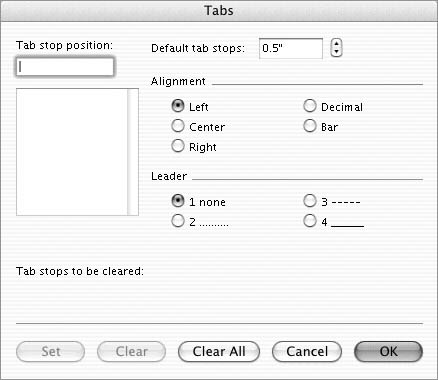
| 2. | In the Alignment area, select the type of tab that you want.
| 3. | In the Leader area, select the type of leader that you want the tab stop to have.
| 4. | Enter a ruler measurement in the Tab stop position box.
| 5. | Click Set. The tab stop is added to the tab list (Figure 57).
Figure 57. When you add a tab, it appears in the list in the Tabs dialog. 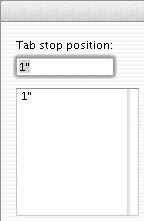
| 6. | Repeat steps 2 through 5 for each tab stop that you want to set (Figure 58).
Figure 58. The tab stop settings for Figure 52. 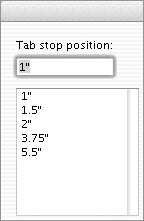
| 7. | Click OK.
|
To remove tab stops with the Tabs dialog 1. | In the Tabs dialog, select the tab stop that you want to remove.
| 2. | Click Clear. The tab stop is removed from the list and added to the list of Tab stops to be cleared in the dialog (Figure 59).
Figure 59. When you click Clear to remove a tab stop, it is removed from the tab list. 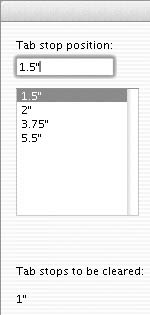
| 3. | Repeat steps 1 and 2 for each tab stop that you want to remove.
| 4. | Click OK.
|
Tip
To change the default tab stops 1. | In the Tabs dialog (Figure 56), enter a new value in the Default tab stops box.
| 2. | Click OK.
|
Tip
To create a simple table with tab stops 1. | Position the insertion point in the paragraph in which you set tabs (Figure 60).
Figure 60. Position the insertion point in the paragraph for which you have set tab stops. 
| 2. | To type at a tab stop, press , then type (Figure 61).
Figure 61. Press to type at the first tab stop, then type. In this example, text is typed at a right-aligned tab stop. 
| 3. | Repeat step 2 to type at each tab stop.
| 4. | Press  or or  to end the paragraph or line and begin a new one. The tab stops in the paragraph are carried forward (Figure 62). to end the paragraph or line and begin a new one. The tab stops in the paragraph are carried forward (Figure 62).
Figure 62. When you are finished typing a line, press to start a new paragraph with the same tab stops. 
| 5. | Repeat steps 2 through 4 to finish typing your table (Figure 54).
|
Tips You can move tabs at any timeeven after you have begun using them. Be sure to select all of the paragraphs that utilize the tab stops before you move them. Otherwise, you may only adjust tabs for part of the table. Another way to create tables is with Word's table feature, which is far more flexible than using tab stops. I tell you about it in Chapter 8.
|