Borders & Shading Borders and shading are two separate features that can work together to emphasize text: Borders enables you to place lines above, below, to the left, or to the right of selected characters or paragraphs (Figure 63). Figure 63. Borders and shading can emphasize text. 
Shading enables you to add color or shades of gray to selected characters or paragraphs (Figure 63).
 Tips Tips
How borders or shading are applied depends on how text is selected: To apply borders or shading to characters, select the characters. To apply borders or shading to a paragraph, click in the paragraph or select the entire paragraph. To apply borders or shading to multiple paragraphs, select the paragraphs.
When applying borders to selected text characters (as opposed to selected paragraphs), you must place a border around each side, creating a box around the text. I tell you about page borders, which can be applied to entire pages, in Chapter 5.
To apply text borders with the Formatting Palette 1. | Select the text to which you want to apply borders.
| 2. | If necessary, display the Borders and Shading options in the Formatting Palette (Figure 64).
Figure 64. The Borders and Shading options of the Formatting Palette. 
| 3. | Choose an option from the Border Type pop-up menu (Figure 65) to set the type of border.
Figure 65. The Border Type pop-up menu. 
| 4. | Choose an option from the Line Style pop-up menu (Figure 66) to set the line style for the border lines.
Figure 66. The Line Style pop-up menu. 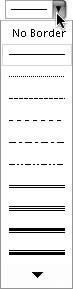
| 5. | Choose an option from the Border Color pop-up menu (Figure 67) to set the color for the border lines.
Figure 67. The Border Color pop-up menu. 
| 6. | Choose an option from the Line Weight pop-up menu (Figure 68) to set the thickness of the border lines.
Figure 68. The Line Weight pop-up menu. 
|
Tips You can apply more than one border to selected paragraphs. For example, if you want a top and bottom border, choose the top border option and then choose the bottom border option. Both are applied. Some border options apply more than one border. For example, the outside border option (top left button) applies the outside border as well as the top, bottom, left, and right borders.
To apply text borders with the Borders and Shading dialog 1. | Select the text you want to apply borders to.
| 2. | Choose Format > Borders and Shading (Figure 25).
| 3. | Click the Borders button in the Borders and Shading dialog that appears to display its options (Figure 69).
Figure 69. The Borders tab of the Borders and Shading dialog. 
| 4. | Click a Setting icon to select the type of border. All options except None and Custom place borders around each side of the selected text.
| 5. | Click a style in the Style list box to select a line style.
| 6. | Choose a line color from the Color popup menu. (This menu is similar to the one in Figure 67.) Automatic applies the color that is specified in the paragraph style applied to the text.
| 7. | Choose a line thickness from the Width pop-up menu. (This menu is similar to the one in Figure 68.)
| 8. | If necessary, choose an option from the Apply to pop-up menu (Figure 70). The Preview area changes accordingly.
Figure 70. If necessary, use the Apply to menu in the Borders and Shading dialog to specify what the border or shading settings should apply to. 
| 9. | To apply custom borders, click the buttons in the Preview area to add or remove lines using the settings in the dialog.
| 10. | When the Preview area illustrates the border you want to apply, click OK.
|
Tips You can repeat steps 5 through 7 and 9 to customize each line of a custom border. You can further customize a paragraph border by clicking the Options button to display the Border and Shading Options dialog (Figure 71). Set options and click OK. Figure 71. The Border and Shading Options dialog. 
To remove text borders 1. | Select the text from which you want to remove borders.
| 2. | In the Formatting Palette, choose No Border from the Border Type pop-up menu (Figure 72).
Figure 72. To remove borders, choose No Borders from the Border Type pop-up menu in the Formatting Palette. 
|
Or 1. | Select the text from which you want to remove borders.
| 2. | Choose Format > Borders and Shading (Figure 25) and click the Borders button in the Borders and Shading dialog that appears (Figure 69).
| 3. | Click the None icon.
| 4. | Click OK.
|
To apply shading with the Formatting Palette 1. | Select the text to which you want to apply shading.
| 2. | If necessary, display the Borders and Shading options in the Formatting Palette (Figure 64).
| 3. | Choose an option from the Shading popup menu (Figure 73) to set the percent or pattern for the shading.
Figure 73. The Shading pop-up menu in the Formatting Palette. 
| 4. | Choose an option from the Pattern Color pop-up menu (Figure 74) to set the foreground color for the shading.
Figure 74. Pattern Color sets the foreground color of the pattern. 
| 5. | Choose an option from the Shading Color pop-up menu (Figure 75) to set the background color for the shading.
Figure 75. Shading Color sets the background color of the pattern. 
|
To apply shading with the Borders and Shading dialog 1. | Select the text you want to apply shading to.
| 2. | Choose Format > Borders and Shading (Figure 25).
| 3. | Click the Shading tab in the Borders and Shading dialog to display its options (Figure 76).
Figure 76. The Shading options of the Borders and Shading dialog. 
| 4. | Click a Fill color or shade to select it. (This becomes a background color, if you choose a pattern in step 5.)
| 5. | To create a pattern, choose an option from the Style drop-down list (similar to Figure 73) and then choose a foreground color from the Color pop-up menu (similar to Figure 67).
| 6. | If necessary, choose an option from the Apply to drop-down list (Figure 70). The Preview area changes accordingly.
| 7. | When the Preview area shows the shading that you want to apply, click OK.
|
Tips Use text shading with care. If the pattern is too dark or "busy," the shaded area may be impossible to read! Clicking the More Colors button in the Borders and Shading dialog displays the Colors dialog (Figure 77), which you can use to select different colors. Figure 77. The Colors dialog enables you to use a standard Mac OS color picker to choose a custom color. 
To remove shading 1. | Select the text from which you want to remove shading.
| 2. | In the Formatting Palette, choose Clear from the Shading pop-up menu (Figure 73).
|
Or 1. | Select the text from which you want to remove shading.
| 2. | Choose Format > Borders and Shading (Figure 25) and click the Shading button in the Borders and Shading dialog that appears (Figure 76).
| 3. | Click the No Fill button.
| 4. | Click OK.
|
|