| A cross-reference is a reference to an item that appears in another location in a document. "See Table 2 in Chapter 3" and "See the section titled 'Bookmarks' on page 5" are two examples of cross-references. Cross-references are commonly used in technical documents, like computer how-to books. (In fact, if Adobe InDesign had a cross-reference feature like Word's, this book would have a lot more cross-references, complete with page numbers.) Word's cross-reference feature is extremely powerful. It enables you to create cross-references to headings, footnotes, bookmarks, captions, numbered paragraphs, and other items in your Word documents. If an item moves or is modified, the cross-reference can be easily updated for the change. And if you're creating a document that will be read onscreen, you can take advantage of the hyperlink feature to make cross-references clickable links to the referenced item. Cross-references are made up of two components (Figure 37): Figure 37. A cross-reference consists of static text and one or more cross-reference fields. 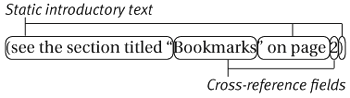
Static introductory text is text you type as part of the cross-reference. This text does not change. Cross-reference field is text inserted by the cross-reference feature as a Word field. This text can change if the information it refers to changes.
This part of the chapter explains how to insert and delete cross-references in your Word documents. To insert a cross-reference 1. | Position the insertion point where you want the cross-reference to appear (Figure 38).
Figure 38. Position the insertion point where you want the cross-reference to begin. 
| 2. | Enter the first part of the static text of the cross-reference (Figure 39).
Figure 39. Enter the first part of the static text. 
| 3. | Choose Insert > Cross-reference (Figure 1) to display the Cross-reference dialog (Figure 40).
Figure 40. The Cross-reference dialog. 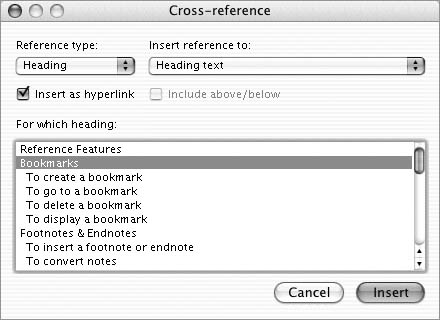
| 4. | Choose a type of reference from the Reference type pop-up menu (Figure 41).
Figure 41. The Reference type pop-up menu. 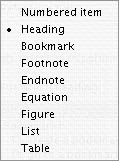
| 5. | Choose an option from the Insert reference to pop-up menu. The options that appear vary based on what you chose in step 4. Figure 42 shows the options for a Heading reference.
Figure 42. The Insert reference to pop-up menu with Heading chosen from the Reference type pop-up menu. 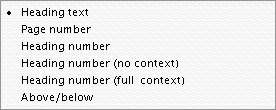
| 6. | To insert the reference as a clickable hyperlink, turn on the Insert as hyperlink check box.
| 7. | To instruct Word to include the word "above" or "below" as part of the reference, turn on the Include above/below check box. (This option is only available for some reference types.)
| 8. | Select the item you want to refer to in the scrolling list. For example, to duplicate the reference that appears in Figure 37, I'd select "Bookmarks."
| 9. | Click Insert. The reference is inserted, but the Cross-reference dialog remains active (Figure 43).
Figure 43. A cross-reference inserted into a document. 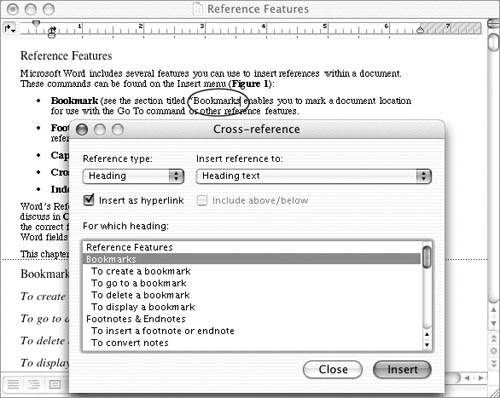
| 10. | If necessary, click in the document window and position the insertion point where additional static text should appear. Then type in the additional text (Figure 44).
Figure 44. Additional static text inserted after the first cross-reference. 
| 11. | To insert another cross-reference, click the Cross-reference dialog to make it active, then follow steps 4 through 9 to insert it (Figure 45).
Figure 45. Another cross-reference inserted into a document. In this case, the reference is the page number for a specific heading. 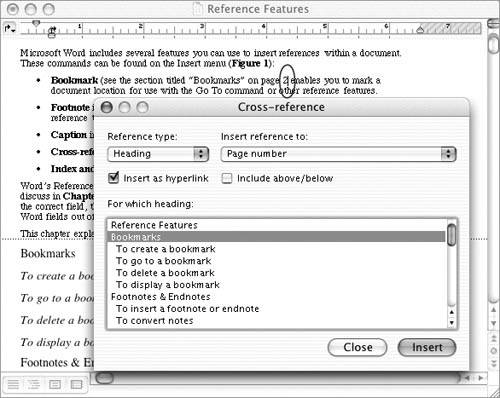
| 12. | If necessary, repeat steps 10 and 11 for additional static text (Figure 46) and/or cross-references.
Figure 46. The final bit of static texta close parenthesis characterinserted into the document. The cross-reference shown in Figure 37 is now complete. 
| 13. | When you're finished with the Cross-reference dialog, click Close to dismiss it.
|
 Tips Tips
It is impossible to cover all options available in the Cross-reference dialog, since they vary based on the reference type and the contents of a document. The instructions here provide enough information to get you started exploring the options on your own. Remember, if you insert the wrong cross-reference, you can always delete it and try again. Cross-references can be formatted like any other document text.
To delete a cross-reference 1. | In the document window, select the cross-reference you want to delete. It becomes highlighted in black (Figure 47).
Figure 47. Select the cross-reference you want to delete or modify. 
| 2. | Press  . The cross-reference disappears, like any other text. . The cross-reference disappears, like any other text.
|
To change what a cross-reference refers to 1. | Select the cross-reference you want to modify. (Do not select any introductory text.) The cross-reference is highlighted in black (Figure 47).
| 2. | Choose Insert > Cross-reference (Figure 1) to display the Cross-reference dialog (Figure 48).
Figure 48. The Cross-reference dialog also enables you to change a selected cross-reference. 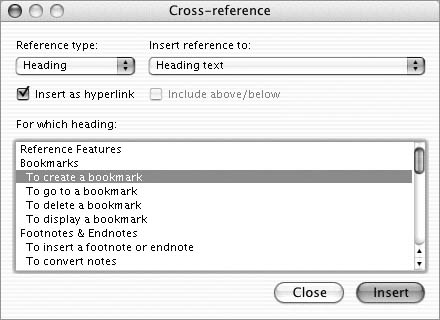
| 3. | Choose options from the Reference type (Figure 41) and Insert reference to (Figure 42) drop-down lists to set revised cross-reference options (Figure 48).
| 4. | Click Insert. The new cross-reference replaces the one that was selected (Figure 49).
Figure 49. The cross-reference you selected is replaced with the new one. 
|
|