Creating and Managing Layouts
Creating and managing layouts is one of the most important tasks required of a FileMaker developer. It's also one of the most intuitive. There are, nonetheless, numerous subtle facts and details that you need to know. We encourage you to have a test file open as you go through the following sections so that you can try things firsthand.
Creating a New Layout
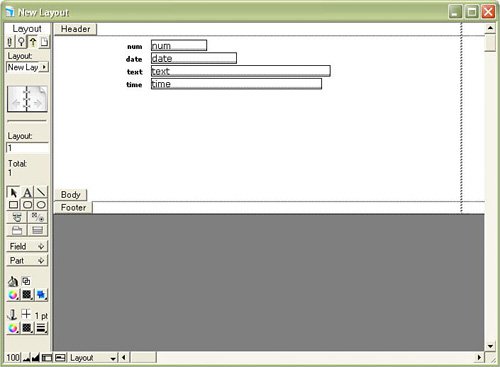
Every time you create a new table in a file, FileMaker automatically creates a new layout for you as well, based on the new table. The layout is given the same name as your table, and all the fields you defined at the time of table creation are placed on the layout for you. Figure 4.1 shows an example of what this default layout looks like.
Figure 4.1. The default layout created when you add a new table to a file.
You can create new layouts anytime you want while in Layout mode simply by choosing Layouts, New Layout/Report, or by pressing ( N) [Ctrl+N]. You are then taken to a setup wizard that can help you configure a layout according to one of a handful of types of common layout designs. Figure 4.2 shows the first screen of the Layout Wizard, on which you specify a name for the layout and choose a layout type. You also specify a layout's context here; that topic is covered in the next section.
Figure 4.2. This is the first screen of the wizard for creating new layouts.
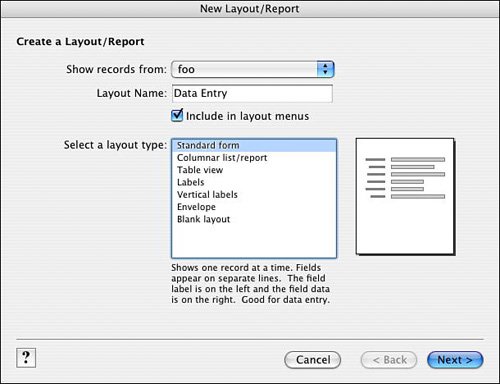
You can create the following six types of layouts:
- Standard Form Useful for data-entry layouts, Standard Form generates a basic form view layout with a set of fields you specify. You can select a theme for the layout as well; themes specify the default background color and text styles that will be applied to the layout.
- Columnar List/Report As the name implies, this type is used for creating basic list and subsummary reports. If you don't already have the necessary summary fields in your database, you can create them right from within the wizard.
- Table View Table view gives you a spreadsheet-like view of your data. When you select Table View as your layout type, you can select the fields you want to appear on your new layout. They are then displayed according to your selected theme in Table view. Table view is quite useful for behind-the-scenes data manipulation, but it may not be suitable as an end-user interface.
- Labels This type of layout is used for printing sheets of labels in standard or custom sizes. The Layout Wizard prompts you to specify the type of labels you will be usingAvery 5160/5260 are the labels used most commonly. If you don't see your label type listed, you can specify custom measurements. See the "Multicolumn Layouts" section later in this chapter for some tips that will come in handy for working with label layouts.
- Envelope You are prompted to select fields you want to use for the address portion of the envelope. The default layout is sized for standard business envelopes. You may need to do some testing and tweaking of the layout to get things just right for your envelopes and printer.
- Blank Layout Choosing Blank Layout gives you just that: a completely blank layout, which you can then manipulate any way you want, free of wizards.
We do not discuss all the screens of the New Layout/Report Assistant here; they're quite intuitive, even for new developers. Besides, if you are new to FileMaker, nothing beats spending an hour just playing around with the assistant to see firsthand what the various configuration options do for you. You won't cause harm to any existing layouts by doing so, nor can you hurt the database even if you mess up the creation of a new layout.
After a layout has been created, it can be completely modified and turned into whatever you need it to be. Much of the remainder of this chapter is devoted to the tools at your disposal to do just that.
Tip
No tool is available for importing layouts from one file to another. If you ever need to do this, the best method is to set up a new, blank layout with layout parts sized the same as the source layout. Then, copy all the objects from the source file and paste them into the new file. Fields, buttons, and portals need to be respecified to point to their correct referents, but at least all your formatting will be retained.
Within a file, you can duplicate layouts by choosing Layouts, Duplicate Layout. Often, this is a preferred method for creating new layouts, even if they end up looking significantly different from the original. Part sizes, graphic elements, and formatting options are all retained, so modifying as necessary with these as a starting point is usually much faster than creating new layouts from scratch.
Tip
Create a template layout for yourself that has examples of all the necessary bits and pieces specified (portals, fields, field labels), along with color squares and grid lines. Then you can simply duplicate your template when you need to create a new layout, and you'll be well on your way to a finished product.
Layout Context
Every layout is linked to a table occurrence from the Relationships Graph. Many layouts can be linked to a particular table occurrence, but each layout must be tied to one, and only one, table occurrence.
|
For more information on table occurrences, see "Adding a Table Occurrence to the Relationships Graph," p. 187. |
The reason layouts need to be associated with table occurrences is that in a multitable file, FileMaker needs some way of knowing which records to display in a given layout. In the old days when FileMaker allowed only one table per file, it was always clear that layouts in file X should display records from table X. Now, layouts in file X can be configured to display records from table A, B, or C. The context of a layout is determined by the table occurrence to which it is tied. Context, in turn, determines the table from which the layout will show records, and also establishes the reference point for other types of operations, such as displaying data from related tables, or evaluating calculations that reference related tables.
 |
The concept of layouts being tied to table occurrences can be a bit confusing. See "Determining Which Records Will Be Displayed on a Layout" in the "Troubleshooting" section at the end of this chapter. |
You might wonder why layouts need to be associated with table occurrences and not source tables themselves. If you were concerned only with displaying records from the source table, you wouldn't need to worry about table occurrences. But layouts also need to be able to contain records from related tables (that is, portals), and relationships are built between table occurrences, not between source tables. Having a layout linked to a table occurrence makes it unambiguous what context should be used to access related records.
Consider it in terms of perspective. To view any data within your solution, your user needs a starting point, or perspective, and an end point. For example, you might be looking from Company Detail through a portal to Employees related to that company record. The associated table occurrence tied to a given layout serves as a user's starting point, and any related data will be viewed from that table occurrence's perspective on the Relationships Graph.
|
If you're unfamiliar with relational data modeling or how to display related data in FileMaker, we recommend that you see Chapter 5, "Relational Database Design," p. 129, and Chapter 6, "Working with Multiple Tables," p. 157. |
When you define a new layout, the very first prompt of the New Layout/Report Assistant lets you specify where to show records from. The options in the pick list are all the table occurrences from the current file's Relationships Graph.
If you do have multiple occurrences of any of your source tables, the selection of a particular occurrence in no way affects your ability to see or edit field data in the source table itself. That is, if you don't intend to put any related fields on the layout, it's likely to be inconsequential which occurrence of that source table you select. Do realize, however, that context for scripts is determined by the currently active layout, so some scripts might behave differently if one or another occurrence is used.
|
The implications of context for scripting are discussed elsewhere; see "Script Context and Internal Navigation," p. 260. |
Layout Setup
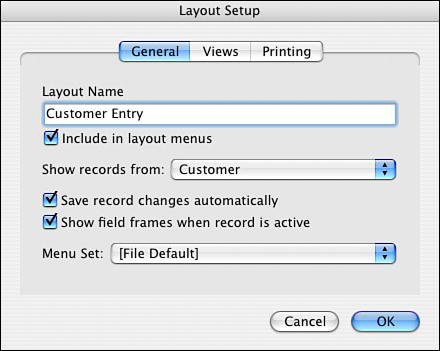
The Layout Setup dialog, accessed under the Layouts menu, allows you to edit many of the fundamental characteristics of a layout, such as the name of the layout, its context, and how it can be viewed (see Figure 4.3).
Figure 4.3. The Layout Setup dialog is where you go to change things such as the name of a layout and its context.
Layout Names
You have a great deal of flexibility in how you name layouts. Layout names do not need to be unique and can be up to 100 characters long. They can include numbers, symbols, spaces, and pretty much anything else you want to use.
Although flexibility is a good thing, we suggest that you follow a few guidelines:
- If a layout will potentially be accessed via ODBC or Custom Web Publishing, you should avoid symbols, punctuation, and spaces in the layout name.
- Only the first 8 to 12 characters of a layout name are visible in the layout selection popup (near the top of the Status Area). The full name is visible when a user clicks on the popup, but it can be helpful to use short, unique names for easy identification.
- Try to use names that are somewhat descriptive of the purpose of the layout. Names like List and Layout #3 may not convey much meaning to users, or future developers for that matter.
- In a multitable file, consider having the base table name as part of the layout name. For instance, Customer:Data Entry or Data Entry (Customer) may be good names if you need to differentiate among multiple data-entry layouts.
- Finally, if you use a single hyphen (-) as a layout name, this appears in the layout pop-up list as a divider. Users can't select divider layouts, which merely serve to help organize what might otherwise be an unwieldy list. Typically, such layouts would be left completely blank, but this isn't a requirement.
Tip
The single-hyphen naming trick works in other areas of FileMaker as well, such as within value lists and as a script name.
View Options
Every layout you develop can potentially be viewed in three ways: as a form, as a list, or as a table. A user with access to standard menu commands can use the View menu in Browse mode to switch between them. When you navigate to a layout, you will see it in whatever state it was last saved in, so bear in mind that switching from layout to layout may change the view setting as well.
The differences between the three view types are quite straightforward:
- View as Form This view type always shows one record at a time. Any header and footer parts are not fixed on the layout; if the layout has a long body, a user might need to scroll to see the footer. If the body part is short, the last part on the layout expands to fill the empty space. Subsummary parts are visible in Browse mode, but any summary fields in them represent summaries of all the records in the found set. The maximum height and width of a layout is just over 111 inches. For some long forms, such as legal contracts, you may need to split the form into two separate layouts.
- View as List With View as List, the number of records displayed is determined by the height of the layout body part and the height of the window. If more records are present in the found set than can be displayed onscreen, the vertical scrollbar enables users to see additional records. Any header and footer parts are fixed onscreen at all times, even when a user scrolls to see additional records. Subsummary parts are never visible in Browse mode with View as List. If fields are placed in the header or footer parts, they take their values from the currently active record. Any modification to a field in the header or footer part likewise affects the currently active record.
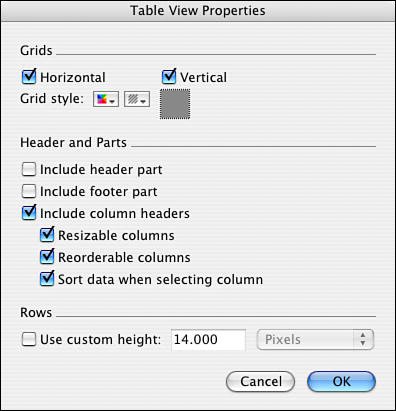
- View as Table In Table view, all the fields placed in the layout's body are presented in a spreadsheet-like grid. The initial order of the fields is determined by their top-to-bottom position on the layout. That is, the first column is the topmost field on the layout. No nonfield elements (for example, buttons, text, graphics) from the body of the layout are rendered in Table view. Field formatting (for example, color, font, font size) is honored, however. The column headers conform to the format of the first field. Other properties of the Table view can be specified under the Views tab of the Layout Setup dialog. As shown in Figure 4.4, you can specify whether header and footer parts should be visible and whether columns can be sorted, reordered, and resized.
Figure 4.4. You can alter the look and functionality of the table view by using the Table View Properties dialog.
Using the Views tab of the Layout Setup dialog, you can disable user access to certain view types. Although usually not necessary, this can be a good precaution to take to keep adventurous users on the right track. Accessing an inappropriate view type is likely not going to cause much harm, but it certainly can confuse users.
Multicolumn Layouts
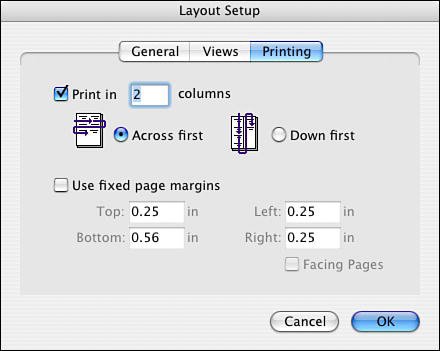
When printing labels and certain types of reports, you might want to present your data in multiple columns. You can specify the number of columns to display on the Printing tab of the Layout Setup dialog; this is shown in Figure 4.5.
Figure 4.5. You can customize the print settings for a particular layout on the Printing tab of the Layout Setup dialog.
In Layout mode, dashed vertical lines represent the boundaries between columns. Columns other than the first are grayed out; the idea is that you need to place any objects you want displayed in the first column, and these objects are replicated to the other columns as necessary. Figure 4.6 shows an example of a three-column layout used to display a phone directory. Notice that the header and footer part are not divided into columns. This means that if you want headers to appear above the second and third columns, you need to add those explicitly, as we've done in Figure 4.6.
Figure 4.6. This example shows how a layout for a three-column phone directory might appear in Layout mode.
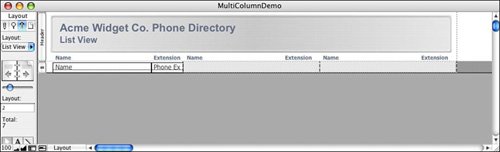
It's not possible to have columns of differing widths; every column is the same width as the first one. You can manually adjust the column width by clicking on the dashed divider between the first and second columns and dragging left or right as appropriate.
Subsummary parts and leading and trailing grand summaries can be used on multicolumn layouts, but they behave slightly differently depending on whether you've chosen to display data Across First or Down First. If you chose Down First, any summary parts are also columnar. On the other hand, if the data is displayed Across First, summary parts span the full width of the layout, just as the header and footer parts do.
|
Subsummary parts are covered in depth in "Working with Parts," p. 103. |
The effects of a multicolumn layout can be viewed only in Preview mode. In Browse mode, a user sees only a single column of data.
Hiding and Reordering Layouts
In Browse mode, layouts can be designated to be either accessible or inaccessible via the layout pull-down menu in the Status Area. If a layout is accessible, users can see it and navigate to it at will (assuming that the Status Area is visible and/or accessible). If the layout is inaccessible, users can navigate to it only by running a script that takes them there. (In Layout mode, all layouts are accessible.)
Typically, layouts are set to be inaccessible when you need to prevent users from manually navigating to a layout. For instance, you might have report layouts or find screens that require certain preparation before they become useful. There may be unanticipated and/or undesired results if a user is able to bypass the scripts you've created and navigate directly to a layout.
The option to have a layout be accessible or not is on the first screen of the New Layout/Report Assistant; it can also be set through the Layout Setup dialog. The Set Layout Order dialog, shown in Figure 4.7, also has a check box on each line that can be toggled to change a layout from visible to hidden and vice versa. Using this method is the quickest way to hide (or show) a number of layouts at once.
Figure 4.7. Use the Set Layout Order dialog to set the accessibility and order of layouts.
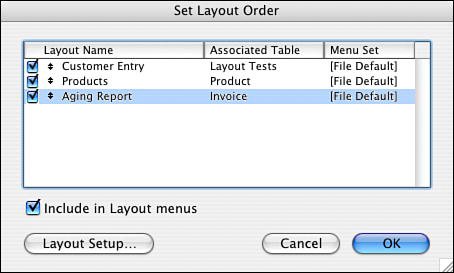
The Set Layout Order dialog, as you might guess from its name, also enables you to change the order in which layouts appear in the layout pop-up list. You can use the double-arrowed selection tool to move a layout up or down in the order. You can accomplish the same thing by selecting a line and pressing () [Ctrl] and the up or down arrow.
Note
In FileMaker 6 and earlier versions, you were required to be the host of a file to access the Set Layout Order dialog. It can now be managed even as a client of FileMaker Server.
Restricting Access to Layouts
Using the methods discussed in the preceding section to hide layouts is a good way of keeping users from going places they shouldn't, but it's not adequate security if you truly need to restrict access to layouts. Moreover, making layouts inaccessible affects all users; you can't set up rules determining which layouts are accessible for which users.
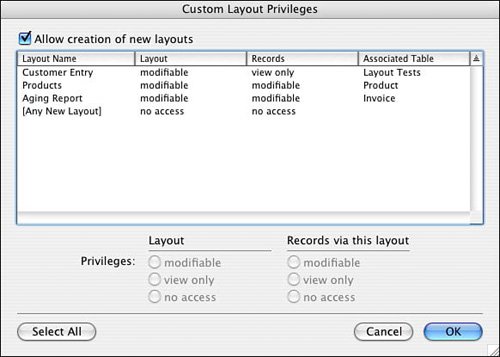
Added protection for layouts can be achieved by restricting access via security privilege sets. A privilege set can be defined to provide All No Access, All View Only, or All Modifiable control over all layouts at once; alternatively, you can specify custom layout privileges for each individual layout, as shown in Figure 4.8. You can protect editing of the layouts themselves, as well as the data displayed on them. Any user who has no access to a layout doesn't see that the layout exists, even in Layout mode.
Figure 4.8. Custom layout privileges enable you to restrict certain users from modifying or viewing certain layouts.
|
For more information about setting up privilege sets, see "Working with Privilege Sets," p. 334. |
If you want to prevent certain users from creating new layouts, leave the Allow Creation of New Layouts option at the top of the Custom Layout Privileges dialog unchecked. Additionally, you can set default privileges that users will have for new layouts by editing the options for the [Any New Layout] line.
Note that the preceding security settings allow developers to give users the ability to edit some layouts and not others, and also to create their own layouts (or not). It is possible in FileMaker to establish "junior developer users" who can exercise a degree of freedom within certain areas of a given system without jeopardizing critical or more complex areas.
Working with Parts |
Part I: Getting Started with FileMaker 8
FileMaker Overview
- FileMaker Overview
- FileMaker and Its Marketplace
- Introduction to Database Software
- FileMaker Deployment Options
- Whats New in FileMaker Pro 8
Using FileMaker Pro
- Getting Started
- Working in FileMaker Pro
- Troubleshooting
- FileMaker Extra: Becoming a FileMaker Pro Power User
Defining and Working with Fields
- Defining and Working with Fields
- Working Under the Hood
- Working with Fields
- Working with Field Types
- Assigning Field Options
- Troubleshooting
- FileMaker Extra: Indexing in FileMaker
Working with Layouts
- Working with Layouts
- Whats a Layout?
- Creating and Managing Layouts
- Working with Parts
- Working with Objects on a Layout
- Working with the Tab Control Object
- Working with Fields
- Portals
- Troubleshooting
- FileMaker Extra: Designing Cross-PlatformFriendly Layouts
Part II: Developing Solutions with FileMaker
Relational Database Design
- Relational Database Design
- Understanding Database Design
- Database Analysis
- Working with Entities and Attributes
- Understanding Relationships
- Relationship Optionality
- Understanding the Role of Keys in Database Design
- Many-to-Many Relationships: Solving the Puzzle
- The Basics of Process Analysis
- FileMaker Extra: Complex Many-to-Many Relationships
Working with Multiple Tables
- Working with Multiple Tables
- Multitable Systems in FileMaker Pro
- Creating a One-to-Many Relationship in FileMaker
- Working with Keys and Match Fields
- Understanding Table Context
- Working with Related Data
- Creating a Many-to-Many Relationship
- Relational Integrity
- Rapid Multitable Development
- Troubleshooting
- FileMaker Extra: Building a Three-Way Join
Working with Relationships
- Working with Relationships
- Relationships Graphs and ERDs
- Relationships as Queries
- Creating Self-Relationships
- Creating Ranged Relationships
- Creating Cross-Product Relationships
- Working with Data from Distant Tables
- Working with Multiple Files
- How and When to Use Multiple Files
- Troubleshooting
- FileMaker Extra: Managing the Relationships Graph
Getting Started with Calculations
- Getting Started with Calculations
- Understanding How and Where Calculations Are Used
- Exploring the Calculation Dialog Box
- Essential Functions
- Using Conditional Functions
- Aggregate Functions
- Learning About the Environment
- Troubleshooting
- FileMaker Extra: Tips for Becoming a Calculation Master
Getting Started with Scripting
- Getting Started with Scripting
- Scripts in FileMaker Pro
- Creating Scripts
- Common Scripting Topics
- Triggering Scripts
- Working with Buttons on Layouts
- Troubleshooting
- FileMaker Extra: Creating a Script Library
Getting Started with Reporting
- Getting Started with Reporting
- Deriving Meaning from Data
- Working with Lists of Data
- Summarized Reports
- Delivering Reports
- Troubleshooting
- FileMaker Extra: Incorporating Reports into the Workflow
Part III: Developer Techniques
Developing for Multiuser Deployment
- Developing for Multiuser Deployment
- Developing for Multiple Users
- Sessions in FileMaker Pro
- Concurrency
- Audit Trails in FileMaker Pro
- Launch Files
- Troubleshooting
- FileMaker Extra: Development with a Team
Implementing Security
- Approaching Security
- User-Level Internal Security
- File-Level Access Security
- Troubleshooting
- FileMaker Extra: Working with Multiple Files
Advanced Interface Techniques
- Advanced Interface Techniques
- User Interfaces in FileMaker Pro
- Navigation
- Multiwindow Interfaces
- Working with Custom Menus
- Showing/Hiding Layout Elements
- Dedicated Find Layouts
- Data Presentation
- Working with Table View
- Troubleshooting
- FileMaker Extra: User Interface Heuristics
Advanced Calculation Techniques
- Advanced Calculation Techniques
- Whats an Advanced Calculation Technique?
- Logical Functions
- Text Formatting Functions
- Array Functions
- The Filter-ing Functions
- Custom Functions
- GetNthRecord
- Troubleshooting
- FileMaker Extra: Creating a Custom Function Library
Advanced Scripting Techniques
- Advanced Scripting Techniques
- What Is Advanced Scripting?
- Script Parameters and Script Results
- Script Variables
- Window Management Techniques
- Go to Related Record
- Troubleshooting
- FileMaker Extra: Recursive Scripts
Advanced Portal Techniques
- Advanced Portal Techniques
- Portals in FileMaker Pro
- Portal Basics
- New Record Only Relationships
- Horizontal Portals
- Using Portals to Create Calendars
- Selection Portals
- Filtered Portals
- Dynamic Portal Sorting
- Troubleshooting
- FileMaker Extra: Portals and Record Locking
Debugging and Troubleshooting
- Debugging and Troubleshooting
- What Is Troubleshooting?
- Staying Out of Trouble
- Planning for Trouble
- Troubleshooting Scripts and Calculations
- Troubleshooting in Specific Areas: Performance, Context, Connectivity, and Globals
- File Maintenance and Recovery
- FileMaker Extra: Other Tools of the Trade
Converting Systems from Previous Versions of FileMaker Pro
- Converting Systems from Previous Versions of FileMaker Pro
- Migration Choices
- Converting Files
- Pre-Conversion Tasks
- Post-Conversion Tasks
- Troubleshooting
- FileMaker Extra: Converting Web-Enabled Databases
Part IV: Data Integration and Publishing
Importing Data into FileMaker Pro
- Importing Data into FileMaker Pro
- Working with External Data
- Flat-File Data Sources
- Importing Multiple Files from a Folder
- Importing Photos from a Digital Camera
- Importing from an ODBC Data Source
- Importing from an XML Data Source
- Using a Script to Import Data
- Troubleshooting
- FileMaker Extra: Exploiting the FileMaker-to-FileMaker Import
Exporting Data from FileMaker
- Exporting Data from FileMaker
- Getting Out What You Put In
- The Basic Mechanics of Exporting
- Export File Formats
- Formatting Exported Data
- Exporting Related Fields
- Exporting Grouped Data
- Exporting to Fixed-Width Formats
- Working with Large Fields and Container Fields
- Scripted Exports
- Accessing FileMaker Data Using ODBC and JDBC
- Using FileMaker Pro as an ODBC Client
- Troubleshooting
- FileMaker Extra: Accessing FileMaker Data via JDBC
Instant Web Publishing
- Instant Web Publishing
- An Overview of Instant Web Publishing
- Enabling and Configuring IWP
- Designing for IWP Deployment
- Using an IWP Solution
- Troubleshooting
- FileMaker Extra: Building Your Own Next and Previous Page Buttons
FileMaker and Web Services
- FileMaker and Web Services
- About Web Services
- FileMaker and XML
- Transforming XML
- XML Import: Understanding Web Services
- Working with Web Services
- Troubleshooting
- FileMaker Extra: Write Your Own Web Services
Custom Web Publishing
- Custom Web Publishing
- About Custom Web Publishing
- Custom Web Publishing Versus Instant Web Publishing
- Custom Web Publishing Versus XML Export
- Getting Your Databases Ready for Custom Web Publishing
- Publishing FileMaker Data as XML
- Using XSLT with Custom Web Publishing
- Building Web Applications with XSLT-CWP
- Other Custom Web Publishing Commands and Parameters
- About the FileMaker XSLT Extensions
- Troubleshooting
- FileMaker Extra: About the Custom Web Publishing Tools
Part V: Deploying a FileMaker Solution
Deploying and Extending FileMaker
- Deploying and Extending FileMaker
- FileMaker Deployment Options
- Single User
- Peer-to-Peer Hosting
- FileMaker Server
- Web Publishing
- ODBC/JDBC
- Citrix/Terminal Services
- Runtime Solutions
- Deploying to Handheld Devices
- Customized Deployment Options
- Troubleshooting
- FileMaker Extra: The Limits of Customization
FileMaker Server and Server Advanced
- FileMaker Server and Server Advanced
- About FileMaker Server
- Installing FileMaker Server
- Running FileMaker Server
- Using the Server Administration Tool
- Configuring and Administering FileMaker Server Using the SAT
- Managing Clients
- Managing Databases
- Administration from the Command Line
- Working with External Services
- Automatically Updating Plug-ins
- Scheduled Tasks
- Monitoring FileMaker Server
- Troubleshooting
- FileMaker Extra: Best Practices Checklist
FileMaker Mobile
- FileMaker Mobile
- FileMaker Mobile 8 Overview
- Using FileMaker Mobile on Your Handheld Device
- Troubleshooting
- FileMaker Extra: Publishing Related Data
Documenting Your FileMaker Solutions
- Documenting Your FileMaker Solutions
- Why Is Documentation Important?
- Developing Naming Conventions
- Using Comments Effectively
- Documenting the Relationships Graph
- Using the Database Design Report
- Using Third-Party Documentation Tools
- Putting the Finishing Touches on Your Documentation
- Final Thoughts on Documentation
- FileMaker Extra: Soliant Development Standards
EAN: 2147483647
Pages: 296
