Creating a Simple Web Service
Creating a Simple Web Service Now that you have an understanding of the ASP.NET infrastructure, let's use it to create a simple Web service. Let's start by creating a simple Web service without the help of Visual Studio .NET so that you can understand all the constituent pieces of a Web service. The high-level steps are as follows :
Create an asmx File for the Web ServiceThe following code shows the source for a very simple Web service. Save this code into a file called arithmetic.asmx . 1. <%@ WebService Language="C#" class="Arithmetic" %> 2. using System.Web.Services; 3. class Arithmetic 4. { 5. [WebMethod] 6. public float Add(float arg1,float arg2) 7. { 8. return arg1+arg2; 9. } 10. [WebMethod] 11. public float Subtract(float arg1,float arg2) 12. { 13. return arg1-arg2; 14. } 15. [WebMethod] 16. public float Multiply(float arg1,float arg2) 17. { 18. return arg1*arg2; 19. } 20. } Line 1 uses the WebService directive to specify that the Web service is implemented in C# and that the name of the class that provides the business logic for the Web service is called Arithmetic . In this case, the implementation of the Arithmetic class is contained directly in the asmx file. Line 2 has a using statement for the System.Web.Services namespace. I include this namespace primarily so that I have access to the WebMethod attribute. In order to expose a method using a Web service, you must mark the method with the WebMethod attribute as I have done with the three methods implemented in this web service. Create an IIS Virtual DirectoryTo create an IIS virtual directory for your Web service, perform the following steps:
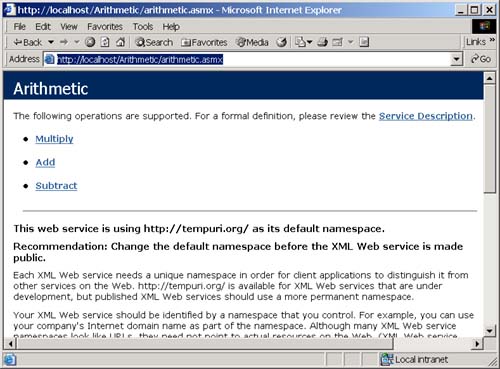
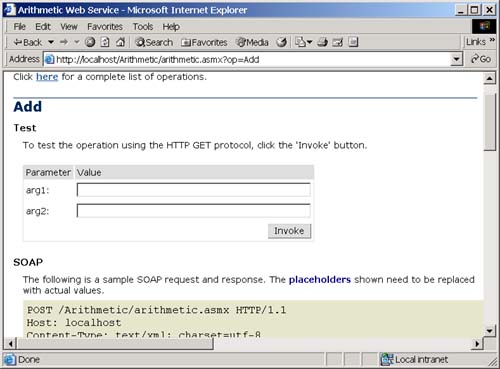
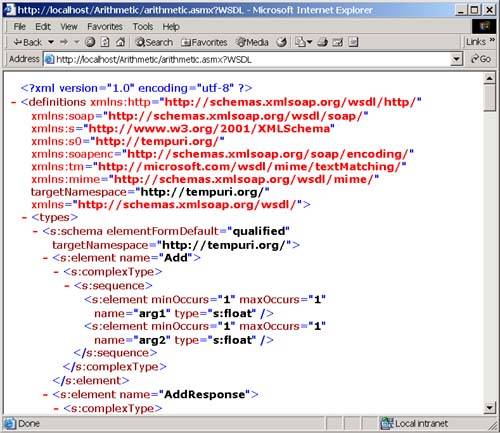
You now have an IIS virtual directory that should correspond to the following URL: localhost/Arithmetic/ . TestYou can now test your Web service without having to build a client. You will see the help file shown in Figure 10-4 if you point your Web browser to the following URL: localhost/Arithmetic/arithmetic.asmx. Figure 10-4. The Web services help file. This help file is generated by a script called DefaultWSdlHelpGenerator.aspx , which you can find at D:\WINNT\Microsoft.NET\Framework\v1.0.3705\CONFIG (although your version number may vary). Using this help file, you can execute any of the three methods in the Web service. For instance, if you click the Add link shown in Figure 10-4, you see the Web page shown in Figure 10-5. Figure 10-5. The Web services help file. Although, in practice, most people will use SOAP, the .NET Framework's Web services infrastructure also supports HTTP Post and HTTP Get. In fact, the help page uses HTTP Get. If you scroll down in the page, it does show you how to submit a request to the Add method using each of these three protocols. If you enter a value for arg1 and arg2 and click the Invoke button (see Figure 10-5), you see the result shown in Figure 10-6. Figure 10-6. The Web services help file. Note If you receive an error that contains the description "Unable to generate a temporary class", you may need to give read/write privileges for the Temp folder to the ASPNET account. See the Knowledge Base article at support.microsoft.com/default.aspx?scid=kb;en-us;Q322886. You can view the WSDL file for the Web service by clicking the Service Description link on the Web service help file (see Figure 10-4) or by entering this URL in your Web browser: localhost/arithmetic/arithmetic.asmx? WSDL . You see the result shown in Figure 10-7. Figure 10-7. The WSDL file for the Web service. Currently, a few things are wrong with this Web service that you should correct before you go any further. If you do not specify an XML namespace for your Web service, the system gives it the namespace tempuri.org. This temporary URI should only be used while your Web service is under development. The automatically generated help file warns you in excruciating and very clearly worded detail that you should change the namespace for your Web service before you release it for public consumption. The namespace that you choose for your Web service should be a unique name. Your company's Internet domain name is a good choice. You can change the namespace for your Web service using the System.Web.Services.WebService attribute as follows: 1. <%@ WebService Language="C#" class="Arithmetic" %> 2. using System.Web.Services; 3. [WebService(Namespace="http://gordon.com/webservice/")] 4. class Arithmetic 5. { 6. [WebMethod] 7. public float Add(float arg1,float arg2) 8. { 9. return arg1+arg2; 10. } 11. [WebMethod] 12. public float Subtract(float arg1,float arg2) 13. { 14. return arg1-arg2; 15. } 16. [WebMethod] 17. public float Multiply(float arg1,float arg2) 18. { 19. return arg1*arg2; 20. } 21. } After you make this change, if you navigate to localhost/Arithmetic/arithmetic.asmx , you will see that the rather verbose warning about the temporary URI has gone away. The next problem has to do with the organization of the code. ASP.NET Web services support the code-behind attribute just like Web forms. Using code-behind allows you to precompile the source code for your Web service into an assembly, which you deploy in a bin directory beneath the IIS virtual directory. If you put the source code for your Web service in the asmx file, the ASP.NET runtime compiles this code into an assembly, which it caches at the following location: D:\WINNT\Microsoft.NET\Framework\v1.0.3705\Temporary ASP.NET Files\arithmetic \. To use code-behind, change the asmx file to look as follows: <%@ WebService Language="C#" Codebehind="Arithmetic.cs" class="Arithmetic" %> Then add the following code to a file called Arithmetic.cs : 1. using System.Web.Services; 2. [WebService(Namespace="http://gordon.com/webservices/")] 3. class Arithmetic 4. { 5. [WebMethod] 6. public float Add(float arg1,float arg2) 7. { 8. return arg1+arg2; 9. } 10. [WebMethod] 11. public float Subtract(float arg1,float arg2) 12. { 13. return arg1-arg2; 14. } 15. [WebMethod] 16. public float Multiply(float arg1,float arg2) 17. { 18. return arg1*arg2; 19. } 20. } Then compile this into an assembly by executing the following command at a Visual Studio .NET command prompt: csc /t:library /out:arithmetic.dll arithmetic.cs Finally, create a directory beneath the root directory of your virtual directory called bin and copy the arithmetic.dll assembly to this location. Create a ClientSo far, I have only used a Web browser and the DefaultWSdlHelpGenerator.aspx test page to execute the Web service. Let's build a Web Forms client. You can call the Web service using one of three protocols: HTTP GET, HTTP POST, or SOAP. In order to make this call, you need to format an HTTP request using one of these protocols, send the request to the URI for the Web service, and then parse the HTTP response that contains the result. Fortunately, the .NET Framework SDK provides a tool called the Web Services Description Language Tool (wsdl.exe) that generates a proxy that does all of the hard work for you. This proxy is a class that contains methods with the same argument list and return value as the Web service. To call a method in your Web service, you call the corresponding method on the proxy. The proxy turns your method call into a SOAP, HTTP GET, or HTTP POST message. (You decide which protocol the proxy will use when you generate it with wsdl.exe. It defaults to using SOAP, but you can change the protocol if you want). The proxy will then send the message to the Web service's URI. The proxy defaults to using the URI that you specified when you generated the proxy, but you can alter this by setting the URL property on the proxy. Finally, the proxy parses the response from the Web service and returns it to the caller as the return value from the method. The proxy even allows you to make method calls on the Web service either synchronously or asynchronously. Let's generate a proxy for the arithmetic Web service. Create a separate directory to hold the client for the XML Web service and execute the following command at a Visual Studio .NET command prompt to generate the proxy: wsdl http://localhost/arithmetic/arithmetic.asmx?wsdl /language:CS /out:arithmeticproxy.cs In this case, I have specified that the proxy should be generated using the C# code and that the result should be written to a file called arithmeticproxy.cs . The complete list of possible command-line parameters for wsdl.exe is shown in Table 10-2. Table 10-2. Command-line parameters for wsdl.exe
Note By default, wsdl.exe will write the source code for the proxy to a file with the same name as the asmx file, but with the correct file extension for the specified language (for example, .cs for C#). If you generate the source file for the proxy in the same directory as the asmx file, and you do not explicitly specify a name for your source file using the out parameter, wsdl.exe will overwrite (and it does so without warning) the asmx file. Obviously, you would only generate the proxy in the same directory as the asmx file in a pedagogical example like this one. The source code that wsdl.exe generates follows. In this case, I'm only showing the generated methods for the Add method in the Web service because the Subtract and Multiply methods generate similar code. 1. using System.Diagnostics; 2. using System.Xml.Serialization; 3. using System; 4. using System.Web.Services.Protocols; 5. using System.ComponentModel; 6. using System.Web.Services; 7. [DebuggerStepThroughAttribute()] 8. [DesignerCategoryAttribute("code")] 9. [WebServiceBindingAttribute(10. Name="ArithmeticSoap", 11. Namespace="http://gordon.com/webservices/")] 12. public class Arithmetic : 13. [4]SoapHttpClientProtocol { 14. // Constructor 15. public Arithmetic() { 16. this.Url = 17. "http://localhost/arithmetic/arithmetic.asmx"; 18. } 19. [4] [SoapDocumentMethodAttribute(20. "http://gordon.com/webservices/Add", 21. RequestNamespace="http://gordon.com/webservices/", 22. ResponseNamespace="http://gordon.com/webservices/", 23. [6].Description [SoapBindingUse.Literal, 24. ParameterStyle=[4]SoapParameterStyle.Wrapped)] 25. public System.Single Add(System.Single arg1, 26. System.Single arg2) 27. { 28. object[] results = this.Invoke("Add", 29. new object[] {arg1,arg2}); 30. return ((System.Single)(results[0])); 31. } 32. 33. public System.IAsyncResult BeginAdd(34. System.Single arg1, 35. System.Single arg2, 36. System.AsyncCallback callback, 37. object asyncState) 38. { 39. return this.BeginInvoke("Add", new object[] { 40. arg1,arg2},callback,asyncState); 41. } 42. 43. public System.Single EndAdd(44. System.IAsyncResult asyncResult) 45. { 46. object[] results = this.EndInvoke(asyncResult); 47. return ((System.Single)(results[0])); 48. } 49. // 50. // Similar methods for the Subtract and Multiply 51. // methods are omitted... 52. // 53. } The generated proxy derives from a .NET Framework class called SoapHttpClientProtocol , which encapsulates the logic you need to call an XML Web service using SOAP. Notice the Hello Web service contains only one method called SayHello, but the proxy contains three methods: SayHello, BeginSayHello, and EndSayHello. The last two methods allow you to call the Web service asynchronously. Notice the hard-coded URL for the Web service on lines 16 and 17. You can alter the URL that the proxy uses by setting the URL property on the proxy, but a better solution is to use the urlkey parameter to wsdl.exe, which inserts logic to read the URL from a key in the client's configuration file. If you use wsdl.exe with the following command line: wsdl /urlkey:WebServiceURL http://localhost/arithmetic/arithmetic.asmx?wsdl /language:CS /out:arithmeticproxy.cs Then wsdl.exe adds the following logic to the proxy: string urlSetting = System.Configuration. ConfigurationSettings.AppSettings["WebServiceURL"]; if ((urlSetting != null)) this.Url = urlSetting; else this.Url = "http://localhost/TestWebService/Service1.asmx"; Notice that the logic will first try to read the URL from a configuration file, and, if no configuration file is specified, it defaults the URL to the original location of the Web service. This is a much better approach and is highly recommended. You can compile the proxy into an assembly using the following command: csc /t:library /out:arithmeticproxy.dll arithmeticproxy.cs Because you've already built so many Windows Forms clients , let's build a client for this Web service using ASP.NET Web Forms. I'll use Visual Studio .NET to build the Web Forms client. The steps are as follows:
CREATE AN ASP.NET WEB FORMS PROJECTStart Visual Studio .NET and then execute the following steps:
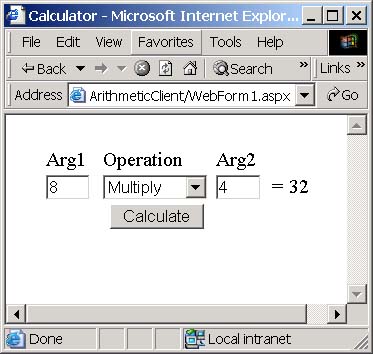
Visual Studio .NET creates a new virtual directory for the application at the location that I specified. The physical location of the virtual directory is [Inetpub]\ wwwroot \ArithmeticClient where [InetPub] is the location of the InetPub directory on your machine. On my machine, this location is D:\Inetpub\ . Visual Studio .NET creates a project at this location that contains a single ASP.NET Web Form called WebForm1.aspx , which is the main window of your application. DRAW THE UIUsing the toolbox in Visual Studio .NET, draw the UI shown in Figure 10-8 on your form. Figure 10-8. The UI for the Arithmetic Web Forms client in Visual Studio .NET. Name the controls on the UI as shown in Table 10-3. Table 10-3. Control IDs for the Web Forms client
REFERENCE THE PROXY ASSEMBLYIn order to call the Web, you need to reference the proxy assembly that you built earlier. To do this, perform the following steps:
Note In the next section, you learn how to create a Web reference, which both creates the proxy and references it, using Visual Studio .NET. IMPLEMENT THE UIHere is the code for the Calculate button: 1. private void cmdCalculate_Click(object sender, System.EventArgs e) 2. { 3. Arithmetic ws; 4. float arg1, arg2, result=0; 5. ws=new Arithmetic(); 6. arg1=float.Parse(txtArg1.Text); 7. arg2=float.Parse(txtArg2.Text); 8. switch (dpdOperations.SelectedIndex) 9. { 10. case 0: 11. result=ws.Add(arg1,arg2); 12. break; 13. case 1: 14. result=ws.Subtract(arg1,arg2); 15. break; 16. case 2: 17. result=ws.Multiply(arg1,arg2); 18. break; 19. } 20. lblRslt.Text=result.ToString(); 21. } Line 5 creates a new instance of the Arithmetic proxy, which calls the Arithmetic Web service. Lines 6 and 7 parse the contents of the two argument text boxes into two floating-point values. Lines 8 through 19 is a switch statement that calls the appropriate method on the Arithmetic Web service based on the operation that the user selected in the operations dropdown. Line 20 displays the result. Notice that the calls we make to the Web service on Lines 11, 14, and 17 are simple and straightforward. I don't have to worry about formatting a SOAP request or parsing a SOAP response; the proxy does all of that. |


| | |
| Team-Fly |
| Top |
EAN: 2147483647
Pages: 119