4.11. Installing Mac OS X Programs In general, new programs arrive on your Mac via one of two avenues: on a CD or via an Internet download. The CD method is slightly simpler; see "Performing the Installation" later in this section. For help installing downloaded programs, on the other hand, read on. 4.11.1. .sit, .tar, .zip, and .gz Programs you download from the Internet generally arrive in a specially encoded, compressed form, as shown in Figure 14-21. The downloaded file's name usually ends with one of these file name extensions: -
.sit indicates a StuffIt file, the Macintosh file-compression standard. You decompress such files with Stuffit Expander, a free program available from www.stuffit.com/mac/expander/download3.html. -
.tar is short for tape archive , an ancient Unix utility that combines (but doesn't compress) several files into a single icon, for simplicity in sending. -
.gz is short for gzip , a standard Unix compression format. -
.tar.gz or .tgz represents one compressed archive containing several files. -
.zip is the same as it is on Windows: a standard file-compression format that shows up in email attachments, web downloads, and so on. When you double-click a .zip file, Mac OS X launches a super-fast , background-only decompressing program.
Tip: Don't tell this to jealous Windows fans, but you can compress any file in the Finder by Control-clicking or right-clicking it and choosing "Create Archive of [whatever the file's name is]." After a few moments, you get a zip-compressed file, which you can then email to anyone in the world who uses either a Mac or a Windows PC.
Some Web browsers, including Safari, automatically convert some of these compression and archiving formats into usable form. Once you return to your desktop, you may well see several of these files, representing various stages of decompression and decoding (see Figure 4-21). If not, just remember that StuffIt Expander, described above, can turn all of them back into usable form. If your browser didn't spur it into action automatically, just double-click your compressed file to get it back to the way it started. 4.11.2. Disk Images (.dmg files) Once you've unstuffed (or untarred, or unzipped ) a downloaded program, it often takes the form of a disk-image file, whose name ends with the letters .dmg . Disk images are extremely common in Mac OS X. All you have to do is double-click the .dmg icon. After a moment, it magically turns into a disk icon on your desktop, which you can work with just as though it's a real disk (Figure 4-21). For example: -
Double-click it to open it. The software you downloaded is right inside. -
Remove it from your desktop by dragging it to the Trash (whose icon turns into a big silver Eject key as you drag), highlighting it and pressing  -E (the shortcut for File -E (the shortcut for File  Eject), or Control-clicking it and choosing Eject from the shortcut menu. (Youve still got the original .dmg file you downloaded, which you can use to resuscitate the disk image itself.) Eject), or Control-clicking it and choosing Eject from the shortcut menu. (Youve still got the original .dmg file you downloaded, which you can use to resuscitate the disk image itself.) 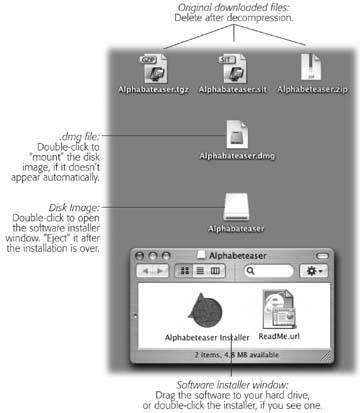 | Figure 4-21. Downloading a new program from the Internet may strew your desktop with icons. After the installation is complete, you can delete all of thembut keep the .dmg file if you think you might want to install the software again later. | |
4.11.3. Cleaning Up After Decompression When the StuffIt Expander progress-bar dialog box disappears, you may have several icons on your desktop. Some are useful, some you're free to trash. -
The original compressed file . As illustrated in Figure 4-21, it's safe to throw away the .sit, .tar, .gz, or .tgz file you originally downloaded (after it's decompressed, of course). -
The .dmg file . Once you've turned it into an actual disk-drive icon (Figure 4-21, bottom), installed the software from it, and ejected the disk-drive icon, you can delete the .dmg file. Keep it only if you think you might need to reinstall the software someday. -
The disk image itself . This final icon, the one that contains the actual software or its installer, doesn't exist as a file on your hard drive. It's a phantom drive, held in memory, that will go away by itself when you log out. So after installing its software, feel free to drag it to the Trash. 4.11.4. Performing the Installation Working with .tar, .gz, and .dmg files are all skills unique to downloading Mac OS X programs from the Internet. Installing software from a CD is much more straightforward. In either case, once you've got a disk icon on your desktop (either a pseudo-disk from a disk image or a real CD you've inserted), you're ready to install the software. You can install many Mac OS X programs just by dragging their icons or folders to your hard drive. Others offer a traditional installer program that requires you to double-click, read and accept a license agreement, and so on. In both cases, where you decide to install the new program is suddenly a big issue. You have the following choices: POWER USERS' CLINIC
When Programs Are Actually Folders | | You may have noticed that OS X programs don't seem to have 50,000 support files strewn across your hard drive. To open Safari, you don't first open a Safari folder ; you can just double-click the Safari icon itself. That's a much better arrangement than in Mac OS 9 or Windows, where many programs must remain in special folders, surrounded by libraries, dictionaries, foreign language components , and other support files and folders. The question is: Where did all those support files go? Mac OS X features so-called packages or bundles , which are folders that behave like single files. Every properly written Mac OS X program looks like a single, double-clickable application icon. Yet to the Mac, it's actually a folder that contains both the actual application icon and all of its support files, which are hidden for your convenience. If you'd like to prove this to yourself, try this. Choose Go Applications. See the Calculator program in the list? Control-click it. From the contextual menu, choose Show Package Contents. Youre asking Mac OS X to show you what's inside the Calculator "application icon" folder. The Calculator package window opens, revealing a Contents folder full of strange -looking, Unixy folders and files that, behind the scenes, are pieces of the Calculator program itself. The application-as-folder trick is convenient , because it means that you can uninstall the program by dragging this single icon to the Trash without worrying that you're leaving behind its entourage of support files. (That is, unless you use Microsoft Office, which still keeps a separate stash of support files just like it does in Windows.)  |
-
In the Applications folder . Most programs sit in your Applications folder. Almost always, this is where you'll want to install new programs. Putting them in the Applications folder makes it available to anyone who uses the Mac.
Note: You can't put anything in your Applications folder unless you have an administrator account , as described on Section 12.1.2.
-
In your Home folder . This option is valuable only if you share your Mac with other people, as described in Chapter 12. If that's your situation, you may occasionally want to install a program privately, reserving it for your own use only. In that case, just install or drag it into your Home folder (see Section 1.10.2). When other people log onto the machine, they won't even know that you've installed that new program.
Note: If you don't have an administrator account, this is your only option.
|