Section 14.24. Utilities: Your Mac OS X Toolbox
The Utilities folder (inside your Applications folder) is home to another batch of freebies: another couple dozen tools for monitoring, tuning, tweaking, and troubleshooting your Mac.
The truth is, though, that you're likely to use only about six of these utilities. The rest are very specialized gizmos primarily of interest only to network administrators or Unix geeks who are obsessed with knowing what kind of computer-code gibberish is going on behind the scenes.
14.24.1. Activity Monitor
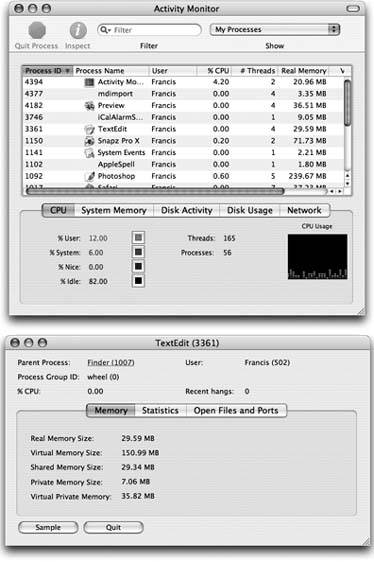
Activity Monitor is designed to let the technologically savvy Mac fan see how much of the Mac's available power is being tapped at any given moment.
|
14.24.1.1. The Processes table
Even when you're only running a program or two on your Mac, dozens of computational tasks ( processes ) are going on in the background. The top half of the dialog box, which looks like a table, shows you all the different processesvisible and invisiblethat your Mac is handling at the moment. For each item, you can see the percentage of CPU being used, who's using it (either your account name , someone else's, or root , meaning the Mac itself), and the quantity of memory it's using.
14.24.1.2. The System monitor tabs
At the bottom of Activity Monitor, you're offered five tabs that reveal intimate details about your Mac and its behind-the-scenes efforts: CPU (how much work your processor is doing), System Memory (the state of your Mac's RAM at the moment), Disk Activity (meaning your hard drive), Disk Usage (how full your hard drive is), and Network.
14.24.2. AirPort Admin Utility
Don't even think about this program unless you've equipped your Mac with (or your Mac came with) the hardware necessary for Apple's wireless AirPort networking technologynamely, an AirPort wireless card.
Even then, you don't use the AirPort Admin Utility to set up AirPort connections for the first time. For that task, use the AirPort Setup Assistant described on the next page.
After you're set up, you can use AirPort Admin Utility to monitor the connections in an existing AirPort network. (You can also use this utility to set up new connections manually, rather than using the step-by-step approach offered by the Assistant.)
|
14.24.3. AirPort Setup Assistant
An assistant, in Apple-ese, is what you'd call a wizard in Windows. It presents a series of screens, posing one question at a time.
The AirPort Setup Assistant is the screen-by-screen guide that walks you through the steps needed to set up and use AirPort wireless networking. You'll be asked to name your network, provide a password for accessing it, and so on. When you've followed the steps and answered the questions, your AirPort hardware will be properly configured and ready to use.
14.24.4. Audio MIDI Setup
Maybe you've heard that Mac OS X comes with spectacular internal wiring for music, sound, and MIDI (Musical Instrument Digital Interface, a standard "language" for inter-synthesizer communication). It's available, that is, to music software companies that write their wares to capitalize on these new tools. (The big-name programs, including Digital Performer, are ready to go.)
This configuration program offers two tabs. The first, Audio Devices, is the master control panel for all your various sound inputs and outputs: microphones, line inputs, external speakers, and so on. Of course, for most people, this is all meaningless, because most Macs have only one input (the microphone) and one output (the speakers ). But if you're sitting even now in your darkened music studio, humming with high-tech audio gear whose software has been designed to work with this little program, you're smiling.
The second tab, MIDI Devices, lets you click Add Device to create a new icon that represents one of your pieces of gear. Double-click the icon to specify its make and model. Finally, by dragging lines from the "in" and "out" arrows, you teach your Mac (and its MIDI software) how the various components are wired together.
14.24.5. Bluetooth File Exchange
One of the luxuries of owning a Bluetooth-equipped Mac is the ability to shoot files (to similarly forward-thinking colleagues) through the air, up to 30 feet away. Bluetooth File Exchange makes it possible, as described on Section 13.4.5.
14.24.6. ColorSync Utility
This "bet-you'll-never-touch-it" utility performs a fairly esoteric task: repairing ColorSync profiles that may be "broken" because they don't strictly conform to the ICC profile specifications. (ICC [International Color Consortium] profiles are part of Apple's ColorSync color management system.)
14.24.7. Console
Console is a magic window that shows you what's happening under the hood of your Mac as you go about your business. Its function is to record a text log of all the internal status messages being passed between the Mac OS X and other applications as they interact with each other.
Opening the Console log is a bit like stepping into an operating room during a complex surgery; you're exposed to stuff the average person just isn't supposed to see. (Typical Console entries: "kCGErrorCannotComplete" or "doGetDisplayTransferByTable.") You can adjust the font and word wrapping using Console's Format menu, but the truth is that the phrase "CGXGetWindowType: Invalid window 1" looks ugly in just about any font.
Console isn't useless, however. These messages can be of value to programmers who are debugging software or troubleshooting a messy problem, or to tech-support helpers you call.
14.24.8. DigitalColor Meter
DigitalColor Meter can grab the exact color value of any pixel on your screen, which can be helpful when matching colors in Web page construction or other design work. After launching the DigitalColor Meter, just point to whichever pixel you want to measure, anywhere on your screen. A magnified view appears in the meter window, and the RGB color value of the pixels appears in the meter window. You can display the color values as RGB percentages or actual values, in Hex form (which is how colors are defined in HTML; white is represented as #FFFFFF, for example), and in several other formats.
Here are some tips for using the DigitalColor Meter to capture color information from your screen:
-
To home in on the exact pixel (and color) you want to measure, drag the Aperture Size slider to the smallest sizeone pixel. Then use the arrow keys to move the aperture to the precise location you want.
-
Press Shift-
 -C (Color
  Copy Color) to put on the Clipboard the numeric value of the color youre pointing to.
 -
Press Shift-
 -H (Color
  Hold Color) to "freeze the color meter on the color you're pointing toa handy stunt when you're comparing two colors onscreen. You can point to one color, hold it using Shift-
  -H, then move your mouse to the second color. Pressing Shift-
  -H again releases the hold on the color.
 -
When the Aperture Size slider is set to view more than one pixel, DigitalColor Meter measures the average value of the pixels being examined.
14.24.9. Directory Access
If you use your Mac at home, or if it's not connected to a network, you'll never have to touch Directory Access. Even if you are connected to a network, there's only a remote chance you'll ever have to open Directory Accessunless you happen to be a network administrator, that is.
This utility controls the access that each individual Mac on a network has to Mac OS X's directory services special databases that store information about users and servers. Directory Access also governs access to LDAP directories (Internet- or intranet-based "white pages" for Internet addresses).
A network administrator can use Directory Access to do things like select NetInfo domains, set up search policies, and define attribute mappings . If those terms don't mean anything to you, just pretend you never read this paragraph and get on with your life.
14.24.10. Disk Utility
This important program serves two key functions:
-
It's Mac OS X's own little Norton Utilities, a powerful hard-drive administration tool that lets you repair, erase, format, and partition disks. If you make the proper sacrifices to the Technology Gods, you'll rarely need to run Disk Utility. But it's worth keeping in mind, just in case you ever find yourself facing a serious disk problem.
-
Disk Utility also creates and manages disk images , electronic versions of disks or folders that you can send electronically to somebody else.
The following discussion tackles the program's two personalities one at a time.
14.24.10.1. Disk Utility, the hard drive-repair program
Here are some of the tasks you can perform with this half of Disk Utility:
-
Repair folders, files, and program that don't work because you supposedly don't have sufficient "access privileges." This is by far the most common use of Disk Utility, not to mention the most reliable and satisfying . Using the Fix Permissions button fixes an astonishing range of bizarre Mac OS X problems, from programs that won't open to menulets that freeze.
-
Get size and type information about any disks attached to your Mac.
-
Fix disks that won't appear on your desktop or behave improperly.
-
Completely erase disksincluding rewritable CDs (CD-RW).
-
Partition a disk into multiple volumes (that is, subdivide a drive so that its segments appear on the desktop with separate disk icons).
-
Set up a RAID array (a cluster of separate disks that acts as a single volume).
Note: Disk Utility can't verify, repair, erase, or partition your startup disk the disk on which your system software is currently running. That would be like a surgeon performing an appendectomy on himselfnot a great idea. (It can fix the permissions of the disk it's on, thank goodness.)If you want to use Disk Utility to fix or reformat your startup disk, you must start up your Mac from a different system disk, such as the Mac OS X Install disc.
The left Disk Utility panel lists your hard drive and any other disks in your Mac at the moment. When you click the name of your hard drive's mechanism, like "74.5 GB Hitachi iC25N0" (not the "Macintosh HD" partition label below it), you see a panel with five tabs, one for each of the main Disk Utility functions:
-
First Aid . This is the disk-repair part of Disk Utility, and it does a great job at fixing many disk problems. When you're troubleshooting, Disk Utility should always be your first resort. To use it, you click the icon of a disk and then click either Verify Disk (to get a report on the disk's health) or Repair Disk (which fixes whatever problems the program finds).
If Disk First Aid reports that it's unable to fix the problem, then it's time to invest in a program like DiskWarrior (www.alsoft.com).
Tip: If Disk First Aid finds nothing wrong with a disk, it reports, "No repairs were necessary." That's the strongest vote of confidence Disk First Aid can give.
You may wind up using the Verify and Repair Disk Permissions buttons even more often. Their function is to straighten out problems with the invisible Unix file permissions that keep you from moving, changing, or deleting files or folders. (The occasional software installer can create problems like this.) You'd be surprised how often running one of these permission checks solves glitchy little Mac OS X problems.
-
Erase . Select a disk, choose a format (almost always Mac OS Extended), give it a name, and click Erase to wipe the disk clean and apply the format you chose.
-
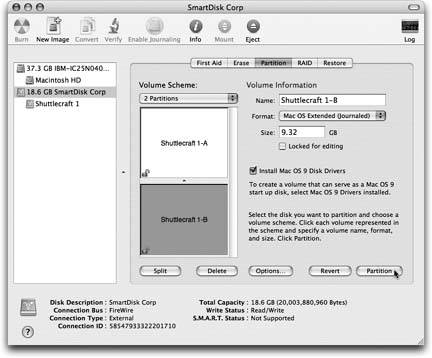
Partition . With the Partition tools, you can erase a hard drive in such a way that you subdivide its surface. Each disk is represented on your screen by two (or more) different hard drive icons. (See Figure 14-37.)
There are some very good reasons not to partition a drive these days, though: A partitioned hard drive is more difficult to resurrect after a serious crash, requires more navigation when you want to open a particular file, and offers no speed or safety benefits.
-
RAID . RAID stands for Redundant Array of Independent Disks, and refers to a special formatting scheme in which a group of separate disks are configured to work together as one very large, very fast drive. In a RAID array, multiple disks share the job of storing dataa setup that can improve speed and reliability.
Most Mac users don't use or set up RAID arrays, probably because most Mac users only have one hard drive (and Disk Utility can't make your startup disk part of a RAID array).
If you're using multiple external hard disks, though, you can use a RAID to merge them into one giant disk. Just drag the icons of the relevant disks (or disk partitions) from the left-side list of disks into the main list (where it says, "Drag disks here to add to set"). Use the RAID Scheme pop-up menu to specify the RAID format you want to use (Stripe, for example, is a popular choice for maximizing disk speed), name your new mega-disk, and then click Create. The result is a single "disk" icon on your desktop that actually represents the combined capacity of all the RAID disks.
-
Restore . This tab lets you make a perfect copy of a disk or a disk image, much like the popular shareware program CarbonCopy Cloner. You might find this useful when, for example, you want to make an exact copy of your old Mac's hard drive on your new one. (You can't do that just by copying your old files and folders manually via, say, a network. If you try, you won't get the thousands of invisible files that make up a Mac OS X installation. If you use the Restore function, they'll come along for the ride.)
Start by dragging the disk or disk image you want to copy from into the Source box. Then drag the icon of the disk you want to copy to into the Destination box.
Tip: If you want to copy an online disk image onto one of your disks, you don't have to download it first. Just type its Web address into the Source field. You might find this trick convenient if you keep disk images on your iDisk (Section 5.4.2), for example.
|
If you turn on Erase Destination, Disk Utility will obliterate all the data on your target disk before copying the data. If you leave this checkbox off, however, Disk Utility will simply copy everything onto your destination, preserving all your old data in the process. (The Skip Checksum checkbox is available only if you choose to erase your destination disk. If you're confident that all of the files on the source disk are 100% healthy and whole, turn on this checkbox to save time. Otherwise, leave it off for extra safety.)
Finally, click the Restore button. (You might need to type in an administrator password.) Restoring can take a long time for big disks, so go ahead and make yourself a cup of coffee while you're waiting.
Tip: Instead of clicking a disk icon and then clicking the appropriate Disk Utility tab, you can just Control-click a disk's name and choose Information, First Aid, Erase, Partition, or Restore from the shortcut menu.
14.24.10.2. Disk Utility, the disk-image program
The world's largest fan of disk images is Apple itself; the company often releases new software in disk-image form. A lot of Mac OS X add-on software arrives from your Web download in disk-image form, too.
Disk images are popular for software distribution for a simple reason: Each image file precisely duplicates the original master disk, complete with all the necessary files in all the right places. When a software company sends you a disk image, it ensures that you'll install the software from a disk that exactly matches the master disk.
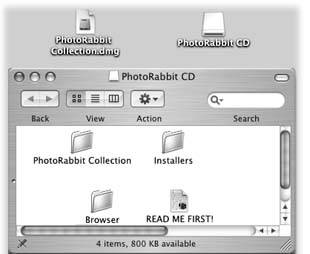
It's important to understand the difference between a disk-image file and the mounted disk (the one that appears when you double-click the disk image). Figure 14-38 makes the distinction clear.
|
You can create disk images, too. Doing so can be very handy in situations like these:
-
You want to create a backup of an important CD. By turning it into a disk-image file on your hard drive, you'll always have a safety copy, ready to burn back onto a new CD. (This is an essential practice for educational CDs that kids will be handling soon after eating peanut butter and jelly .)
-
You want to replicate your entire hard drivecomplete with all of its files, programs, folder setups, and so ononto a new, bigger hard drive (or a new, better Mac), using the new Restore feature described earlier.
-
You want to back up your entire hard drive, or maybe just a certain chunk of it, onto an iPod or another disk. (Again, you can later use the Restore function to complete the transaction.)
-
You bought a game that requires its CD to be in the drive at all times. Many programs like these run equally well off of a mounted disk image that you made from the original CD.
-
You want to send somebody else a copy of a disk via the Internet. You simply create a disk image, and then send that preferably in compressed form.
Here's how you make a disk image.
-
To image-ize a disk or partition . Click the name of the disk you want (in the left-panel list, where you see the disks currently in, or attached to, your Mac). (The topmost item is the name of your drive , like "484.0 MB MATSHITADVD-R" for a DVD drive or "74.5 GB Hitachi" for a hard drive. Beneath that entry, you generally see the name of the actual partition, like "Macintosh HD," or the CD's name as it appears on the screen.)
Then choose File
 New
New  Disk Image from [whatever the disk or partitions name is].
 -
To image-ize a folder . Choose Image
 New
New  Image from Folder. In the Open dialog box, click the folder you want and then click Open.
Tip: Disk Utility can't turn an individual file into a disk image. But you can always put a single file into a folder, and then make a disk image of that .
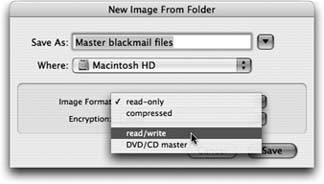
Either way, the next dialog box (Figure 14-39) offers some fascinating options.
-
Image Format . If you choose "read/write," your disk image file, when double-clicked, will turn into a superb imitation of a hard drive. You'll be able to drag files and folders onto it, drag them off of it, change icons' names on it, and so on.
If you choose "read-only," however, the result will behave more like a CD. You'll be able to copy things off of it, but not make any changes to it.
The "compressed" option is best if you intend to send the resulting file by email, for example, or if you'd like to preserve the disk image on some backup disk for a rainy day. It takes a little longer to create a simulated disk when you double-click the disk image file, but it takes up a lot less disk space than an uncompressed version.
Finally, choose "DVD/CD master" if you're copying a CD or a DVD. The resulting file is a perfect mirror of the original disc, ready for copying onto a blank CD or DVD when the time comes.
-
Encryption . Here's a great way to lock private files away into a vault that nobody else can open. If you choose "AES-128 (recommended)," you'll be asked to assign a password to your new image file. Nobody will be able to open it without the passwordnot even you. On the other hand, if you save it into your Keychain (Section 12.9.5), it won't be such a disaster if you forget the password.
-
Save As . Choose a name and location for your new image file. The name you choose here doesn't need to match the original disk or folder name.
|
When you click Save (or press Enter), if you opted to create an encrypted image, you'll be asked to make up a password at this point.
Otherwise, Disk Utility now creates the image and then mounts itthat is, turns the image file into a simulated, yet fully functional, disk icon on your desktop.
When you're finished working with the disk, eject it as you would any disk (Control-click it and choose Eject, for example). Hang onto the .dmg disk image file itself, however. This is the file you'll need to double-click if you ever want to recreate your "simulated disk."
14.24.10.3. Turning an image into a CD
One of the other most common disk-image tasks is turning a disk image back into a CD or DVDprovided you have a CD or DVD burner on your Mac, of course.
All you have to do is drag the .dmg file into the Disk Utility window, select it, and click the Burn icon on the toolbar (or, alternatively, Control-click the .dmg icon and choose Burn from the shortcut menu). Insert a blank CD or DVD, and then click Burn.
14.24.11. Grab
Grab takes pictures of your Mac's screen, for use when you're writing up instructions, illustrating a computer book, or collecting proof of some secret screen you found buried in a game. You can take pictures of the entire screen (press ![]() -Z, which for once in its life does not mean Undo) or capture only the contents of a rectangular selection (press Shift-
-Z, which for once in its life does not mean Undo) or capture only the contents of a rectangular selection (press Shift- ![]() -A). When you're finished, Grab displays your snapshot in a new window, which you can print, close without saving, or save as a TIFF file, ready for emailing, posting on a Web page, or inserting into a manuscript.
-A). When you're finished, Grab displays your snapshot in a new window, which you can print, close without saving, or save as a TIFF file, ready for emailing, posting on a Web page, or inserting into a manuscript.
Tip: The Mac also has built-in screen-capture keystrokes, just as Windows does; see Section 7.48 for details.
14.24.12. Grapher
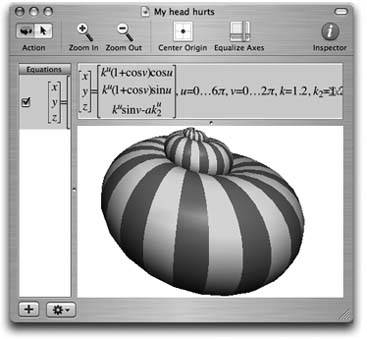
This equation grapher is an amazing piece of work.
When you first open Grapher, you're asked to choose what kind of virtual "graph paper" you want: two-dimensional (standard, polar, logarithmic ) or three-dimensional (cubic, spherical, cylindrical). Click a name to see a preview; when you're happy with the selection, click Open.
Now the main Grapher window appears (Figure 14-40). Do yourself a favor: Spend a few wow-inducing minutes choosing canned equations from the Examples menu, and watching how Grapher whips up gorgeous, colorful , sometimes animated graphs on the fly.
|
When you're ready to plug in an equation of your own, type it into the text box at the top of the window. (If you're not such a math hotshot, or you're not sure of the equation format, work from the canned equations and mathematical building blocks that appear when you choose Equation  New Equation from Template or Window
  Show Equation Palette.)
Once the graph is up on the screen, you can tailor it like this:
-
To move a 2-D graph in the window, choose View
 Move Tool and then drag; to move a 3-D graph, -drag it.
 -
To rotate a 3-D graph, drag it around.
-
To change the colors, line thicknesses, 3-D "walls," and other graphic elements, click the
 button (or choose Window
  Show Inspector) to open the formatting palette. The controls you find here vary by graph type, but rest assured that Grapher can accommodate your every visual whim.
 -
To change the fonts and sizes, choose Grapher
 Preferences. On the Equations panel, the four sliders let you specify the relative sizes of the text elements. If you click the sample equation, the Font panel appears (Section 4.9), so you can fiddle with the type.
 -
Add your own captions, arrows, ovals, or rectangles using the Object menu.
14.24.13. Installer
You'll never launch this. It's the engine that drives the Mac OS X installer program and other software installers . There's nothing for you to configure or set up.
14.24.14. Java Folder
Programmers generally use the Java programming language to create small programs that they sometimes embed into Web pagesanimated effects, clocks, calculators , stock tickers, and so on. Your browser automatically downloads and runs such applets ( assuming that you have "Enable Java" turned on in your browser), thanks to the Java- related tools in this folder.
14.24.15. Keychain Access
Keychain Access manages all your secret informationpasswords for network access, file servers, FTP sites, Web pages, and other secure items. For instructions on using Keychain Access, see Section 12.9.5.
14.24.16. Migration Assistant
This little cutie automates the transfer of all your stuff your Home folder, network settings, programs, and morefrom one Mac to another. It assumes that you've connected them using a FireWire cable, because it relies on Target Disk Mode (Section 5.8.1) to get the copying done quickly. (It can also copy everything over from a secondary hard drive or partition.)
The instructions on the screen guide you through the setup process; then the Assistant automates the transfer.
14.24.17. NetInfo Manager
NetInfo is the central Mac OS X database that keeps track of user and group accounts, passwords, access privileges, email configurations, printers, computers, and just about anything else network related. NetInfo Manager is where a network administrator (or a technically inclined Mac guru) can go to view and edit these various settings.
To dive into NetInfo Manager, start by clicking the padlock button at the bottom of the main window and enter an administrator's password. Then examine the various parameters in the top-left Directory Browser list. As you'll quickly discover, most of these settings are written in Unix techno-speak.
Although most of NetInfo is of little use to a typical Mac fan, a few parts are easy enough to figure out. If you click users in the left-side list, you'll see, in the next column, a list of accounts you've created. Click one of the user names there, and you'll see, in the properties pane at the bottom of the screen, some parameters that may come in handysuch as each person's name, password, and password hint. By double-clicking one of these info items, you can edit it, which can come in genuinely handy if someone on your school or office network forgets their password.
14.24.18. Network Utility
The Network Utility gathers information about Web sites and network users. It offers a suite of advanced, industry-standard Internet tools like these:
-
Use Whois ("who is") to gather an amazing amount of information about the owners of any particular domain (such as www.apple.com)including name and address info, telephone numbers , and administrative contacts using the technique shown in Figure 14-41.
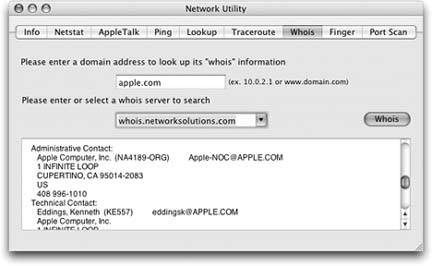
Figure 14-41. The WhoIs tool is a powerful part of Network Utility. First enter a domain that you want information about, then choose a WhoIs server from the pop-up menu (you might try whois.networksolutions. com). When you click the WhoIs button, you'll get a surprisingly revealing report about the owner of the domain, including phone numbers, fax numbers, contact names, and so on.
-
Use Ping to enter a Web address (such as www.google.com), and then "ping" (send out a " sonar " signal to) the server to see how long it takes for it to respond to your request. Network Utility reports the response time in millisecondsa useful test when you're trying to see if a remote server (a Web site, for example) is up and running.
-
Traceroute lets you track how many "hops" are required for your Mac to communicate with a certain Web server. Just type in the network address then click Trace. You'll see that your request actually jumps from one trunk of the Internet to another, from router to router, as it makes its way to its destination. You'll find that a message sometimes crisscrosses the entire country before it arrives at its destination. You can also see how long each leg of the journey took, in milliseconds .
14.24.19. ODBC Administrator
This program is designed to arbitrate of ODBC access requests . Any questions?
If you have no idea what that means, and no corporate system administrator has sat down with you to explain it to you, then your daily work probably doesn't involve working with corporate ODBC (Open Database Connectivity) databases. You can ignore this program or throw it away.
| POWER USERS' CLLINIC The XCode Tools |
| The Tiger DVD includes a special batch of programs, known as the XCode Tools, just for developers (programmers) who write Mac OS X software. You'll need some of these programs if you want to get into some of the more esoteric (or, as some would say, fun) Mac OS X tricks and tips. To install these tools, open Xcode Tools If you visit Developer (Use File Also, don't miss Core Image Fun House (also in Developer When you're done psychadelic-izing your image, you can export it to a standard JPEG or TIFF image by choosing File |
14.24.20. Print Center
This is the hub of your Mac's printing operations. You can use the Print Center to set up and configure new printers, and to check on the status of print jobs, as described in Chapter 8.
14.24.21. System Profiler
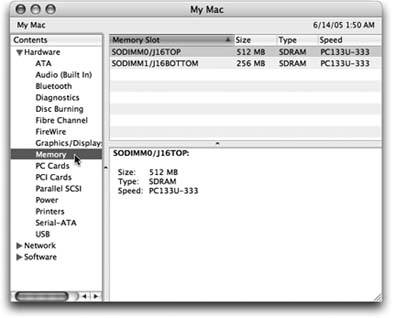
System Profiler is a great tool for learning exactly what's installed on your Mac and what's notin terms of both hardware and software. The people who answer the phones on Apple's tech-support line are particularly fond of System Profiler, since the detailed information it reports can be very useful for troubleshooting nasty problems.
Tip: Instead of burrowing into your Applications
 Utilities folder to open System Profiler, its sometimes faster to use this trick: Choose
  About This Mac. In the resulting dialog box, click the More Info button. BoomSystem Profiler opens. (And if you click your Mac OS X version number twice in the About box, you get to see your Macs serial number!)
 When you launch System Profiler, it reports information about your Mac in a list down the left side (Figure 14-42).
|
14.24.22. Terminal
Mac OS X's resemblance to an attractive, mainstream operating system like Windows or the old Mac OS is just an optical illusion; the engine underneath the pretty skin is Unix, one of the oldest and most respected operating systems in use today. And Terminal is the rabbit hole that leads youor, rather, the technically boldstraight down into the Mac's powerful Unix world.
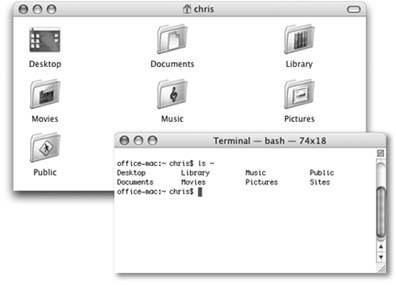
The first time you see it, you'd swear that Unix has about as much in common with the Mac OS X illustrated in the other chapters of this book as a Jeep does with a watermelon (see Figure 14-43).
|
What the illustration at the bottom of Figure 14-43 shows, of course, is a command line interface : a place where you can type out instructions to the computer itself. This is a world without icons, menus, or dialog boxes; even the mouse is almost useless.
Surely you can appreciate the irony: The brilliance of the original 1984 Macintosh was that it eliminated the command line interface that was still the ruling party on the computers of the day (like Apple II and DOS machines). Most non-geeks sighed with relief, delighted that they'd never have to memorize commands again. Yet here's Mac OS X, Apple's supposedly ultramodern operating system, complete with a command line! What's going on?
Actually, the command line never went away. At universities and corporations worldwide, professional computer nerds kept right on pounding away at the little C : or % prompts, appreciating the efficiency and power such direct computer control afforded them.
Now, you never have to use Mac OS X's command line. In fact, Apple has swept it far under the rug, obviously expecting that most people will use the beautiful icons and menus of the regular desktop.
For intermediate or advanced computer fans with a little time and curiosity , however, the command line opens up a world of possibilities. It lets you access corners of Mac OS X that you can't get to from the regular desktop. It lets you perform certain tasks with much greater speed and efficiency than you'd get by clicking and dragging icons. And it gives you a fascinating glimpse into the minds and moods of people who live and breathe computers.
14.24.22.1. A Terminal crash course
Terminal is named after the terminals (computers that consist of only a monitor and keyboard) that tap into the mainframe computers at universities and corporations. In the same way, Terminal is just a window that passes along messages to and from the Mac's brain.
The first time you open Terminal, you'll notice that there's not much in its window except the date and time of your last login, a welcome message, and the "$" (the command line prompt).
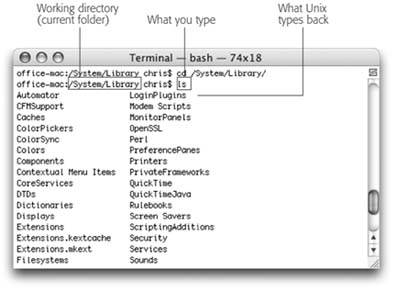
For user-friendliness fans, Terminal doesn't get off to a very good startthis prompt looks about as technical as computers get. It breaks down like this (see Figure 14-44):
-
office-mac : is the name of your Mac (at least, as Unix thinks of it), as recorded in the Sharing panel of System Preferences.
-
~. The next part of the prompt indicates what folder you're "in" (see Figure 14-44). It denotes the working directory that is, the current folder. (Remember, there are no icons in Unix.) Essentially, this notation tells you where you are as you navigate your machine.
The very first time you try out Terminal, the working directory is set to the symbol ~, which is shorthand for "your own Home folder." It's what you see the first time you start up Terminal, but you'll soon be seeing the names of other folders here[ office-mac:/Users ] or [ office-mac:/System/Library ], for example. (More on this slash notation on Section 2.6.)
Note: Before Apple came up with the user-friendly term folder to represent an electronic holding tank for files, folders were called directories . (Yes, they mean the same thing.) But in any discussion of Unix, "directory" is the correct term.
-
chris$ begins with your short user name. It reflects whoever's logged into the shell (the current terminal "session"), which is usually whoever's logged into the Mac at the moment. As for the $ sign: Think of it as a colon . In fact, think of the whole prompt shown in Figure 14-44 as Unix's way of asking, "OK, Chris, I'm listening. What's your pleasure ?"
The insertion point looks like a tall rectangle at the end of the command line. It trots along to the right as you type.
|
As you read this section, remember that capitalization matters in Terminal, even though it doesn't in the Finder. As far as Unix commands are concerned , Hello and hello are two very different things.
14.24.22.2. Unix programs
Each Unix command generally calls up a single application (or process , as geeks call it) that launches, performs a task, and closes . Many of the best-known such applications come with Mac OS X.
Here's a fun one: Just type uptime and press Enter. (That's how you run a Unix program: just type its name and press Enter.) On the next line, Terminal shows you how long your Mac has been turned on continuously. It shows you something like: "6:00PM up 8 days, 15:04, 1 user, load averages: 1.24, 1.37, 1.45"meaning your Mac has been running for 8 days, 15 hours nonstop.
You're finished running the uptime program. The $ prompt returns, suggesting that Terminal is ready for whatever you throw at it next.
Try this one: Type cal at the prompt, and then press Enter. Unix promptly spits out a calendar of the current month.
[office-mac:~] chris$ cal June 2003 S M Tu W Th F S 1 2 3 4 5 6 7 8 9 10 11 12 13 14 15 16 17 18 19 20 21 22 23 24 25 26 27 28 29 30 [office-mac:~] chris$
As you can see, it wraps up the response with "[office-mac:~] chris$"yet another prompt, meaning that Terminal is ready for your next command.
This time, try typing cal 11 2005, cal -y , or cal -yj . These three commands make Unix generate a calendar of November 2005, a calendar of the current year, and a Julian calendar of the current year, respectively.
14.24.22.3. Navigating in Unix
If you can't see any icons for your files and folders, how are you supposed to work with them?
You use Unix commands like pwd (tells you what folder you're looking at), ls (lists what's in the current folder), and cd (changes to a different folder).
Tip: As you can tell by these examples, Unix commands are very short. They're often just two-letter commands, and an impressive number of those use alternate hands (ls, cp, rm, and so on).
| UP TO SPEED Pathnames 101 |
| In many ways, browsing the contents of your hard drive using Terminal is just like doing so with the Finder. You start with a folder, and move down into its subfolders , or up into its parent folders. In Terminal, you're frequently required to specify a certain file or folder in this tree of folders. But you can't see their icons from the command line. So how are you supposed to identify the file or folder you want? By typing its pathname . The pathname is a string of folder names, something like a map, that takes you from the root level to the next nested folder, to the next, and so on. (The root level is, for learning-Unix purposes, the equivalent of your main hard drive window. It's represented in Unix by a single slash. The phrase/ Users , in other words, means "the Users folder in my hard drive window," or, in other terms, "the Users directory at the root level.") To refer to the Documents folder in your own Home folder, for example, you could type / Users/chris/Documents (if your name is Chris, that is). Or you could replace the path to your home folder with a tilde (~), and specify your Documents folder with nothing more than ~/ Documents . |
14.24.22.4. Getting help
Mac OS X comes with nearly 900 Unix programs. How are you supposed to learn what they all do? Fortunately, almost every Unix program comes with its own little help file. It may not appear within an elegant Mac OS X windowin fact, it's pretty darned plainbut it offers much more material than the regular Mac Help Center.
|
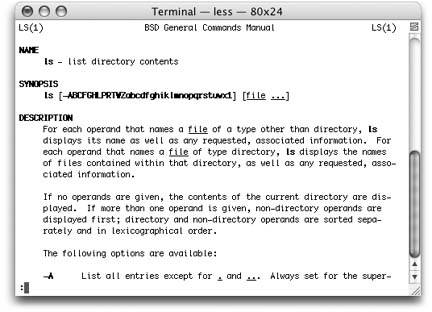
These help files are called user-manual pages, or manpages , which hold descriptions of virtually every command and program available. Mac OS X, in fact, comes with manpages on about 4,000 topicsabout 9,000 printed pages' worth. Unfortunately, manpages rarely have the clarity of writing or the learner-focused approach you'll find in the Mac Help Center. They're generally terse, just-the-facts descriptions. In fact, you'll probably find yourself needing to reread certain sections again and again. The information they contain, however, is invaluable to new and experienced users alike, and the effort spent mining them is usually worthwhile.
To access the manpage for a given command, type man followed by the name of the command you're researching . For example, to view the manpage for the ls command, enter: man ls . Now the manual appears, one screen at a time, as shown in Figure 14-45.
For more information on using man , view its own manpage by enteringwhat else? man man .
Tip: The free program ManOpen, available for download from the "Missing CD" page of www.missingmanuals.com, is a Cocoa manual-pages reader that provides a nice-looking, easier-to-control window for reading manpages.
14.24.22.5. Learning more
Unix is, of course, an entire operating system unto itself. If you get bit by the bug, here are some sources of additional Unix info:
-
www.ee.surrey.ac.uk/Teaching/Unix. A convenient, free Web-based course in Unix for beginners .
-
www.megazone.org/Computers/manual.shtml. A fast-paced, more advanced introduction.
-
Learning Unix for Mac OS X Tiger , by Dave Taylor & Brian Jepson (O'Reilly Media). A compact, relatively user-friendly tour of the Mac's Unix base.
Tip: Typing unix for beginners into a search page like Google.com nets dozens of superb help, tutorial, and reference Web sites. If possible, stick to those that feature the bash shell . That way, everything you learn online should be perfectly applicable to navigating Mac OS X via Terminal.
EAN: N/A
Pages: 371
