8.1. Printers and Printing Today's Mac OS X comes preinstalled with hundreds of printer drivers, including those for all current printer models from Epson, HP, Canon, and Lexmark. All you have to do is connect your printer and start printing, without installing a single piece of printer software. Now that's plug and play. The situation is trickier if you have an older printerthe one you've been using with Windows, for examplethat you'd like to make work with your new Mac. If it connects via a cable that the Mac recognizes (USB, for example, or Ethernet if it's an office laser printer), you can probably find Mac OS Xcompatible driver software for it in one of these locations: -
http://gimp-print. sourceforge .net. That's the Web site for Gimp-Print. It may have an unappetizing name but it is, in fact, a collection of Mac OS X printer drivers for hundreds of Mac and Windows printers. -
The printer company's Web site. 8.1.1. Introducing the Printer When you're ready to hook up your printer, follow this guide: -
Connect the printer to the Mac, and then turn the printer on . Inkjet printers usually connect to your USB jack. Laser printers generally hook up to your Ethernet connector. (If you're on an office network, the laser printer may already be connected somewhere else on the network, saving you this step. If you're hooking the printer straight into your Mac's Ethernet jack, you may need an Ethernet crossover cable to connect it, rather than a standard Ethernet cable.)
Note: Some Ethernet- or network-connected laser printers communicate with your Mac using a language called AppleTalk. If you have such a printer, here is step 1.5: Open the Network pane of System Preferences. Double-click your current connection (like Built-in Ethernet or AirPort), and click the AppleTalk tab. Turn on Make AppleTalk Active, and then click Apply Now. (If you omit this step, Print Center will nag you about it later.)
-
Open the document you want to print. Choose File  Print. In the Print dialog box, choose your printers name from the Printer pop-up menu (or one of its submenus, if any) . Print. In the Print dialog box, choose your printers name from the Printer pop-up menu (or one of its submenus, if any) . Cool! Wasn't that easy? Very nice how the Mac auto-discovers, auto-configures, and auto-lists almost any USB, FireWire, Bluetooth, or Bonjour printer. Have a nice afternoon. The End. Ohunless your printer isn't listed in the Printer pop-up menu. (Hey, it can happen.) -
From the Printer pop-up menu, choose Add Printer (Figure 8-1, top) . A program called Printer Setup Utility opens automatically. (You could also have opened it manually from your Applications Utilities folder, or by opening the Print & Fax pane of System Preferences and clicking Printer Setup.) WORKAROUND WORKSHOP
Parallel-Printer Hell | | If you have a parallel printer, you might assume that you're out of luck; the Mac has no parallel port. The technically oriented make old parallel printers work by buying a $150 component called a network print server ; plugging it into the Ethernet network; and using CUPS and Gimp-Print to print to that printer. (See the tip on Section 8.1.3 for more on CUPS.) The non-technical and stingy, however, do just fine with a parallel-to-USB adapter, which plugs into your printer's parallel port and your Mac's USB port. You can get one for under $30, and if your printer is made by a name-brand manufacturer, your Mac will usually work with it as easily as it would with a regular USB printer. All this effort may not be worth the trouble, though, if the old printer is an inkjet printer. New inkjets are so cheap these days, they practically fall out of specially marked boxes of Frosted Mini-Wheats. But if it's a parallel printer that you have a special admiration for, or some specialty printer that's supposedly Mac-incompatible (like a dot-matrix printer that you need for printing carbon-paper forms), you'll be happy to have these two options. | It's even better at auto-detecting printers available to your Mac. If you see the printer's name now, in the Printer Browser window, click it and then click Add (Figure 8-1, middle). You've just designated that printer as the default printerthe one that you'll print on most of the time. 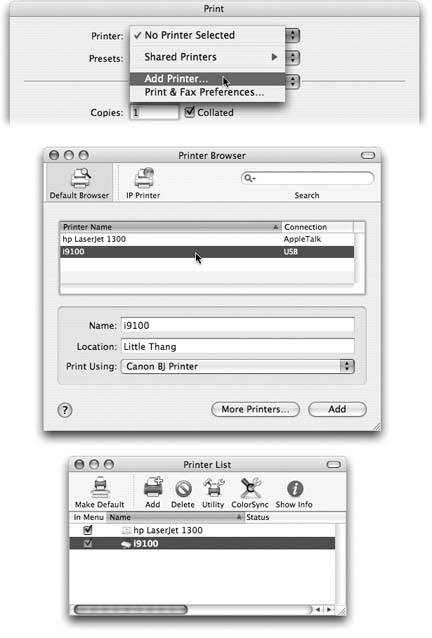 | Figure 8-1. Top: To introduce your Mac to a new printer, try to print somethingand then choose Add Printer from this pop-up menu.
Middle: Your Mac should automatically "see" any printers that are hooked up and turned on. Click the one you want, and then click Add. (If you have some oddball printer whose driver doesn't come built into Mac OS X, a "Driver not installed" message appears. Find the driver, if it exists, on the printer's Web site.)
Bottom: If you've set up more than one printer in this way, you'll see all of them listed in the Printer List. (To get there from the Printer Browser shown above, choose View Printer List.) The one whose name appears in bold is the default printerthe one destined to produce your next printout unless you choose a different one from the Print pop-up menu. | | You're all set. Have a good time. Unless your printer still isn't showing up. In that case, proceed to step 4. -
Click More Printers. In the next dialog box, use the pop-up menu to specify how the printer is connected to your Mac . For example, choose USB if you've connected an inkjet printer to your USB port. (You may see a brand-name version here, like Epson USB or Canon USB; choose that, if it matches your printer brand.) Choose AppleTalk if you're connected to a laser printer via an Ethernet network cable or AirPort wireless network. After a moment, the names of any printers that are turned on and connected appear in the printer list. For most people, that means only one printerbut one's enough.
Tip: Windows Printing means, "Hey, your Mac can send printouts to a Windows-only printer out there on your office network!" Just choose this option, click the name of the network group you're in, and then type an account name and password, if necessary.
-
Click the name of the printer you want to use . As an optional step, you can open the Printer Model pop-up menu at the bottom of the dialog box. Choose your printer's manufacturer (like HP or Canon), and then, in the list that appears, choose your particular printer's model name, if you can find it. That's how your Mac knows what printing features to offer when the time comes: double-sided, legal size , second paper tray, and so on. -
Click Add . After a moment, you return to the main Printer Browser window, where your printer now appears (Figure 8-1, top). You're ready to print.
Note: If you still don't see your printer's name, ask yourself: Is my Mac on a corporate network? Does the network have an LPR (Line Printer) printer? If you and your company's network nerd determine that the printer you want to use is, in fact, an LPR printer, click IP Printing at the top of the Printer Browser dialog box (Figure 8-1, middle). Fill in the appropriate IP address and other settings, as directed by your cheerful network administrator.
8.1.2. Making the Printout You print documents from within the programs you use to create them, exactly as in Windows. The options for printing should feel distinctly familiar. 8.1.2.1. Page Setup The experience of printing depends on the printer you're usinglaser printer, inkjet, or whatever. In every case, however, all the printing options hide behind two commands: File Page Setup, which you need to adjust only occasionally, and File Print, which you generally use every time you print. The Page Setup dialog box lets you specify some key characteristics about the document you're going to print: orientation, paper dimensions, and so on (see Figure 8-2). The options here vary by program and printer. The Page Setup options for an Epson inkjet, for example, differ dramatically from those for a laser printer. Only your printer's user manual can tell you exactly what these choices do.
Note: Unless you're happy with Apple's defaults, you must set the Page Setup options differently for each program you use.
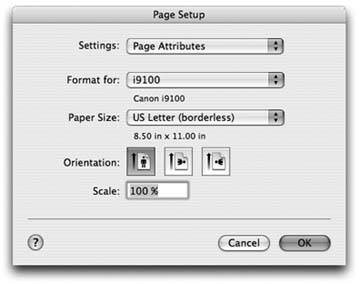 | Figure 8-2. Here in Page Setup are the controls you need to print a document rotated sideways on the page, so that it prints "the long way." The Scale control, which lets you reduce or enlarge your document, can be handy if the program you're using doesn't offer such a control. And the Paper Size pop-up menu, of course, specifies the size of the paper you're printing onUS Letter, US Legal, envelopes, or one of the standard European or Japanese paper sizes. | |
8.1.2.2. The Print command Although you can grow to a ripe old age without ever seeing the Page Setup dialog box, you can't avoid the Print dialog box. It appears, like it or not, whenever you choose File Print in one of your programs. Once again, the options you encounter depend on the printer you're using. But here's what you may find on the box's main screen (the screen you see when the pop-up menu reads Copies & Pages): -
Printer . If you have more than one printer connected to your Mac, you can indicate which you want to use for a particular printout by choosing its name from this pop-up menu. -
Presets . Here's a way to preserve your favorite print settings. Once you've proceeded through this dialog boxspecifying the number of copies, which printer trays you want the paper taken from, and so onyou can choose Save As from the pop-up menu shown in Figure 8-3, and then assign your settings a name (like "Borderless, 2 copies"). Thereafter, you'll be able to re-create that elaborate suite of settings just by choosing its name from this pop-up menu. -
Copies . Type the number of copies you want printed. The Collated checkbox controls the printing order for the various pages. For example, if you print two copies of a three-page document, the Mac will generally print the pages in this order: 1, 2, 3, 1, 2, 3. If you turn on Collated, on the other hand, it'll print in this order: 1, 1, 2, 2, 3, 3. -
Pages . You don't have to print an entire documentyou can print, say, only pages 2 through 15.
Tip: You don't have to type numbers into both the From and To boxes. If you leave the first box blank, the Mac assumes that you mean "from page 1." If you leave the second box blank, the Mac understands you mean "to the end." To print only the first three pages, in other words, leave the first box blank, and type 3 into the second box. (These page numbers refer to the physical pages you're printing, not to any fancy numbering you've set up in your word processor.)
-
PDF . A PDF file, of course, is an Adobe Acrobat documenta file that any Mac, Windows, Linux, or Unix user can view, read, and print using either Preview or the free Acrobat Reader (included with every PC and earlier Mac operating system). One of Mac OS X's most useful features, though, is its ability to create PDF filesa truly beautiful feature that saves paper, ink, and time. The document remains on your hard drive, and the text inside is even searchable using Spotlight. To access all the PDF-creating features for a document, click the pop-up button shown in Figure 8-3. The command you'll use most often is probably Save as PDF, which turns the printout into a PDF file instead of sending it to the printer. -
Preview . This button provides a print-preview function to almost every Mac OS X program on earth, which, in the course of your life, could save huge swaths of the Brazilian rainforest and a swimming pool's worth of ink in wasted printouts. Technically, the Preview button sends your printout to the Preview program . Preview, an expert graphics viewer, lets you zoom in or zoom out, rotate, or otherwise process your preview. When you're satisfied with how it looks, you can print it (File Print), cancel it (File Close), or turn it into a PDF (File Save as, Format: PDF). -
Supplies . This new Tiger feature will strike you either as blissfully convenient or disgustingly mercenary. It's a button that takes you directly to a Web page where you can buy new cartridges for your specific printer model. If you examine the unnamed pop-up menu just below the Presets pop-up menu, you find dozens of additional options. They depend on your printer model and the program you're using at the moment, but here are some typical choices: -
Layout . As described in Figure 8-3, you can save paper and ink or toner cartridges by printing several miniature pages on a single sheet of paper. -
Scheduler . This option lets you specify when you want your document to print. If you're a freelancer, sitting at home with an inkjet on your desk, you might not immediately grasp why anyone wouldn't want the printouts right now . But try to print a 400-page catalog in a big office where other people on the network might resent you for tying up the laser printer all afternoon, and you'll get the idea. -
Paper Handling . You can opt to print out your pages in reverse order so that they stack correctly, or you can print just odd or even pages so that you can run them through again for double-sided printing. -
ColorSync . Most color printers offer this pane, where you can adjust the color settingsa little more red, perhaps. This is also where you indicate whose color-matching system you want to use: Apple's ColorSync, your printer manufacturer's, or none at all. 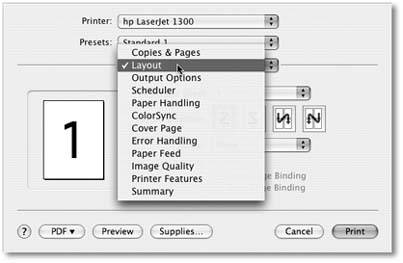 | Figure 8-3. The options included in this dialog box depend on the printer model you're using. On the Layout pane, you can choose from the Pages per Sheet pop-up menu to indicate how many miniature virtual pages you want printed on each sheet, to save paper and ink. | |
-
Quality & Media (inkjet printers only). Here's where you specify the print quality you want, the kind of paper you're printing on, and so on. (The name of this pane varies by manufacturer.) -
Error Handling . Using these controls, you can specify that you want a technical message to print out when the laser printer reports a PostScript error (when your document is too complex for the printer's memory, for example). Depending on your printer, you may also be able to specify what kind of notification you want to receive if your specified paper tray runs out of paper. -
Paper Feed . If you chose the correct printer model when setting up your printer, then this screen already "knows about" your printer's various paper trays. Here's where you specify which pages you want to come from which paper tray. (By far the most popular use for this feature is printing the first page of a letter on company letterhead, and the following pages on blank paper from a second tray.) -
[Program Name] . Whichever program you're usingMail, Word, AppleWorks, or anything elsemay offer its own special printing options on this screen. Some HP printers, for example, offer Cover Page, Finishing, and other choices. -
Summary . This command summons a text summary of all your settings so far.
Tip: Here's one for the technically inclined. Open your Web browser (Safari, for example) and enter this address: http://127.0.0.1:631 . You find yourself at a secret "front end" for CUPS (Common Unix Printing System), the underlying printing technology for Mac OS Xand the one that lets your Mac communicate with a huge array of older printers that don't yet have Mac OS X drivers. Using this administration screen, you can print a test page, stop your printer in its tracks, manage your networked printers and print jobs, and more. Very slick.
8.1.3. Managing Printouts The real fun of printing begins only after you've used the Print command (and clicked Print in the dialog box). At this point, you can manage the printouts-in-waiting in a number of waysways that are useful primarily for people who do a lot of printing, have connections to a lot of printers, or share printers with many other people. Start by opening Printer Setup Utility. In the list of printers, the Status column shows you which printers are busy. Double-click a printer's name to see something like Figure 8-4; the printouts that will soon be sliding out of your printer appear in a tidy list. 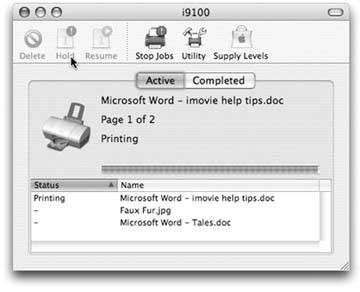 | Figure 8-4. Waiting printouts appear in this Printer Setup Utility window. You can sort the list by clicking the column headings Name or Status; make the columns wider or narrower by dragging the column-heading dividers horizontally; or reverse the sorting order by clicking the column name a second time. The Supply Level button shows you how much ink each cartridge has remaining (certain printer models only). | |
Here are some of the ways in which you can control these waiting printouts, which Apple affectionately calls the print queue : -
Delete them . By clicking an icon (or  -clicking several) and then clicking the Delete toolbar button, you remove items from the list of waiting printouts. Now they don't print. -clicking several) and then clicking the Delete toolbar button, you remove items from the list of waiting printouts. Now they don't print. -
Pause them . By highlighting a printout and then clicking the Hold button, you pause the printout. It doesn't print out until you highlight it again and click the Resume button. This pausing business could be useful when, for example, you need time to check or refill the printer, or when you're about to print your resignation as your boss drops by to offer you a promotion.
Tip: If you pause one printout, the others lined up behind it continue to print.
-
Halt them all . You can stop all printouts from a printer by clicking Stop Jobs. (They resume when you click the button again, which now says Start Jobs.) |