Warp: Controlled Distortion
| The Warp effect is one of several distortion functions in Illustrator's arsenal. You can use Warp to apply any of 15 different preset distortions to any object, group, or layer.
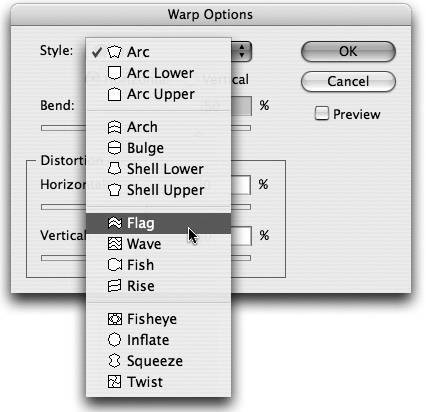
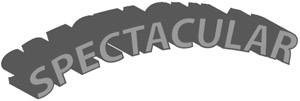
To apply a Warp effect, make a selection and choose Effect > Warp > Arc. Even though all 15 warp styles are listed in the submenu, you don't have to worry about choosing the right one just yetthe Warp Options dialog lets you choose from any of the preset warp styles. When the Warp Options dialog appears, turn on the Preview check box so that you can preview your warp on your artboard as you adjust the settings. Click the Style pop-up menu to choose from the list of warp styles, which comprise Arc, Arc Lower, Arc Upper, Arch, Bulge, Shell Lower, Shell Upper, Flag, Wave, Fish, Rise, Fisheye, Inflate, Squeeze, and Twist. Little icons appear to the left of each warp style to help you visualize what each one does, although trial and error work better in our opinion (Figure 7.85). Figure 7.85. The little icons that appear to the left of each Warp effect help you understand what each option actually does. Once you've chosen a warp style, you can specify whether the warp is applied horizontally or vertically, and you can adjust how slight or extreme the warp is applied by adjusting the Bend slider. Additionally, you can use the Horizontal and Vertical Distortion sliders to apply additional distortion to your selection. Warp effects are particularly useful when applied at the group or layer level, where you might often add or remove elements from the group. For example, you might apply a Warp effect to a logo to show movement or excitement. If you applied the Warp effect at the group level, adding new art to the group will automatically cause the new art to take on the same Warp effect as well. What If . . . You Apply the Warp Effect to 3D Text?A powerful way to accentuate a logo or a headline is to add a 3D Extrude effect to text. Because 3D is a Live Effect, there is no need to first convert text to outlines. Adding a Warp effect to 3D text can take things to the next level and opens a world of possibilities. Try it:
Of course, you can use the Type tool to edit the text as neededboth the 3D and the Warp effects update accordingly. Turning on Smart Guides makes it easier to select the text on the artboard. |
EAN: 2147483647
Pages: 147
- Chapter II Information Search on the Internet: A Causal Model
- Chapter VII Objective and Perceived Complexity and Their Impacts on Internet Communication
- Chapter XI User Satisfaction with Web Portals: An Empirical Study
- Chapter XIII Shopping Agent Web Sites: A Comparative Shopping Environment
- Chapter XV Customer Trust in Online Commerce


