Lesson 3: Supporting Security Settings and Local Security Policy
A security policy is a combination of security settings that affect the security on a computer. Computers that are members of a workgroup are subject only to Local Security Policy—settings that are applied to the computer when a user logs on. Computers that are members of a domain are subject to both Local Security Policy and Group Policy. As a DST, you must be able to configure, manage, and troubleshoot Local Security Policy. You should also understand how Group Policy affects a computer in a domain, but you will usually not be called upon to configure or troubleshoot Group Policy.
After this lesson, you will be able to
-
Explain how Local Security Policy affects a computer running Windows XP.
-
Identify the Resultant Set of Policy (RSoP) that is in effect on a computer.
-
Use the Local Security Policy tool to change security settings.
-
Identify the important security settings that are available through Local Security Policy.
Estimated lesson time: 30 minutes
Understanding Security Policy
As the name implies, Local Security Policy applies only to the local computer. Using Local Security Policy, you can control the following:
-
Who accesses the computer
-
Which resources users are authorized to use on their computer
-
Whether a user or group’s actions are audited (recorded in the Windows Event Log)
If you want to use Local Security Policy to control the computers in a workgroup, you must configure Local Security Policy on each computer in the workgroup.
Administrators manage Windows security in a domain environment using Group Policy, which enables the enforcement of security policies across all users in a specific site or domain. In an Active Directory environment, administrators can apply Group Policy to domains, sites, or organizational units (OUs), each of which is a type of container that is used to group user and computer accounts in the domain.
| Note | For more information on Active Directory structure, see “Active Directory Collection” at http://www.microsoft.com/resources/documentation/WindowsServ/2003/all/techref/en-us/Default.asp?url=/resources/documentation/windowsServ/2003/all/techref/en-us/W2K3TR_ad_over.asp. |
Order of Policy Application
For computers that are members of a domain, both Local Security Policy and Group Policy are often used. As a result, policies can come from more than one source and are applied in the following order:
-
Local Security Policy is applied to the computer.
-
Group Policy settings are applied for the Active Directory site of which the computer is a member. Policy settings that are configured at this level override Local Security Policy.
-
Group Policy settings are applied for the Active Directory domain of which the computer is a member. Policy settings configured at this level override settings made at the previous levels.
-
Group Policy settings configured for the Active Directory OU of which the computer is a member are applied. Policy settings configured at this level override settings made at the previous levels.
Resultant Set of Policy (RSoP)
A single computer can be affected by Local Security Policy and any number of Group Polices at different levels. Policy settings are cumulative, so all settings contribute to effective policy. The effective policy is called the Resultant Set of Policy (RSoP).
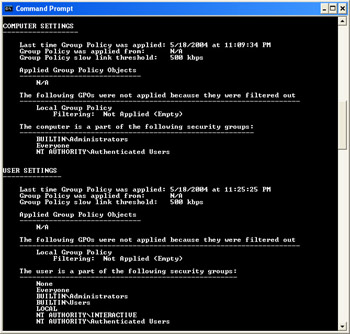
You can view the RSoP for a computer by using the command-line tool gpresult.exe. To display RSoP, open the command prompt on a computer running Windows XP and type gpresult. Windows calculates the RSoP for the computer and displays the results, as shown in Figure 3-7.
| See Also | To learn more about the gpresult tool and for a list of options you can use with it, type gpresult /? at the command prompt. |
The Help And Support Center also includes a tool that shows effective Group Policy settings for the current user. If you are troubleshooting policy settings for a user from a remote location, you can have the user use this tool to export the information to a file. The user can then e-mail the file to you or to an administrator.
To access the Group Policy tool, follow these steps:
-
From the Start menu, select Help And Support.
-
In the right pane of the Help And Support Center window, select Use Tools To View Your Computer Information And Diagnose Problems.
-
In the left pane, in the Tools list, select Advanced System Information.
-
In the right pane, select View Group Policy Settings Applied.
-
Scroll to the bottom of the report that is displayed and select Save This Report To An .Htm File.
-
In the Explorer User Prompt dialog box, type a path and name for the file and click OK.
Configuring Local Security Policy
You can access the Local Security Policy tool, shown in Figure 3-8, from the Administrative Tools window on a computer running Windows XP Professional. The Local Security Policy tool is not available on computers running Windows XP Home Edition.
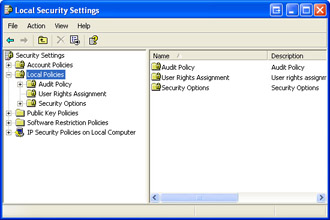
Figure 3-8: Local Security Policy administrative utility.
| Note | Notice that after you launch the Local Security Policy utility, the window is named Local Security Settings. These settings are a subset of the Local Security Policy and can also be modified through the Group Policy utility. |
The Local Security Policy settings that you should be concerned with as a DST are as follows:
-
Account Policies. These include the following:
-
Password Policy, which controls settings such as the minimum and maximum password age, minimum password length, and whether passwords must be complex.
-
Account Lockout Policy, which controls whether user accounts are locked out after a preconfigured number of failed logon attempts.
-
Local Policies. These include the following:
-
Audit Policy, which controls whether various user activities are logged to the Windows Event Log.
-
User Rights Assignment, which controls settings that give users the ability to perform particular operating system tasks, such as backing up the computer, changing the time, or shutting down the computer.
-
Security Options, which control a number of important security settings regarding access to the computer and resources.
Specific settings that are important to DSTs are covered in the following sections.
Password Policy
Password Policy allows you to increase the effectiveness of users’ passwords. By default, users are not required to have passwords, and little control is placed on password usage. Password policies allow you to configure the following settings:
-
Enforce Password History Specifies the number of passwords that Windows XP tracks for each user. When a user attempts to change a password, the user is not permitted to repeat the passwords that Windows is tracking. A setting of 0 effectively disables this option—all passwords, even the current password, could be used.
-
Maximum Password Age Causes passwords to expire after the specified number of days. When the password expires, the user is prompted to change it. This setting ensures that even when passwords are discovered by unauthorized users, they will be changed periodically to increase security.
-
Minimum Password Age Prevents a user from changing a password for the specified number of days.
-
Minimum Password Length Specifies the minimum number of characters that a password must contain. The longer the password, the more difficult it is to guess and the more secure it is.
-
Passwords Must Meet Complexity Requirements Forces users to configure passwords that support a password filter that you install on domain controllers. Password filters enforce more secure password policies. For example, Microsoft provides a filter that forces passwords to be at least six characters long, does not permit the password to contain the user name or parts of the full name, and requires the use of at least three of the following: lowercase letters, uppercase letters, numbers, and symbols.
-
Store Password Using Reversible Encryption For All Users In The DomainAllows passwords to be recovered from the password database in case of emergency. Normally, passwords are stored in an encrypted format that cannot be reversed. Microsoft does not recommend this option. If someone were to break in to the domain, it would then be a simple matter to extract all the user passwords. The option applies in an Active Directory domain environment only.
Account Lockout Policy
Account Lockout Policy allows you configure the computer to stop responding to logon requests from a user who has a valid logon name but who keeps entering the incorrect password. This is called an invalid logon attempt. Generally, too many invalid logon attempts in a short period of time indicates that someone is try to guess the password and break in using that account.
You can configure the following Account Lockout Policy settings:
-
Account Lockout Duration Controls how long the account will be locked out. Setting this value to 0 locks the account indefinitely until an administrator manually unlocks it. The default setting for this value is 30 minutes.
-
Account Lockout Threshold Controls how many invalid logon attempts will trigger account lockout. Setting this value to 0 disables account lockout. The default value for this setting is 0 (account lockout features are disabled by default, providing for an infinite number of incorrect logon attempts).
-
Reset Account Lockout Counter After Enables you to configure the number of minutes that have to pass before the account lockout count is reset to 0. For example, if this option were set to 15 minutes, the account lockout threshold would have to be reached within a 15-minute time frame. If not, the counter would be reset. The default setting for this value is 5 minutes.
When Account Lockout Policy locks an account, an event is placed in the Windows System log, viewable through Event Viewer (which is available in the Administrative Tools folder in Control Panel). You can unlock the account by accessing the properties of the user account in Local Users And Groups or by waiting the number of minutes specified in the account lockout duration.
Audit Policy
Windows XP’s auditing functionality allows you to monitor user and operating system activities on a computer. You can then use this information to detect intruders and other undesirable activity. Understanding how to implement and manage auditing is an important part of overall security policy.
Auditing consists of two major components:
-
Audit Policy Defines the types of events that will be monitored and added to the security logs. The system administrator controls Audit Policy.
-
Audit entries The individual entries added to the Windows security log when an audited event occurs. You can view entries in the security log using Event Viewer.
Choosing Events to Audit You can audit many types of events. You must determine which events to audit based on the specific security needs that are associated with the computer that you are configuring. Events that you can audit are displayed in Table 3-1.
| Auditable Event | Activated When |
|---|---|
| Account Logon Event | A domain controller receives a logon request, or a connection attempt is made to a domain resource. |
| Account Management | A user or group account is created, modified, or deleted. |
| Directory Service Access | An Active Directory object is accessed. |
| Logon Event | A user logs on to or logs off of a local computer. |
| Object Access | An object—such as a file, folder, or printer—is accessed. |
| Policy Change | A policy affecting security settings, user rights, or auditing is modified. |
| Privilege Use | A user right is exercised to perform some type of action, such as changing the system time. |
| Process Tracking | An application executes an action. Generally, this option is used only by programmers who need to track program execution. |
| System Event | A computer is shut down or rebooted, or various events occur that affect security. |
Auditing impairs overall system performance, so be careful when choosing events to be audited. The more events that you audit, the greater the impact on overall system performance, and the larger and more difficult the security logs will be to analyze. Minimize the events to be audited, but make sure that you are auditing enough to meet your security needs. Typically, you will enable auditing when you suspect that there is a security problem and want to verify your suspicion, or when you have particularly sensitive files or computers to protect. Table 3-2 provides several suggestions on events to audit.
| Action to Audit | Choose this Auditable Event |
|---|---|
| Shutting down and restarting the computer, potentially indicating an unauthorized reconfiguration or break-in attempt | System Events |
| Users logging on at odd hours or logging on to computers that they would not normally log on to, indicating a potential break-in or theft | Logon Events (and Account Logon Events in domain environment) |
| Users unsuccessfully attempting to log on, indicating a potential break-in attempt | Logon Events (and Account Logon Events in domain environment) |
| Changes to user and group accounts, potentially indicating that an administrative-level user is making unauthorized changes or providing someone with unauthorized access | Account Management |
| Printer usage, looks for excessive or unauthorized access | Object Access |
| Access to particular files and folders, looking for access by unauthorized users or for odd access patterns that could indicate a potential sabotage or theft incident | Object Access |
Auditing File, Folder, and Printer Access It is not practical for Windows XP to automatically enable auditing on every file, folder, and printer on the computer when object access auditing is enabled. It would create unnecessary overhead and significantly affect computer performance. Therefore, when you configure Audit Policy for file, folder, and printer access, you need to take additional steps. In addition to configuring the Audit Policy, you must also enable auditing on the object that you want to audit. For files and folders to be audited, they must exist on an NTFS partition.
To configure auditing on a file or folder, follow these steps:
-
In Windows Explorer, right-click the file or folder to be audited and select the Properties option.
-
In the Security tab, click Advanced.
-
In the Auditing tab, click Add. The Select User Or Group dialog box is displayed.
-
Add the users or groups whose access you want to audit and then click OK (if you want to audit all access, choose the group Everyone).
-
Configure the type of access that you want to audit. Click OK to exit.
-
The Auditing tab is displayed again. Verify that you have configured auditing the way that you intended and click OK.
To configure auditing for a printer, complete the following steps:
-
In the Printer folder, right-click the printer to be audited and select the Properties option.
-
In the Security tab, click Advanced.
-
In the Auditing tab, click Add. The Select User Or Group dialog box will be displayed.
-
Select the users or groups whose access you want to audit and then click OK. The Auditing Entry dialog box is displayed.
-
Configure the type of access that you want to audit. In this case, we chose to audit successful printing events, permitting us to monitor printer usage. Click OK when complete.
-
The Auditing tab is displayed again. Verify that you have configured auditing the way that you intended and then click OK.
Viewing Audit Entries in the Security Log For auditing to be a useful security tool, you must review and archive the Security Log regularly. You can view the Security Log by using the Event Viewer.
Figure 3-9 shows the Security Log on a typical Windows XP computer. Notice that both success and failure entries are stored in the same log.
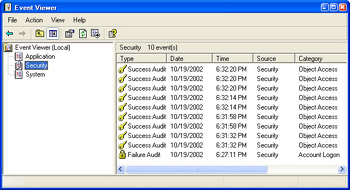
Figure 3-9: Use Event Viewer to view the Windows XP Security Log.
Figure 3-10 shows a failed audit entry—in this case, a failed logon attempt. The event properties contain the date and time that the event occurred, the user name that was used, and the computer on which the event occurred. Other types of audit entries will contain different information but at a similar level of detail.
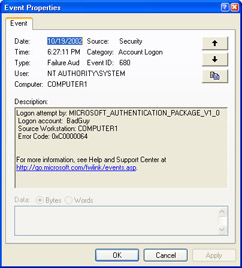
Figure 3-10: Viewing a failed audit entry.
User Rights Assignment
A User Rights Assignment gives the user the ability to perform a particular task, such as back up the computer, change the time, or shut down the computer. User rights are very different from permissions. User rights pertain to a user’s ability to perform specific functions on a computer. Permissions control a user’s ability to access resources such as files, folders, and printers.
There are many user rights that you can assign. The following are several of the more commonly used options:
-
Access This Computer From The Network Allows users to connect to the computer through the network. This is enabled for Everyone by default. If you remove Everyone from this setting, no one could connect to any shares on this computer, including home folders and roaming profile folders.
-
Add Workstations To Domain Allows users to join computers with the domain.
-
Back Up Files And Directories Allows users to bypass file system security and back up all files and folders on the computer. There is a corresponding user right called Restore Files And Directories, which gives users the ability to perform file and folder restores.
-
Change The System Time Allows users to change the time, date, and time zone on a computer. Some functions are time-dependent, such as logon time restrictions, and you may not want general users to be able to change the time and interfere with such operations.
-
Log On Locally Allows users to log on directly to a computer. To clarify, it means that the user can sit in front of the computer, do a Ctrl+Alt+Delete, and log on. The other method of connecting to a computer is through the network, which is controlled through the Access This Computer From The Network user right.
-
Shut Down The Computer Allows users to shut down the computer. Computer shutdown interferes with the users’ ability to access a server’s resources. Also, shutting down and restarting the computer is required to activate certain critical reconfiguration options. The right to shut down the computer should be severely limited on machines that are functioning as servers, but can be granted as necessary on workstations.
-
Take Ownership Of Files Or Other Objects Allows users to take ownership of any resource on the computer. If a user owns a resource, that user has the ability to assign permissions to it. You need to be careful assigning this right because it allows users access to every resource on the computer. By default, only administrators can take ownership, which is required for them to fully manage the resources on the computer.
Security Options
Security options apply to the entire system rather than to a particular user. All users on the computer will be affected by security options. You can configure options such as prompting users to change their passwords a certain number of days before they expire and displaying a message to the users at logon.
There are many security options available. Important settings include the following:
-
Shutdown: Allow System To Be Shut Down Without Having To Log On Allows users to perform a shutdown without having to be authenticated to the computer. Users perform this action by pressing Ctrl+Alt+Delete and selecting the Shutdown option at the Log On To Windows dialog box. This option is disabled by default.
-
Microsoft Network Server: Amount Of Idle Time Required Before Suspending A Session Defines how long, in minutes, a connection to this computer can be idle before it is disconnected. If a user connects to a server but then does not use the connection for awhile, it takes up resources on the server. By default, the computer automatically drops idle connections after 15 minutes.
-
Network Security: Force Logoff When Logon Hours Expire Works in conjunction with the logon hours that are defined for user accounts. This setting controls whether users will be automatically disconnected when their logon hours expire. If this option is disabled, it means that users can stay logged on after their logon hours expire if they are already logged on, but they cannot establish a new session.
-
Interactive Logon: Do Not Require CTRL+ALT+DELETE Allows you to control whether the user has to press that keystroke combination when logging on. This is an important security feature of Windows XP because the Ctrl+Alt+Delete sequence suspends processing during logon and prevents applications from running that may be trying to capture a user’s credentials.
-
Interactive Logon: Do Not Display Last User Name Causes the computer to not display the name of the last user who logged on in the Log On To Windows dialog box. If someone is trying to break into the computer, that person needs a user name and password; and if a valid user name is displayed when Ctrl+Alt+Delete is entered, the user already has half of the needed information.
-
Interactive Logon: Message Text/Title For Users Attempting To Log On Displays a dialog box when a user uses Ctrl+Alt+Delete to log on. The message is generally used to warn users that unauthorized access to the computer is prohibited for legal reasons, but you can use it for general communication if you need to.
-
Interactive Logon: Prompt User To Change Password Before Expiration Causes the computer to start prompting users for a new password a specific number of days before their password actually expires. This is an important option because if a user’s password expires, the user may not be able to log on to change it, and the network administrator will have to change the user’s password manually.
Lesson Review
The following questions are intended to reinforce key information presented in this lesson. If you are unable to answer a question, review the lesson materials and try the question again. You can find answers to the questions in the “Questions and Answers” section at the end of this chapter.
-
Which Password Policy setting permits you to specify the number of passwords that Windows XP keeps track of for each user so that when a user attempts to change a password, the user cannot reuse any of the passwords that the computer is keeping track of?
-
Enforce Password History
-
Maximum Password Numbers
-
Minimum Password Numbers
-
Password Must Meet Complexity
-
-
What is the primary disavantage associated with auditing? Under what circumstances should you use auditing?
Lesson Summary
-
Local Security Policy enables the administrator to do such things as set minimum password lengths, set account lockout policies to protect against break-ins, and control who can access the computer through the network.
-
Password Policy enables you to increase the effectiveness of users’ passwords. By default, users are not required to have passwords, and little control is placed on password usage.
-
Account Lockout Policy enables you to configure the computer to stop responding to logon requests from a user who has a valid logon name but who keeps entering an incorrect password. Generally, too many invalid logon attempts in a short time indicate that someone is try to guess the password and break in using that account.
-
Windows XP’s auditing functionality enables you to monitor user and operating system activities on a computer. You can then use this information to detect intruders and other undesirable activity. Understanding how to implement and manage auditing is an important part of overall security policy.
-
A User Rights Assignment gives the user the ability to perform a particular task, such as backing up the computer, changing the time, or shutting down the computer. User rights are very different from permissions. User rights pertain to a user’s ability to perform specific functions on a computer. Permissions control a user’s ability to access resources such as files, folders, and printers.
EAN: N/A
Pages: 195
- Key #2: Improve Your Processes
- Beyond the Basics: The Five Laws of Lean Six Sigma
- Making Improvements That Last: An Illustrated Guide to DMAIC and the Lean Six Sigma Toolkit
- The Experience of Making Improvements: What Its Like to Work on Lean Six Sigma Projects
- Six Things Managers Must Do: How to Support Lean Six Sigma