Lesson 1: Supporting Local User Accounts and Groups
A user account is a collection of settings that define the actions that a user can perform after the user has logged on to Windows XP. Windows controls access to system resources based on the permissions and user rights that are associated with each user account. User rights are very different from permissions. User rights pertain to a user’s ability to perform specific functions on a computer. Permissions control a user’s ability to access resources such as files, folders, and printers. Local user accounts control access to resources on the local computer, and domain user accounts control access to resources on a network running Active Directory directory service. You can use security groups (both at the local and domain level) to organize users according to common access needs. As a DST, you are responsible for creating, configuring, and troubleshooting local user accounts and local security groups in a workgroup setting. In a domain setting, you are not responsible for creating and managing user accounts or groups, but you might be called on to help troubleshoot logon problems for domain users.
After this lesson, you will be able to
-
Explain the difference between local and domain accounts.
-
Identify the built-in user accounts that are available in Windows XP Professional.
-
Create and modify a user account in Windows XP Professional.
-
Explain the use of groups.
-
Create and add members to a group in Windows XP Professional.
-
Explain the limitations of user accounts in Windows XP Home Edition.
-
Configure Fast User Switching.
Estimated lesson time: 45 minutes
Understanding Logon
As you learned in Chapter 1, “Introduction to Desktop Support,” a computer running Windows XP Professional can be a member of either a workgroup or a domain (Windows XP Home Edition does not support domain membership). Even if you have a single computer running in isolation, it is still a member of a workgroup. Computers in a workgroup rely on local security databases that are stored on each individual computer. Computers in a domain rely on a security database that is part of Active Directory.
When you log on to a computer that is in a workgroup, you log on locally to that computer. This means that the user name and password that you enter is checked against the local accounts database of the computer on which you are working. If you provide proper credentials, you gain access to the Windows desktop and any local resources that you have permission to use.
When you log on to a computer that is a member of a domain, you have two choices presented to you at the logon screen. You can log on to the local computer or you can log on to the domain. If you log on to the domain, your credentials are checked against a list of users that are defined in Active Directory. These credentials control your access to resources both on the local computer and on the network. Users in a domain environment should almost always log on to the domain rather than to the local computer, making local user accounts less important in a domain than they are in a workgroup. However, the ability to log on locally is useful for troubleshooting logon problems because it bypasses Active Directory.
| Note | This lesson focuses on features that are provided by Windows XP Professional. Windows XP Home Edition provides only a subset of these features. At the end of the lesson, you will find detailed information on the differences between Windows XP Professional and Windows XP Home Edition. |
You will use local user accounts for the following purposes:
-
To gain initial access to the computer
-
To control access to local computer resources
-
To control access to network resources in a workgroup environment
In Windows XP Professional, you can create groups by using one of the follwing tools:
-
User Accounts tool The User Accounts tool is available in Control Panel. This tool provides a simple interface for creating user accounts and a limited set of options for managing accounts, such as the ability to change passwords and change the basic account type.
-
Local Users And Groups tool The Local Users And Groups tool, which is shown in Figure 3-1, can be accessed through the Administrative Tools folder. This tool provides a much richer environment for creating and managing users than does the User Accounts tool. You can use the Local Users And Groups tool to perform all actions allowed by the User Accounts tool, as well as a number of additional actions. For this reason, this lesson focuses on using the Local Users And Groups tool.
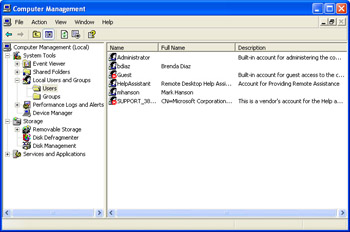
Figure 3-1: Use the Local Users And Groups tool to manage accounts.
Default User Accounts
When you install Windows XP Professional, the setup program creates several initial user accounts automatically. These built-in user accounts are as follows:
-
Administrator The local Administrator account is arguably the most important user account on a computer. This account is a member of the Administrators group and has full access to the computer. You should use the Administrator account to manage a computer; it is not for daily use. If you find that a user is using the Administrator account regularly, encourage the user to create a separate account for regular use.
Tip The initial password for the Administrator account is assigned during the installation of Windows XP Professional. If you log on to a computer running Windows XP for the first time and do not recall being asked to assign a password during installation, you may have created a blank password by accident. If you did assign a password and it is not being recognized at first logon, you may be entering the password in the incorrect case. Windows XP passwords are case sensitive.
-
Guest The Guest account has limited privileges on a computer and is used to provide access to users who do not have a user account on the computer. Although the Guest account can be useful for providing limited access to a computer, the account does present security problems because by design the Guest account allows anyone to log on to the computer. For a more secure environment, disable the Guest account and create a normal user account for anyone who needs to use the computer.
-
HelpAssistant The HelpAssistant account is not available for standard logon. Instead, this account is used to authenticate users that connect by using Remote Assistance. Windows enables this account automatically when a user creates a remote assistance invitation and disables the account automatically when all invitations have expired. You will learn more about Remote Assistance in Chapter 10, “Supporting Network Connectivity.”
-
SUPPORT_xxxxx The SUPPORT_xxxxx account (where xxxxx is a random number generated during Windows setup) is used by Microsoft when providing remote support through the Help And Support Service. It is not available for logon or general use.
Although you cannot delete any of the built-in user accounts, you can rename or disable them. To rename a user account, right-click the account in the Computer Management window and then select Rename. You will learn more about disabling accounts later in this lesson.
Creating User Accounts
Each user in an organization should have a unique user account, which allows Windows to control what each user can access and allows an administrator to monitor users’ access to resources by using the auditing features in Windows XP. Each user should have a unique user account. You should encourage users not to share accounts because it is harder to secure resources according the needs of individual users when users share accounts.
To create a local user account, you must log on to a computer by using the built-in Administrator account or by using any user account that is a member of the Administrators or Power Users groups.
Creating User Accounts in Windows XP Professional
To create user accounts in Windows XP Professional, follow these steps:
-
From the Start menu, select Control Panel.
-
In Control Panel, select Performance And Maintenance.
-
In the Performance And Maintenance window, select Administrative Tools.
-
In the Administrative Tools window, select Computer Management.
Tip There is a shorter way to open the Computer Management window than by going through Control Panel. Just right-click the My Computer icon and then select Manage.
-
In the Computer Management window, expand the System Tools node and then expand the Local Users And Groups node.
-
Under the Local Users And Groups node, right-click the Users folder and select New User.
-
In the New User dialog box, enter the appropriate information, as shown in Figure 3-2.

Figure 3-2: Creating a new user. -
Click Create when finished. The new user will appear in the Users folder.
When you create a user, you can supply the following information:
-
User Name The user name is the name that the user will enter to log on to the computer. You must specify a user name for each user. When you enter the user name, Windows XP preserves the case, but user names are not case sensitive. User names can be up to 20 characters in length, cannot consist entirely of spaces or periods, and must be unique in the local accounts database. User names cannot contain the following characters: * / \ [ ] : ; = , + ? < > “.
-
Full Name You can also enter the user’s complete name. This is optional information that helps more clearly identify the user. The full name does not have any functional relationship to the logon user name.
-
Description The description is also optional and is used for informational purposes only. You could enter a user’s title, department, or any other information that you think is appropriate.
-
Password Passwords can be up to 128 characters in length and are case sensitive. You must confirm the entry of the password to ensure that no typing errors were made in the initial password entry. For more information on passwords, see the Real World sidebar, “Creating Strong Passwords.”
-
User Must Change Password At Next Logon This option, which is selected by default, configures Windows XP to prompt users to change the password the next time that they log on. It is a good idea to specify this setting for new user accounts. You can assign all user accounts the same initial password and then have users change their password to something more appropriate for them.
-
User Cannot Change Password This option prevents users from ever changing their passwords. This option is not selected by default and is rarely used because it is a good security practice to have users change their passwords regularly. However, sometimes you might want the administrator to be in control of the passwords, such as for the Guest account or other accounts that could be shared by multiple users. This option is not available if the User Must Change Password At Next Logon option is selected.
-
Password Never Expires This option overrides any password expiration policies that are configured by using Local Security Policy or Group Policy. See Lesson 3, “Supporting Security Settings and Local Security Policy,” for more information. This option is not available if the User Must Change Password At Next Logon option is selected.
-
Account Is Disabled This option prevents the account from being used for logon purposes. If a user tries to log on as a disabled account, that user will receive an error message and is not granted access. For security purposes, you may choose to leave all new user accounts disabled until the first time the user needs access. This is especially true if you assign all new users the same password (that password will be commonly known in your organization).
Weak passwords are one of the big security risks in most environments. For this reason, you should encourage users to select and use strong passwords, even if they do not really want to. The following list shows why common password selections are considered weak:
-
Using no password at all is not a good practice because it is then easy for other users to just walk up to an unsecured computer and log on.
-
Using a real name, user name, or company name makes for an easy-to-guess password. Also avoid using common passwords such as “letmein” or “password.”
-
Using a common dictionary word makes you vulnerable to automated programs that are designed to guess passwords.
-
Using any password that you write down or that you share with someone else is not secure.
On the other hand, you can use the following guidelines to create strong passwords:
-
Passwords should be at least eight characters long—and longer is better.
-
Passwords should use a combination of lowercase and uppercase letters, numbers, and symbols (for example, ` ~ ! @ # $ % ^ & * ( ) _ + - = { } | [ ] \ : “ ; ‘ < > ? , . / or a space character).
-
Passwords should be changed regularly.
An example of a strong password using these guidelines is X2#hg&5T.
If users find that complex passwords are difficult to remember, tell them that Windows XP allows the use of passphrases instead of passwords. For example, a perfectly valid password in Windows XP is “My grandmother enjoys gardening 3 times each week.” Another technique is to join together simple words with numbers and symbols. An example of a password that uses this technique is “2roosters+2hens=4chicks” (bad math, but an easy-to-remember password).
Managing User Accounts
During the creation of a user account, you can configure only a subset of the available account properties. After you create an account, you can configure several more properties by right-clicking the user account in the Local Users And Groups tool and then selecting Properties.
The General tab of the Properties dialog box for a user account, shown in Figure 3-3, allows you to reconfigure information that you provided when you created the account. The General tab also provides the option to disable an account, which is a useful security measure if the user has left the organization or will be out of the office for a long time.
The Member Of tab in the user account’s Properties dialog box shows the groups that the user account is a member of. You will learn more about groups in the section, “Supporting Groups,” later in this lesson.
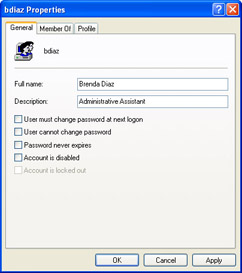
Figure 3-3: Use the General tab of a user account’s Properties dialog box to modify basic account properties.
The Profile tab, shown in Figure 3-4, allows you to configure user profiles and the path to the user’s home folder. These options allow administrators to customize the user’s working environment, if necessary.
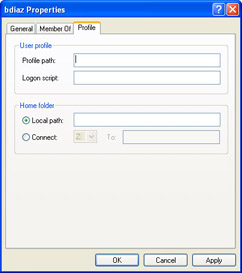
Figure 3-4: Use the Profile tab of the user account’s Properties dialog box to specify a user profile and home folder.
You will learn more about using user profiles in the section, “User Profiles,” later in this lesson. Home folders are shared folders on a network server in which users can store files. In a networked environment, using centralized network storage for user documents instead of storing documents on each local computer can make security and backups easier to manage. As a DST, you will not be asked to configure home folders in a domain-based environment. However, you might need to configure home folders for users in a workgroup.
In addition to configuring user account settings by using the user account’s Properties dialog box, you can also perform several important user-management functions by right-clicking a user account in the Local Users And Groups window:
-
Set Password Use this option to reset a user’s password. You do not need to know the existing password to change it.
-
Delete Use this to option to delete user accounts if they are no longer necessary. Note that after you delete an account, you cannot recover it. For this reason, it is usually better to disable accounts than to delete them.
-
Rename Use this option to rename a user account if someone leaves an organization and someone else takes over that user’s job responsibilities. You can rename the existing user account and change the password (for security reasons); you do not have to create a new account for the new user.
Supporting Groups
Groups simplify the assignment of permissions and user rights to user accounts. You can assign permissions and user rights to a group and then include users in that group instead of assigning the permissions and rights to each individual user account. For example, assume that there are 20 users who all need access to one particular printer. You could handle this task in one of two ways:
-
You could assign access to the printer to each of those 20 user accounts individually. This method is time-consuming and introduces a greater possibility of error with each additional user account that you configure.
-
You could create a single group, make the 20 user accounts members of that group, and then assign access to the printer to the group. All users who are members of a group automatically receive permissions that are assigned to the group. This method simplifies administrative tasks. If an additional user account needs access to the printer, you can simply add that user account to the group. If a user no longer needs access, you can remove the user account from the group.
Default Group Accounts
Windows XP Professional includes several built-in groups:
-
Administrators Group Has full control over the computer and can perform all management functions. The Administrator user account is a member of this group by default.
-
Backup Operators Group Backs up and restores all files on the computer. When using the backup utility, backup operators have access to the entire file system, even if they do not normally have permission to access each of the files. This group has no members by default.
-
Guests Group Has very limited access to the computer. In addition, members of this group cannot maintain individual user profile information—all members of the Guests group share the same profile. The Guest user account is a member of this group by default.
-
Network Configuration Operators Group Manages some aspects of the network configuration of the computer. Tasks that members of this group can perform include modifying Transmission Control Protocol/Internet Protocol (TCP/IP) properties, renaming local area network (LAN) connections, enabling/disabling LAN connections, and issuing Ipconfig release and renew commands. This group has no members by default.
-
Power Users Group Performs many management tasks on the computer, but does not have the full administrative privileges of the Administrator account. For example, Power Users can create user accounts and groups (and manage the user accounts and groups that they create), but they cannot manage objects that are created by members of the Administrators group. Also, Power Users do not have access to files and folders unless they are granted permissions. This group has no members by default.
-
Remote Desktop Users Group Grants the right to log on to the computer from a remote computer, which is required for Remote Desktop access. The group has no members by default.
-
Replicator Group Facilitates directory and file replication in domain environments. This group has no members by default.
-
Users Group Has limited permissions by default. You can add or remove user accounts from this group as necessary. All user accounts on a computer (except for the Guest account) are members of this group by default.
-
HelpServicesGroup Uses certain helper applications and diagnoses computer problems. By default, the member of this group is an account associated with Microsoft support applications, such as Remote Assistance, and you should not add regular users to this group. The HelpServicesGroup has no explicit User Privileges by default. The SUPPORT user account is a member of this group by default.
When a Windows XP computer joins a domain, Windows automatically adds several domain-based groups to local groups. These new memberships are as follows:
-
The domain group Domain Admins is added to the local Administrators group, allowing the administrators of the domain to have administrative control over the computers that join the domain.
-
The domain group Domain Guests is added to the local Guests group.
-
The domain group Domain Users is added to the local Users group.
Domain Admins, Domain Guests, and Domain Users are predefined groups that exist on Windows domain controllers only. These group membership additions are not permanent and can be removed after the computer has joined the domain. The automatic addition of these domain-based groups allows domain administrators to configure access to resources that are connected to the local computer. For example, a Windows XP Professional computer might have a shared printer to which all users in the domain should have access. By default, the local Users group has access the printer. After the Domain Users group is made a member of the local Users group, Domain Users can also access the printer without requiring any additional configuration.
Special Groups
Special groups are also built into Windows XP. The operating system classifies users based on different properties and places them into special groups accordingly. Special group membership is automatic; you cannot manage the membership of special groups with any Windows XP utility. You have access to special groups only when assigning user rights and permissions; you cannot access special groups through the Local Users And Groups tool.
Windows XP Professional includes the following special groups:
-
Everyone group Includes all users who can access the computer in any way, including the Guest account.
-
Authenticated Users group Includes all users who have authenticated to a trusted domain.
-
Interactive group Includes the user who is currently logged on locally to the computer.
-
Network group Includes users who are currently accessing the computer through a connection over the network.
When a user logs on locally to a computer running Windows XP, Windows makes that user a member of the Everyone and Interactive groups (and the Authenticated Users group if the user has authenticated to a domain from the computer). If the user connects to the computer over the network with a valid user name and password, Windows makes that user a member of the Everyone, Network, and (potentially) Authenticated Users groups.
If you want a user to have permission to access a certain resource, such as a printer, only when logged on locally, you assign access to the Interactive special group. Conversely, if you want a user to have access to a certain resource only when connecting through the network, you assign access to the Network special group.
The Everyone and Authenticated Users groups allow you to differentiate between users who have logged on to a domain and users who have logged on using an account in the local accounts database of a computer running Windows XP. Domain accounts are more secure than local accounts because the administrators of the domain create and manage domain accounts, whereas anyone who has local administrative privileges on a particular computer can manipulate local accounts. For resources that require higher security, you should assign access to the Authenticated Users group, not to the Everyone group.
Creating Groups
To create a group, you must be logged in as a member of the Administrators or Power Users groups.
To create a group, follow these steps:
-
In the Computer Management window, expand the System Tools node and then expand the Local Users And Groups node.
-
Right-click the Groups folder, and select New Group.
-
Enter the group name and description as well as the group members, as illustrated in Figure 3-5. Group names can be up to 256 characters long.
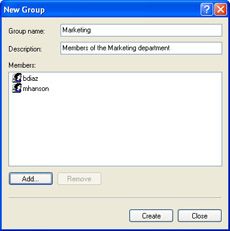
Figure 3-5: Type a name and description for the new group; then add members. -
Click Create when finished. The new group appears in the Groups folder.
Note Members of the Power Users group can manage only the groups that they create. They cannot manage groups that are created by the Administrators group and they cannot manipulate the membership of the default group accounts.
Adding User Accounts to Groups
You can modify group membership at the time you create the group or afterward. After creating a group, you can add user accounts to the group in the following ways:
-
Open the Properties dialog box for a user and add the group on the Member Of tab.
-
Open the Properties dialog box of a group and add members on the General tab.
Tip To select multiple users simultaneously, select the first user, and then press and hold either the Shift or Ctrl key. The Shift key allows you to select an entire range of users. The Ctrl key allows you to add individual users to the selection. After you have selected users, right-click any of the selected users and choose Properties to modify settings common to the users, such as group membership.
Security Identifiers (SIDs)
User accounts and groups are considered security principals, meaning that you can grant them access to resources on a computer. Windows assigns each security principal a unique Security Identifier (SID) when you create the user account.
Although you manage user accounts and groups by name, Windows tracks these objects by using the SIDs. It is more efficient for the operating system to use the SID to identify a user (instead of the user name or full name) because those names may change.
Keep the following items in mind concerning SIDs:
-
When you rename a user or group account, the SID does not change, and all rights and permissions are preserved.
-
If you delete a user or group account, all security assignments that are associated with the account are also deleted. Windows does not reuse the SID that was assigned to the account. If you create a new account by using the same user name, the new account will not receive the same security assignment as the previous account. Even if the accounts share the same name, they do not share the same SID.
Understanding the Limitations of Windows XP Home Edition
So far, this discussion focused on supporting users and groups in Windows XP Professional. Although you can create user accounts in Windows XP Home Edition, you cannot create groups or perform as much user account management as you can in Windows XP Professional.
When supporting Windows XP Home Edition, you should be aware of the following limitations:
-
Windows XP Home Edition does not support the creation of local groups.
-
The Local Users And Groups tool is not available in Windows XP Home Edition. Instead, you must create and manage users through the User Accounts tool in Control Panel. You are limited to creating and deleting accounts, changing passwords, and several other minor activities.
-
Windows XP Home Edition supports only two types of accounts: Computer Administrator, which works much like the Administrators group in Windows XP Professional; and Limited, which limits access to certain resources.
-
Windows XP Home Edition does not have an account named Administrator. Following setup, Windows allows you to create one or more user accounts. Each of the accounts you create at this point is made a Computer Administrator account, although you can change any of the accounts to a Limited account if you want.
-
Computers running Windows XP Home Edition cannot join a domain.
User Profiles
Each user account in Windows XP Professional and Windows XP Home Edition has an associated user profile that stores user-specific configuration settings, such as a customized desktop or personalized application settings. Understanding how user profiles function and how to control them allows you to effectively manage the user’s desktop environment.
Windows XP supports the following types of user profiles:
-
Local A local user profile is available only on the computer on which it was created. A unique local user profile is created and stored on each computer that a user logs on to. Both Windows XP Professional and Windows XP Home Edition support local user profiles.
-
Roaming Roaming profiles are stored in a shared folder on a network server and are accessible from any location in the network. Only Windows XP Professional supports roaming user profiles.
-
Mandatory Mandatory user profiles are roaming user profiles that users cannot make permanent changes to. Mandatory profiles are used to enforce configuration settings. Only Windows XP Professional supports roaming user profiles.
As a DST, you will mostly be concerned with local user profiles. You should understand where Windows stores local profiles and the type of information found in a local profile. If you are working in a corporate environment, you may also encounter roaming and mandatory profiles. However, you will not have to create or configure them.
Local Profile Storage
Windows stores local user profiles in the Documents And Settings folder hierarchy on the system_root drive. When a user first logs on to a computer running Windows XP, Windows creates a folder in Documents And Settings that matches the user’s user name. Figure 3-6 shows a Documents And Settings folder that includes several user profile folders.
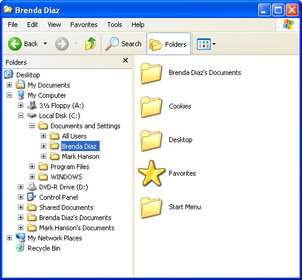
Figure 3-6: Windows stores user profile folders in the Documents And Settings folder.
Within each user profile, several files and folders contain configuration information and data, including the following:
-
Application Data Contains application configuration information. Applications that are designed for Windows XP can take advantage of this folder to store user- specific configuration settings. This folder is hidden by default.
-
Cookies Contains cookie files, which websites usually create to store user information and preferences on the local computer. When you return to a site, the cookie files allow the site to provide you with customized content and track your activity within the site.
-
Desktop Contains files, folders, and shortcuts that have been placed on the Windows XP desktop.
-
Favorites Stores shortcuts to locations that a user has added to the Favorites list in Windows Explorer or Internet Explorer.
-
Local Settings Holds application data, history, and temporary files (including temporary Internet files). This folder is hidden.
-
My Documents Stores documents and other user data. My Documents is easily accessible from the Start menu.
-
My Recent Documents Contains shortcuts to recently accessed documents and folders. You can also access My Recent Documents from the Start Menu. This folder is hidden.
-
NetHood Holds shortcuts created by the Add Network Place option in My Network Places. This folder is hidden.
-
PrintHood Contains shortcuts to printer folder items. This folder is hidden.
-
SendTo Contains shortcuts to document-handling utilities, such as e-mail applications. These shortcuts are displayed on the Send To option on the action menu for files and folders. This folder is hidden.
-
Start Menu Holds the shortcuts to programs that are displayed in the Start menu. One way to modify the Start menu is to add or delete folders and shortcuts to the Start Menu folder within a user’s profile folder.
-
Templates Contains template items that are created by user applications and are used by those applications when a user creates a new document. This folder is hidden.
-
NTUSER.DAT The user-specific portion of the Registry. This file contains configuration changes made to Windows Explorer and the taskbar, as well as user-specific Control Panel and Accessories settings. These settings are visible under HKEY_CURRENT_USER in the Registry.
-
NTUSER.DAT.LOG A log file used as part of the process of committing changes to NTUSER.DAT and also in the recovery of NTUSER.DAT if the computer crashes.
Built-In User Profiles
Windows stores user profiles locally by default. A local user profile is available only on the computer on which it was created. Windows creates two built-in local user profiles during installation:
-
Default User profile Windows uses the Default User profile as a template to create all new profiles on the computer. When a new user logs on, the user receives a copy of the Default User profile as his or her own personal user profile. You can customize the Default User profile to control which options and settings a new user will receive. Modifications to the Default User profile affect only the profiles of new users—existing personal profiles are not affected. The Default User profile is stored in the \Documents and Settings\Default User folder, which is hidden. To view and work with this folder, you must set the Folder Options in Windows Explorer to include hidden files and folders.
-
All Users profile The All Users profile contains settings that apply to every user who logs on to the computer. Windows merges the settings in All Users with the current user’s profile for the duration of the logon session, but the settings are not made a permanent part of the user’s profile. You can modify the All Users profile to contain settings that all users logging on to the computer should have. For example, many applications create shortcuts in the Start menu or desktop of the All Users profile during installation. This ensures that all users who log on to the computer have easy access to those applications. As an administrator, you can directly edit the All Users profile to add and remove items as necessary. The All Users profile is stored in the \Documents and Settings\All Users folder. The folder contains only a subset of the folders contained in other profiles on the computer, because it is concerned only with settings that could potentially apply to everyone.
Using Multiple Profiles for the Same User Account
If a computer running Windows XP Professional is a member of a Windows domain, there is the potential for two users with the same user account name to log on to the same computer. An example of this might involve the local Administrator account (stored in the local accounts database of the Windows XP computer) and the domain Administrator account (stored in the Active Directory database on the domain controllers). The local account and the domain account are discrete entities, each maintaining a different user profile.
Windows XP does not allow two user accounts with the same name to share the same profile folder (for example, C:\Documents and Settings\Administrator). If Windows did allow this to happen, the profile of one user would overwrite the profile of the other. Instead, Windows creates the profile of the first user to log on using the user name of the user in \Documents and Settings\%username%. Windows stores subsequent user accounts with the same name using the path \Documents and Settings\%username%.x. The folder extension (x) varies as follows:
-
If the additional user to log on with the same user name is a domain account, Windows creates the folder extension using the name of the domain.
-
If the additional user to log on with the same user name is a local account, Windows creates the folder extension using the name of the computer.
For example, if the local Administrator logs on first and the domain Administrator logs on second, Windows stores the local Administrator’s profile in the Administrator folder, and the domain Administrator’s profile is stored in a folder named Administrator.<domain_name>.
Multiple user profiles are an issue only when the computer is a member of a domain because domain membership enables both local and domain accounts to log on. In a workgroup environment, Windows XP relies solely on the local accounts database, and you cannot create two user accounts of the same name on the same computer.
Using Fast User Switching
Fast User Switching is a feature introduced with Windows XP that allows multiple local user accounts to log on to a computer simultaneously. When you enable Fast User Switching, users can switch sessions without logging off or closing programs.
Although Fast User Switching is a useful tool on computers with multiple users, you should use it with care. When a user leaves programs running to switch to another user account, those programs still consume computer resources. If several users remain logged on with programs running, the performance of the computer will decline noticeably.
| Exam Tip | If a user, especially a home user, complains to you about a computer seeming to run slowly, be sure to ask whether the computer has Fast User Switching enabled. |
Fast User Switching is enabled by default in Windows XP Home Edition and Windows XP Professional on computers with more than 64 MB of RAM. However, Fast User Switching is not available on computers running Windows XP Professional that are members of a domain.
To enable Fast User Switching, follow these steps:
-
Log on to the computer with a user account that has administrative privileges.
-
From the Start menu, select Control Panel.
-
In Control Panel, select User Accounts.
-
In the User Accounts window, select User Accounts.
-
In the User Accounts dialog box, select Change The Way Users Log On Or Off.
-
Select Use Fast User Switching and then click Apply Options.
When a user initiates the Switch User option, the computer returns to the Welcome screen. The current user’s session remains active, and another user can then log on and use the computer. You can initiate the Switch User command using one of the following options:
-
Click Start, click Log Off, and then click Switch User.
-
Press Ctrl+Alt+Delete to open Task Manager. From the Shut Down menu, click Switch User.
-
Hold down the Windows key, and then press the L key.
Practice: Work with Local User Accounts and Groups
In this practice, you will create a new local user account and then modify the account using the Computer Management tool in Windows XP Professional. You will also create a new local group and then add user accounts to it.
Exercise 1: Create a User Account
-
From the Start menu, select Control Panel.
-
In Control Panel, select Performance And Maintenance.
-
In the Performance and Maintenance window, select Administrative Tools.
-
In the Administrative Tools window, select Computer Management.
-
In the Computer Management window, expand the System Tools node and then expand the Local Users And Groups node.
-
Under the Local Users And Groups node, right-click the Users folder and select New User.
-
In the New User dialog box, type a user name. Optionally, you can also enter a full name, description, and password.
-
Click Create.
-
Click Close to exit the New User dialog box.
Exercise 2: Modify an Existing User Account
-
From the Start menu, select Control Panel.
-
In Control Panel, select Performance And Maintenance.
-
In the Performance And Maintenance window, select Administrative Tools.
-
In the Administrative Tools window, select Computer Management.
-
In the Computer Management window, expand the System Tools node and then expand the Local Users And Groups node.
-
Under the Local Users And Groups node, select the Users folder.
-
Right-click the user account you created in the previous exercise and select Properties.
-
In the user account’s Properties dialog box, on the General tab, change the full name and description of the user.
-
On the Member Of tab, click Add.
-
In the Select Groups dialog box, click Advanced.
-
Click Find Now.
-
In the list of groups, select Power Users and click OK. Click OK again to close the Select Groups dialog box.
-
Click OK to close the user account’s Properties dialog box.
Exercise 3: Create a Group Account and Add User Accounts
-
From the Start menu, select Control Panel.
-
In Control Panel, select Performance And Maintenance.
-
In the Performance And Maintenance window, select Administrative Tools.
-
In the Administrative Tools window, select Computer Management.
-
In the Computer Management window, expand the System Tools node and then expand the Local Users And Groups node.
-
Under the Local Users And Groups node, right-click the Groups folder and select New Group.
-
In the New Group dialog box, type a name for the group. Optionally, you can also type a description.
-
Click Add.
-
In the Select Groups dialog box, click Advanced.
-
Click Find Now.
-
In the list of groups, select the user account you created in Exercise 1 and click OK. Click OK again to close the Select Groups dialog box.
-
Click Create to create the new group. Click Close to close the New Group dialog box.
Lesson Review
The following questions are intended to reinforce key information presented in this lesson. If you are unable to answer a question, review the lesson materials and try the question again. You can find answers to the questions in the “Questions and Answers” section at the end of this chapter.
-
What utilities can you use to create user accounts on a Windows XP Professional computer?
-
What important limitations should you be aware of when supporting Windows XP Home Edition?
-
List the default user accounts in Windows XP Professional.
Lesson Summary
-
User accounts allow users to log on to a computer or to a domain, and subsequently gain access to local and network resources.
-
Group accounts simplify the assignment of security features by allowing you to assign access to groups and then include users in those groups.
-
Domain Admins, Domain Guests, and Domain Users are predefined groups that exist on Windows domain controllers only. These domain-based groups are made members of local groups automatically when a computer joins a domain.
-
Windows XP Home Edition does not support the use of groups, support the ability to join a domain, or include the Local Users and Groups tool.
-
Fast User Switching is a feature introduced with Windows XP that allows multiple local user accounts to log on to a computer simultaneously. When Fast User Switching is enabled, users can switch sessions without logging off or closing programs.
EAN: N/A
Pages: 195