Preparing for the Installation
Although it’s tempting (and easy enough) simply to insert the Exchange Server CD-ROM and go through the Setup routine, it’s best to take care of a few chores first. You should verify that your server is correctly configured, gather some information, and set up special accounts. If you created a good deployment plan, you probably have all the information you need.
If you are considering upgrading your Exchange organization to Exchange Server 2003 from a previous version, we recommend trying the new version on a nonproduction server first to get a feel for its new features. You might also want to test-drive the software even if you are creating a new system rather than upgrading. Testing Exchange Server 2003 before deployment can help you plan the best ways to implement some of the features offered by the new version as those decisions come up during the “real” installation.
If you do decide to take Exchange Server 2003 for a test drive, we recommend setting up a test network that is physically separate from your actual network. If you do not have the resources for a separate network, you can test Exchange Server 2003 on a server on your existing network.
Gathering Information
The following is a checklist of critical questions you should ask yourself before starting an Exchange Server installation. The answers to some of them might seem a bit obvious, but taking the time to study them before you begin will prevent problems during or after installation:
-
Does the computer on which you plan to install Exchange Server 2003 meet the hardware requirements? (See the next section, “Verifying Hardware Requirements.”)
-
Is the computer on which you plan to install Exchange Server 2003 running Windows Server 2003 or Windows 2000 Service Pack 3 or later?
-
Does your server have access to a domain controller and Global Catalog server running Windows Server 2003 or Windows 2000 Service Pack 3 within the local Active Directory site?
-
Do you have access to a user account with the appropriate administrative rights? You must be a local machine administrator on the server on which you will install Exchange Server 2003. You must be a member of the Domain Admins group if you need to run the domainprep tool as part of the installation. You must also be a member of both the Enterprise Admins and Schema Admins groups if you need to run the ForestPrep tool as part of the installation.
-
Does your account have the right to modify the Windows 2000 Active Directory Schema? If not, you can have an administrator who does have rights modify the Schema before you begin installing Exchange Server 2003. (See the section “Installing Exchange Server 2003” later in this chapter.)
-
Is Transmission Control Protocol/Internet Protocol (TCP/IP) correctly configured on your Windows server, and do you have access to DNS servers? (See the “TCP/IP” section later in this chapter.)
-
What are the names of the organization and routing group you will create or join?
-
If you are joining an existing routing group, what is its name?
-
For what connectors will you need to install support during your Exchange Server setup?
-
What is the disk configuration of the computer on which you are installing Exchange Server?
-
Do you have the 25-digit key number from the back of the Exchange Server CD-ROM jewel case?
-
Is Microsoft Internet Information Services (IIS) 5.0 or later running on the computer?
| Tip | The new Exchange Deployment Tools that run prior to Exchange setup provide a convenient checklist for making sure the preinstallation requirements are met. They also let you run many of the tools for setting up the environment before launching setup. You’ll learn how to use them later in the chapter. |
Verifying Hardware Requirements
Before installing Exchange Server 2003, you must make sure your machine meets the minimum hardware requirements. Table 7-1 details the Microsoft minimum and recommended configurations for a computer running Exchange Server 2003. Keep in mind that these requirements indicate the configurations on which Exchange Server will run, not those on which it will run well. Many Exchange servers require multiple processors and more memory to execute the desired services.
| Hardware | Minimum | Recommended |
|---|---|---|
| Processor | 133 MHz Pentium or compatible | 733 MHz Pentium or compatible |
| Memory | 256 MB | 512 MB |
| Disk space | 500 MB on the drive where you install Exchange 2003; 200 MB on the system drive | Space for e-mail and public folders; multiple physical disks configured as a stripe set or stripe set with parity |
| Drive | CD drive or network installation point | CD drive or network installation point |
| Display | VGA or higher | VGA or higher |
| Note | To allow you to verify that your hardware and software are compatible with a given Microsoft product, Microsoft publishes hardware and software compatibility lists. Because these lists are published for various Microsoft operating systems and applications and are updated often, Microsoft publishes them online in searchable form at http://www.microsoft.com/hcl/. |
Getting Service Packs
Microsoft provides its service packs online for free and on CD-ROM for a small charge. A service pack is an update to an operating system or application that encompasses the solutions for multiple problems. In contrast, hot fixes, or patches, are solutions to single, immediate problems with an operating system or application. A service pack will include all hot fixes up to the point that the service pack is released. Service packs and hot fixes assure you quick access to the latest improvements for your operating system or applications.
To get the latest service pack or set of hot fixes from Microsoft, downloading is the way to go. Be aware, however, that although hot fixes are usually small and quick to download, a service pack is typically many megabytes in size and can take a very long time to download, even with a fast Internet connection. Most—but not all—service packs include the contents of past service packs within them. Check to make sure that the service pack you are downloading does include past service packs if you do not already have them installed on your system. This information will be in the Readme file.
Once you have downloaded a service pack, it is important that you test it on another system before implementing it in your production environment. You should test it on the exact same type of hardware you have running in your environment.
Defining the Role of Your Server
Unfortunately, the Microsoft minimum configuration—a 133-MHz Pentium with 256 MB of RAM—is not sufficient for anything but a very small organization or test server, and even then, performance will depend on what you’re doing with the server. For optimal performance, you should run Exchange Server 2003 on a computer that is not also functioning as an Active Directory domain controller for your network. All domain controllers experience some capacity loss because of the overhead required to manage security for the domain. The amount of this overhead is determined by the size and activity of the domain.
Although an Exchange server performs better if it is running on a machine that is dedicated to Exchange messaging, it is not uncommon in small networks to have one machine serve as both a domain controller and an Exchange server because it saves the expense of an extra machine. Saving on a machine, however, might result in meager performance for both Microsoft Windows Server and Exchange Server 2003.
If your computer needs to play the roles of both Exchange server and domain controller, you’ll want more powerful hardware than that listed in Table 7-1. Also, running Exchange Server 2003 on the domain controller means that administrators of that machine must be administrators on all domain controllers.
The Exchange Server 2003 architecture was developed to participate in an Active Directory network. In fact, you can install Exchange Server 2003 only in an Active Directory domain; the Exchange server must also have access to a Global Catalog server. All domain controllers and Global Catalog servers that Exchange Server 2003 uses must be running Windows Server 2003 or Windows 2000 Service Pack 3.
You must also have Domain Name System (DNS) resolution running in your domain, as DNS is used as a service locator by Active Directory and Exchange Server 2003. For more on this subject, see Chapter 4, “Understanding Windows Server 2003 Integration.” The network can have one or more Active Directory forests, each with multiple domain trees in it, and each domain tree can consist of one or more domains. Each Exchange server must be a member server or a domain controller. If it is a member server, the Exchange server must be able to access a domain controller in order to function.
Specifying the role of a server involves more than simply configuring it as a domain controller or as a member server. It also includes indicating the services that the server will provide to the network. One of these services is IIS. Hardware capacity is even more critical if your server is also running IIS or other network applications. IIS, which is required to install Exchange Server 2003, uses considerable memory and processing power; the exact requirements depend on its configuration. For example, if IIS is configured to provide File Transfer Protocol (FTP) service as well as the Simple Mail Transport Protocol (SMTP) and Network News Transfer Protocol (NNTP) services, it uses many more CPU cycles and much more hard disk space than if it did not provide those services. When determining your hardware requirements, you should list the services that the server will host and the hardware requirements of the various applications. Start with the application with the largest hardware requirements, and then increment the RAM, processor speed, and storage capacity for each additional service by about half of its own recommendation. You will then have a fair idea of your server’s hardware needs. For more information on planning your server hardware, see Chapter 6, “Planning for Deployment.”
| Note | When you install IIS on a Windows server (either during setup or afterward), make sure the NNTP and SMTP stacks are also installed. Neither is included in the default IIS installation, and both are necessary for installing the messaging components of Exchange Server 2003. |
Optimizing Hardware Through Configuration
Increasing the speed of your processor and the amount of storage and memory on your computer are effective ways of making your Exchange server more powerful. You can also optimize your existing hardware to help boost the performance of an Exchange server if you configure the operating system in the following ways:
-
If possible, use one physical disk and disk controller for your operating system and another for your pagefile. You can also increase the size of your pagefile to 50 MB or 100 MB beyond the size of your physical memory.
-
After installing Exchange Server 2003, designate separate physical disks to house your information stores and transaction log files. This step allows your log files to be written more quickly to disk. The reason for this increase in speed is that logs are written to disk sequentially, while the Exchange database is written randomly. Having the logs and the database on the same physical disk affects hard disk performance because of the extra time required to continually reposition the head. Furthermore, keeping the logs on a separate disk can assist you if the database disk crashes because the logs are used to recover the database.
-
You can also use a stripe set consisting of multiple physical disks to house the Exchange information stores and other main components, allowing the various components to be accessed most efficiently. Using a stripe set with parity has the additional advantage of providing fault tolerance. Because messaging data is considered critical to most businesses, you should avoid striping without parity because using it increases the chances of losing all data at once. Hardware RAID using striping with parity provides better performance than software RAID because the operating system does not have the burden of managing the disk activity.
Verifying System Requirements
In addition to making sure that your computer’s hardware can handle Exchange Server 2003, you need to check certain other settings before proceeding with your setup.
Windows
Exchange Server 2003 can be installed only under Windows Server 2003 or Windows 2000 Service Pack 3. Make sure the NetBIOS name given to your Windows server is the name you want your Exchange server to have. It is simple enough to change the name of a member server before installing Exchange Server 2003, but it’s more difficult to do so afterward. You can change the name beforehand by clicking the Change button on the Computer Name tab of the System Properties dialog box, which is accessed by clicking the System icon in Control Panel. This displays the Computer Name Changes dialog box, as shown in Figure 7-1. For more information on Exchange Server 2003’s integration with Windows, see Chapter 4.
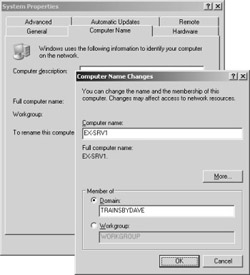
Figure 7-1: Changing the name of your Windows server.
Active Directory Domains
When you install the first Exchange server in an organization, you also create a new Exchange organization, routing group, and administrative group. If you are installing Exchange Server 2003 on a single-domain network or if your new Exchange routing group will not cross any domain boundaries, you should have no problems. However, if your new routing group will cross domain boundaries, you need to make sure appropriate security has been established before you start Setup.
TCP/IP
Exchange Server 2003 includes support for many Internet protocols, including SMTP, Network News Transfer Protocol (NNTP), and HTTP. All these protocols rely on the TCP/IP protocol suite to operate. In fact, SMTP is the default messaging transport mechanism in Exchange Server, meaning that TCP/IP must be properly configured on your Windows server before you install Exchange Server 2003. To configure TCP/IP on your Windows server, open the TCP/IP properties of the network connection you are using or use the Ipconfig utility, as shown in Figure 7-2. Note that each server’s Ipconfig output reflects the actual IP configuration of that server—and varies widely from machine to machine.
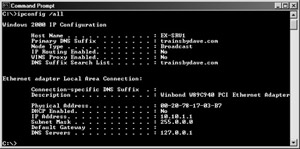
Figure 7-2: Using the Ipconfig /All command to verify TCP/IP configuration.
| More Info | For more information on configuring Windows networking, consult your Windows product documentation. You might also want to check out the Microsoft Windows Server 2003 Administrator’s Companion by Charlie Russel, Sharon Crawford, and Jason Gerend (Microsoft Press). |
Windows Clustering
Windows Server 2003 provides support for clustering technology, in which two Windows servers, called nodes, can be grouped to act as a single network unit. Clustering is designed to provide reliability through hardware redundancy. If one server in a cluster fails, another server in that cluster can take over, providing near-continuous access to network resources. To install Exchange Server 2003 in a clustered environment, you must ensure that a cluster has a single network name and IP address as well as a shared disk that is part of an external disk array. Whenever you add components to or remove components from the clustered Exchange server installation, you run the Setup program on the first node as usual. You must then run Setup again on the second node and choose the Upgrade Node option.
Creating the Exchange Administrator’s Account
Exchange administration and Windows 2000 administration are handled separately. Just because an account has administrative privileges in Windows 2000 does not necessarily mean the account will have administrative privileges in Exchange. When you install Exchange 2000 Server, one user account is given permission to administer Exchange: the account that you are logged on with when you start the installation. If you want to enable other Exchange administrators, you must do so manually, using the Exchange System snap-in.
For this reason, make sure that when you start Exchange Server Setup, you are logged on from the account you want to use for Exchange administration. This account can be the preconfigured Administrator account, your own account, or a special one you create just for the task. It should be a member of the following Active Directory security groups: Domain Admins, Enterprise Admins, and Schema Admins. Later, you can assign administrative privileges to other accounts or groups.
Alternately, you can have an enterprise administrator run the ForestPrep tool (discussed later in the chapter) and assign your account the Full Exchange Administrator permission. You will still need to have local administrative permissions on the server, as well.
Playing It Safe
It should go without saying, but we’re going to say it anyway. Back up your system before you perform any action as major as installing Exchange Server 2003. You can use the Backup utility provided with Windows (which you can find in the Accessories folder). Just start the Automated System Recovery Wizard from the Welcome page of Backup to back up everything on the system and create a floppy disk you can use to start the restore process. You will need one formatted 1.44-MB floppy disk in addition to the media used in performing a backup. Should something go wrong during the installation, you’ll be glad you took the extra time to perform a backup. Chapter 27, “Disaster Recovery of an Exchange 2000 Server,” discusses the procedure for backing up an Exchange server by using Windows Backup. Although the procedure for backing up a Windows server is a bit different than the one described there, you can use that chapter as a tutorial for backing up your system prior to installing Exchange Server 2003 as well.
EAN: 2147483647
Pages: 254
- An Emerging Strategy for E-Business IT Governance
- Assessing Business-IT Alignment Maturity
- Measuring and Managing E-Business Initiatives Through the Balanced Scorecard
- Technical Issues Related to IT Governance Tactics: Product Metrics, Measurements and Process Control
- The Evolution of IT Governance at NB Power
- Chapter V Consumer Complaint Behavior in the Online Environment
- Chapter VIII Personalization Systems and Their Deployment as Web Site Interface Design Decisions
- Chapter X Converting Browsers to Buyers: Key Considerations in Designing Business-to-Consumer Web Sites
- Chapter XIII Shopping Agent Web Sites: A Comparative Shopping Environment
- Chapter XVII Internet Markets and E-Loyalty