Use Auto Contrast to automatically correct an image
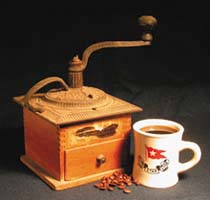
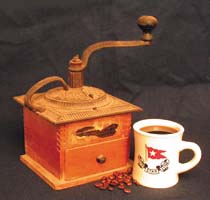
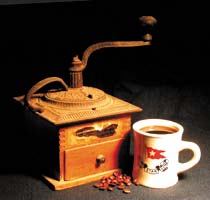
| An old saying goes, "Light is the paintbrush of photography," and it's certainly true. Just as there are many types of paintbrushes, so are there many types of lightsoft light, hard light, directional light, and bounced light, to mention a few. Each influences the mood and quality of a photo. Light also affects such things as color balance, saturation, and contrast. Many times we're able to control these factors. Color balance and saturation are relatively easy to adjust with filters and exposure, but contrast control isn't. One of Photoshop's great strengths is its ability to adjust image properties, and adjusting contrast is a snap with the Auto Contrast command. Understanding contrast in an imagePhotographers like to think in terms of tones, that is, how bright something is as opposed to how dark it is. Everything in a scene falls into three categories: highlight, midtones, and shadows. When you take a photo, the tones in the photo reproduce relative to their corresponding tones in the original scene. If the original scene happens to have the same number of tones as can be reproduced by film or an image card, then everything in the original is reproduced exactly the same in the image, and the scene is said to be a normal-contrast scene, as shown in Figure A1. But most often this doesn't happen. When a scene has fewer tones in it than it can reproduce, it's said to be a low-contrast scene, as shown in Figure A2. Conversely, when a scene has many more tones than it can reproduce, it's said to be a high-contrast scene, as shown in Figure A3. Figure A1.
Figure A2.
Figure A3.
A photo of a low-contrast scene, while containing all the tones of the original, is said to be flat. That's because it contains no true whites, or highlights, and black, or shadows. Everything is simply a tone of gray. On the other hand, a photo of a high-contrast scene not containing all the tones of the original is said to be sharp. That's because it has too many highlights and shadows. Applying the Auto Contrast commandTo adjust the contrast of an image, we simply want to do the opposite of what we see in the scene. We want to increase the contrast of a low-contrast image and decrease the contrast of a high-contrast image. While you can adjust these images manually using the Brightness/Contrast command, typically you'll need to adjust brightness and saturation as well. The Auto Contrast command automatically adjusts everything in one simple step. To use the command:
Note You can also use the keyboard shortcut [Ctrl][Alt][Shift]L ( Three adjustments in one commandAn image that's either too low or too high in contrast can appear flat or sharp, respectively, in highlight and shadow details. A simple way to correct image contrast problems is with the Auto Contrast command. This command adjusts contrast as well as brightness and saturation all in one step. |
 Adjustments
  Auto Contrast, and your original image, such as the one shown in
EAN: N/A
Pages: 105