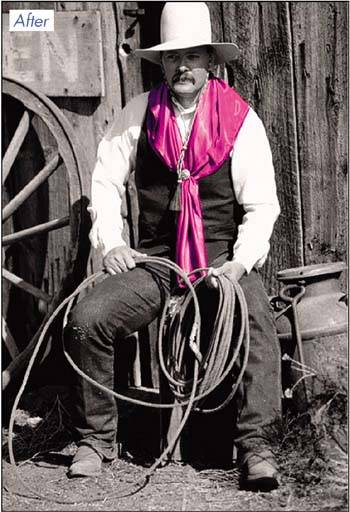
| While the Hue/Saturation command's main purpose is to help you with color correction, it also allows you to combine grayscale imagery with color imagery in Photoshop. This technique is great for creating dramatic images with dominant focal points, similar to that shown in Figure A, where we desaturated a color image everywhere but in the one area we wanted to accent with color. We'll show you how to create this effect quickly and easily using the Hue/Saturation command.
Figure A. 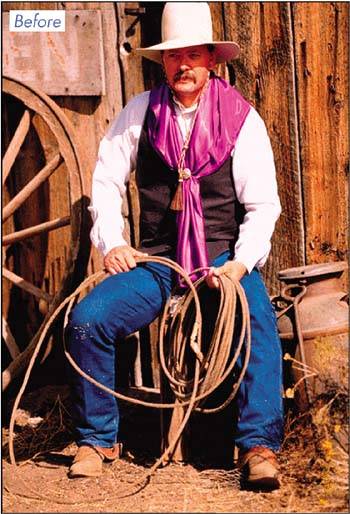
Select the area you want to colorize There are so many ways you can make a selection in Photoshop, we could write an entire chapter on the subject. To narrow down your choices, consider the type of selection you need to make, as it often determines the method you should use. In our image, for example, we want to select the cowboy's mascada, or wild rag. It's an odd shape that's colored dissimilarly from the rest of the image; therefore, the Magic Wand tool is a good choice. Choose a selection tool and set it up 1. | Click on the Magic Wand tool  in the Toolbox or press the keyboard shortcut W to select it. in the Toolbox or press the keyboard shortcut W to select it.
| 2. | Click on the New Selection icon in the tool options bar to make sure it's selected and enter a numerical value between 1 and 255 in the Tolerance text box. A high setting allows you to select a wider range of color; a low setting narrows the selection. Sometimes, you just have to experiment by entering a value and clicking on the subject area with the Magic Wand tool. If more of the image is selected than you want, lower the tolerance value; if not enough is selected, raise it. For our example, we set the tolerance to 75.
| 3. | Decide whether you want a selection that's anti-aliasedsoft-edged rather than jaggedand contiguouscontaining only pixels that are touching. The settings depend on the image area you want to select. In our example, we selected both of these options.
| 4. | Select the Use All Layers check box if multiple layers exist in your image and you want to select similarly colored pixels on all visible layers. Otherwise, leave this option deselected, so a selection is made only on the active layer. Our image has only one layer, so this option isn't relevant. The final settings for our Magic Wand tool are shown in Figure B.
Figure B. 
|
Make the selection 1. | Click the Magic Wand tool on the area in your image that you want to select, such as the wild rag in our image. The colored pixels you click on are sampled and all the (contiguous) pixels of similar color are selected. As you can see in Figure C on the next page, our Magic Wand wasn't able to compensate for all the variations of color created in the highlights and shadows of our subject area. We need to add to our selection.
Figure C. 
Note The accuracy of your selection is very important. You may find it helpful to magnify the area you want to select. To do so, select the Zoom tool  from the Toolbox, and then click and drag the mouse pointer over the area you want to see more clearly. from the Toolbox, and then click and drag the mouse pointer over the area you want to see more clearly. | 2. | Click on the Add To Selection icon  on the tool options bar, and then click directly on the remaining areas you want to include in your selection that are surrounded by a selection border. When the Add To Selection option is active, a plus sign is visible next to the Magic Wand tool, as shown in Figure D. on the tool options bar, and then click directly on the remaining areas you want to include in your selection that are surrounded by a selection border. When the Add To Selection option is active, a plus sign is visible next to the Magic Wand tool, as shown in Figure D.
Figure D. 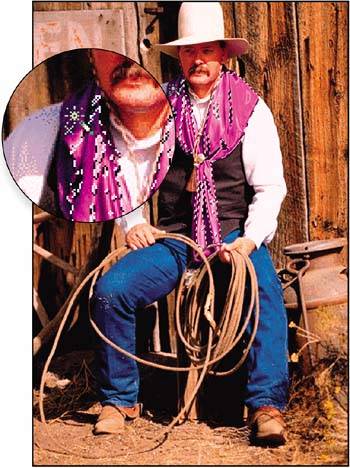
| 3. | Subtract from your selection, if needed. Choose the Subtract From Selection icon  in the tool options bar, and then click on the area in your image that you want to remove from the selection. A minus sign displays next to the Magic Wand tool when this option is active. in the tool options bar, and then click on the area in your image that you want to remove from the selection. A minus sign displays next to the Magic Wand tool when this option is active.
Note  | If the Magic Wand tool selects more of the image than you want, press [Ctrl]Z ( Z on the Mac) to undo the action. Then, lower its Tolerance setting a bit and try again. Z on the Mac) to undo the action. Then, lower its Tolerance setting a bit and try again. |
| 4. | Continue to add to and delete from your selection until only the subject area is selected, as shown in Figure E.
Figure E. 
|
Save the selection Once you have a perfect selection, surely you don't want to risk losing it! Fortunately, you can save it as a channel. To save your selection: 1. | Choose Select  Save Selection. Save Selection.
| 2. | Name the channel something relevant, such as wild rag, in the resulting Save Selection dialog box.
| 3. | Click OK. Your selection is saved in the Channels palette, as shown in Figure F. Actually, you've created a mask!
Figure F. 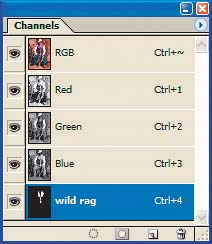
|
Invert the selection area The only problem is that we want to mask the subject area to preserve the color within it. Therefore, we need to invert the selection. This ensures that only the area outside of the mask is affected when we later adjust the color saturation of our image. To invert your selection: Choose Select Inverse or press [Ctrl][Shift]I ( [shift]I on the Mac). By doing so, the selection inverts, as indicated by the selection border along the outside edges of your subject area and along the outside edges of your image. [shift]I on the Mac). By doing so, the selection inverts, as indicated by the selection border along the outside edges of your subject area and along the outside edges of your image.
Reduce color saturation At last, we're ready to take the final step to create the finished effect, shown in Figure A. We'll create a new Hue/Saturation adjustment layer on which to work. On this layer, we'll reduce the saturation of our image to produce a grayscale effect. Only the image area outside of the mask is affected, preserving the color of our subject area and, thereby, accentuating it. What's an adjustment layer? An adjustment layer acts like a layer, but it's really a customized filter or lens through which you can view your image. An adjustment layer automatically affects all layers below it. In the Layers palette (press [F7] to display), you can easily locate an adjustment layer by its circle icon, as shown in Figure G. You can also hide, move, duplicate, or delete an adjustment layer just as you would any other type of layer.
Figure G. 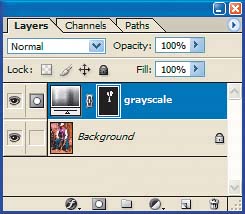
Since adjustment layers preserve your dialog box settings, it's easy to edit and refine the effect on the image. If you want to compare two different settings, that's easy to do as well. You can even apply multiple adjustment layers to the same image. However, if you want any of them to affect the image permanently, you'll need to flatten the image. To do so, choose Flatten Image from the Layers palette's pop-up menu. Create an adjustment layer 1. | Choose Layer New Adjustment Layer. As you can see in the resulting submenu, you can create an adjustment layer for all sorts of image adjustment commands.
| 2. | Choose Hue/Saturation for our example.
| 3. | Name the new layer something relative, such as grayscale, in the resulting New Layer dialog box.
| 4. | Make sure the Use Previous Layer To Create Clipping Mask is deselected, the Mode dropdown list is set to Normal, and the Opacity value is 100 percent.
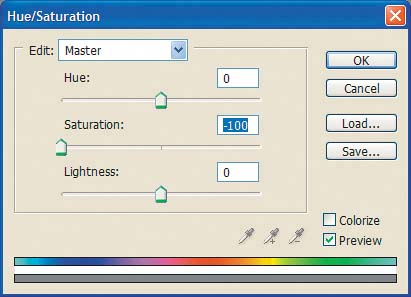
| 5. | Click OK. In the resulting Hue/Saturation dialog box, there are three sliders for making basic adjustments affecting Hue, Saturation, and Lightness. Below that are two colored bars. The top colored bar represents the color before any adjustments and the one below it shows how any adjustments affect all of the hues at full saturation.
| 6. | Make sure Master is chosen from the Edit dropdown list for our example.
| 7. | Move the Saturation slider all the way to the left until the Saturation text box reads 100, as shown in Figure H. This removes the color from your image, making it grayscale, as shown in Figure A.
Figure H. 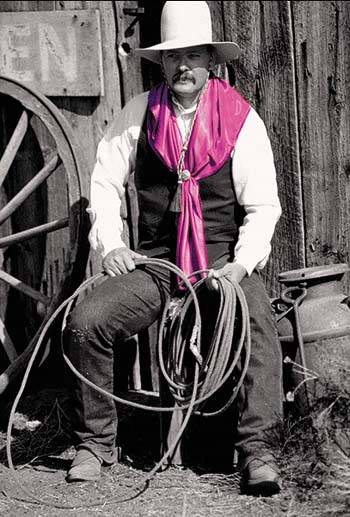
| 8. | Click OK. As we showed you in Figure G, the new adjustment layer is added to your Layers palette.
|
Yee haw! We've shown you how to use the Hue/Saturation command for something other than color correction. Full color images are great, but sometimes a situation calls for something more unique, such as combining color imagery with grayscale imagery. Our cowboy is a perfect example of an image that benefits from this technique. |