16.4 Generating PDF Files
| PDF files can be generated in two ways. Depending on what you like best, you can choose whether to use LaTeX or PHP's onboard tools for working with PDF. In this section both ways will be covered extensively so that you can decide which way is the more elegant one for your application. 16.4.1 Working with LaTeXTeX was originally developed by Donald E. Knuth, who is one of the world's most famous computer experts. He is the author of The Art of Computer Programming, the most commonly known book about algorithms and the most complete book on that topic ever written. TeX has a long history. Today TeX is not used directly because it is far too complex to write a document that is based solely on TeX. LaTeX is a package of macros based on TeX, which was originally written by Leslie Lamport. When people talk about TeX, they usually mean Lamport's macro package, which is widely used today. The main advantage of TeX is its stability. For years not a single bug has been found in TeX, and you can fully rely on TeX. For business-critical applications especially, this is important because you can generate documents consisting of thousands of pages reliably and fast. This section is not designed to be an introduction to TeX or LaTeX. This section has been designed to give you an insight into the world of professional text processing with LaTeX, PHP, and PostgreSQL. First you will see an example of a sophisticated LaTeX document including a style. After that you will learn to generate dynamic documents with the help of PHP so that you can include TeX documents in your Web applications. 16.4.1.1 An Example of LaTeX Code: A BillThe goal of this example is that you can see how LaTeX documents are structured and what you need to generate a PDF file. When you understand how things work, it will be an easy task to generate dynamic LaTeX code. Figure 16.16 shows what the bill will look like. Figure 16.16. A bill.
Several files are needed to generate the bill. In this scenario the main file is called hon.tex. It contains the dynamic part of the document, which means that all components of the bill are compiled in this file. Let's take a look at the code of the file: \documentclass[12pt,a4paper]{letter} \usepackage{billstyle} \input{addresses} \sloppy \begin{document} \date{April, 19th 2001} \begin{letter}{\PostgresInc} \begin{Fee}{H}{01-07} As we have agreed in the contract here is the bill for the implementation of advanced replication. \begin{Bill}{xxx 999.999,99} \Entry{Consulting}{EUR 10.000,00}{0} \Entry{Implementation}{EUR 69.000,00}{0} \Entry{+ 20 \% Turnover Tax}{EUR 15.800,00}{1} \Entry{}{EUR 94.800,00}{2} \end{Bill} \end{Fee} \closing{Best regards} \end{letter} \end{document} First the type of document is defined. In this case it is a letter. The size of the document is A4, which is the European standard format for letters. If you are American, you should use the American letter format instead. The size of the text is set to 12. In the next step, the style of the document is included so that LaTeX can understand all macros used in this document. The style of this document is called billstyle and is stored in billstyle.sty. The file addresses.tex, which is included using \input, contains some shortcuts so that you don't have to write the entire address every time you generate a new document. \begin{document} tells LaTeX that the core of the document starts here. The first thing added to the document is the date the text was written. In this example the date is April 19, 2001. The letter will be sent to PostgresInc (a nonexistent company). addresses.tex contains the real address of the company receiving the bill. The advantage of this file is that the address can be changed globally, so only one file is affected if the address changes. Let's take a look at the file: \long\def\PostgresInc{% www.postgresql.at Inc.\\ Fünfhausgasse 20/1\\ A-1150 Vienna, Austria} \long\def\Pine{% Pine Networks\\ Anywherestreet 344/23\\ A-1010 Vienna, Austria} As you can see, two addresses are in the file. Our bill is sent to the first company mentioned in the file. After defining the address, a block called Fee is started. The way Fee looks is defined in the style file you will see later in this section. Fee has two parameters, which in this example are H and 01-07. The first parameter defines the type of the bill and the second parameter defines the identifier of the bill. The way bills are labeled has nothing to do with LaTeX; it is just a unique number for every bill sent to a customer. The next two lines contain the text on the bill. Every bill contains the product a customer is charged for. In this scenario the various components of the bill are listed in the block starting with \begin{Bill}{xxx 999.999,99}. The parameter in curly brackets tells LaTeX how long the string will be. In this scenario three characters are used for the currency (for example, EUR for Euros). The rest of the characters are used for displaying the digits of the price. With the help of the \Entry command, components are added to the bill. The behavior of \Entry is defined in the style. Finally the components Bill and Fee end, a closing statement is added to the letter, and the letter is finished. For compiling the document, a makefile is used: hon.pdf : hon.tex latex hon.tex dvips hon.dvi -o hon.ps ps2pdf hon.ps hon.pdf The command latex generated a DVI file out of hon.tex. Dvips is used to convert the DVI file to a PostScript file, which can be transformed into a PDF file. To be able to compile hon.tex, a style is needed. The style defines how various components of the letter look. The advantage of styles is that the way a document looks and the content of a document are separated. If you want to change the layout of all documents, you only have to change the style and recompile the documents, which is much easier than changing every single document as you would have to do when running a product such as WordPad or Notepad. Let's take a look at the style: % Fee \usepackage[latin1]{inputenc} \usepackage{german} \usepackage{graphicx} \usepackage[dvips,usenames]{color} \advance\topmargin by -1.5cm \advance\textheight by 2cm \advance\evensidemargin by -1cm \advance\oddsidemargin by -1cm \advance\textwidth by 2cm \advance\headheight by 1cm \advance\headsep by -1cm \signature{(Hans-Jürgen Schönig)} \renewcommand{\closing}[1]{\par\nobreak\vspace{\parskip}% \stopbreaks \noindent \strut\hfill\hfill \parbox{\indentedwidth}{\centering \ignorespaces #1\\[6\medskipamount]% \ifx\@empty\fromsig \fromname \else \fromsig \fi\strut}\hfill \par} \newcommand{\Parbox}[3][c]{\fboxsep-\fboxrule\fbox{\parbox[#1]{#2}{#3}}} \def\Hon@head{\parbox[c]{0.1\textwidth}{% \includegraphics[width=0.1\textwidth]{logo.eps}} \parbox[c]{0.6\textwidth}{\parskip0pt \raggedright\sloppy\sffamily {\Large\bfseries Cybertec Geschwinde \& Schönig\par} Advanced PostgreSQL and Kernel Solutions\\ www.postgresql.at - http://kernel.cybertec.at} \hfill} \def\Hon@foot{\parbox{\textwidth}{\centering\sf\footnotesize% Ludo-Hartmannplatz 1/14, A-1160 Vienna, Phone +43/1/929 25 25/0, office@cybertec.at }} \def\ps@firstpage{\let\@oddhead\Hon@head \let\@evenhead\Hon@head \let\@oddfoot\Hon@foot \let\@evenfoot\Hon@foot } \def\H@Type{H} \def\HName{REQUEST FOR PAYMENT} \def\RName{BILL} \def\HEnd{Please transfer the money to: \\ Account Number: 343-78493-43542/34 \\ First National Austrian Bank\par} \let\REnd\HEnd \def\Fee#1#2{\opening{Number: #1#2} \vskip 1cm \centerline{\Large\bf \csname#1Name\endcsname} \gdef\H@Type{#1} \vskip 1cm } \def\endFee{\csname\H@Type End\endcsname} % Bill \newbox\H@box \newcount\H@count \newdimen\H@width \newdimen\H@Lwidth \newenvironment{Bill}[1]{\settowidth{\H@width}{#1} \begin{quote}\rightskip \H@width}{\end{quote}\par}% \def\H@Value#1#2{\makebox[0pt][l]{\vtop {% \hsize=\H@width \hbox to \hsize {\hfill#1} \H@count=#2 \loop \ifnum \H@count > 0 \vskip 2pt \hrule \advance \H@count by -1 \repeat }}} \def\Entry#1#2#3{\strut#1 \dotfill\ \H@Value{#2}{#3}\\ } \def\Entry#1#2#3{\strut \settowidth{\H@Lwidth}{#1} \ifnum \H@Lwidth > \z@ #1 \dotfill ~ \else \hfill \fi \H@Value{#2}{#3}\\ } \dateaustrian The style is already quite complex and we will not discuss it in full detail because that would be beyond the scope of this book. The only thing that is important for a PHP developer is to see what has to be done when defining a style. The first thing to do in the style file is to tell LaTeX which packages have to be included. The second thing is to define the margins of the document, which means that you have to tell the system where the borders of the document are. In the next step various components are defined. The macros defined in this style file are called by hon.tex. To compile the document you just have to run make, and if no errors occur, a DVI, a PostScript, and a PDF file will be generated by the system. 16.4.1.2 Generating LaTeX Code Using PHPNow that you have seen how to build a simple LaTeX document, you can start writing a PHP script that generates documents for you. The target is to have a simple Web form that allows you to generate simple bills. Therefore we will need various forms, as shown in Table 16.1.
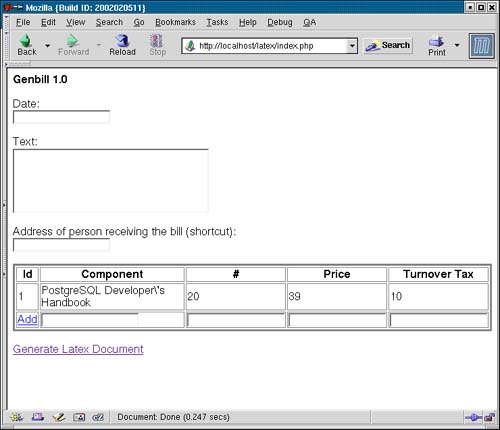
Let's start with index.php, which is the file doing most of the work. It is responsible for generating the user form. Figure 16.17 shows what the form looks like. Figure 16.17. The user form.
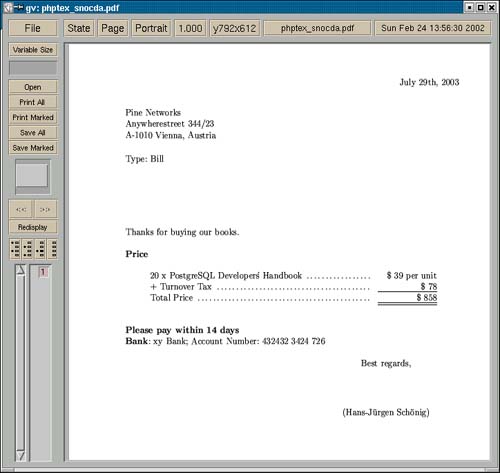
<?php include("html.php"); # generating session and session id session_start(); $sid = session_id(); # displaying HTML header echo $head; # unserializing data $compa = unserialize($comps); $numbera = unserialize($numbers); $pricea = unserialize($prices); $taxa = unserialize($taxs); # checking, if data has been passed to the form if (strlen($date) > 0) { $sdate = $date; session_register("sdate"); } if (strlen($address) > 0) { $saddress = $address; session_register("saddress"); } if (strlen($message) > 0) { $smessage = $message; session_register("smessage"); } if ($newcomp && ($newcomp != '')) { $count++; session_register("count"); $compa[$count] = $newcomp; $comps = serialize($compa); session_register("comps"); $numbera[$count] = $newnumber; $numbers = serialize($numbera); session_register("numbers"); $pricea[$count] = $newprice; $prices = serialize($pricea); session_register("prices"); $taxa[$count] = $newtax; $taxs = serialize($taxa); session_register("taxs"); } # drawing the table drawlines($count, $compa, $numbera, $pricea, $taxa); # generate an input line inputline(); # displaying end of HTML code echo $tail; # add lines containing data to the table function drawlines($count, $compa, $numbera, $pricea, $taxa) { for ($i = 1; $i <= $count; $i++) { echo "<tr><td>$i</td><td>".$compa[$i]."</td>"; echo "<td>".$numbera[$i]."</td><td>".$pricea[$i]."</td>"; echo "<td>".$taxa[$i]."</td></tr>\n"; } } # edit the inputline to the data function inputline() { echo '<tr><td> <a href="javascript: document.forms[0].submit()">Add</a> </td> <td><input type="text" name="newcomp"</td> <td><input type="text" name="newnumber"</td> <td><input type="text" name="newprice"</td> <td><input type="text" name="newtax"</td></tr> '; } ?> The first file that is included is html.php. It contains two HTML fragments ($head and $tail) you will need to build the form. Before continuing with index.php, here is the HTML code for building the screen: <?php $head = ' <html> <body> <b>Genbill 1.0</b> <br><br> <form action="index.php" method="post"> Date: <br> <input name="date" type="text"><br><br> Text: <br> <textarea cols="30" rows="5" name="message"> </textarea><br><br> Address of person receiving the bill (shortcut):<br> <input name="address" type="text"><br><br> <table border="3"> <tr><th>Id</th><th>Component</th><th>#</th><th>Price</th> <th>Turnover Tax</th></tr> '; $tail = ' </table><br> <a href="gentex.php">Generate Latex Document</a> </form> </body> </html> '; ?> $head displays some HTML code including a user form for inserting the date, the text, and the recipient of the bill. After starting a session, the head of the HTML document is generated. As you saw in the figure, the table consists of various columns. To store the information about these columns, variables are used. These variables are registered in the current session. Because the data is stored in arrays, serialization must be performed. At the beginning of the script, the serialized data has to be transformed to arrays again. In the next step the script checks whether or not the variables submitted to the form should be registered. The reason for that is that after useful data has been registered, it should not be destroyed by registering empty variables. Before drawlines is called, an if statement is processed. Inside the if-block $count is increased. It contains the number of components the bill consists of. In the case of valid input, the data is added to the arrays and a string is made out of these arrays again. Let's take a look at the drawlines function. It has been implemented to add one line of data to the scenery. As you can see, it does nothing but generate HTML code. In addition to the data, a line containing input fields is generated. Then the HTML code for ending the screen is displayed. As you have seen, the script adds data to the arrays storing the information every time a user clicks on the link ("Add") in the table. As soon as somebody clicks on the link at the bottom of the screen, gentex.php is called. Let's take a look at gentex.php: <?php include("tex_code.php"); # generating session and session id session_start(); $sid = session_id(); # checking for input if (strlen($date) > 2 ) { $sdate = $date; } if (strlen($message) > 4 ) { $smessage = $message; } if (strlen($address) > 2 ) { $saddress = $address; } if (strlen($sdate) < 3 || strlen($smessage) < 3 || strlen($saddress) < 2) { echo "the data in the previous form is not complete"; die; } echo "date: $sdate<br>\n"; echo "message: $smessage<br>\n"; echo "address: $saddress<br>\n"; # generating LaTex code $tex = "$head\n"; $tex .= '\date{'.$sdate.'}'."\n"; $tex .= "\\begin{letter}{\\$saddress}\n"; $tex .= '\begin{Fee}{Bill}{}'."\n"; $tex .= "$smessage\n"; $tex .= '\\\\ \strut \\\\ \bf Price \rm \begin{Bill}{EUR xx.xxx,xx} '; # adding components to the bill $compa = unserialize($comps); $numbera = unserialize($numbers); $pricea = unserialize($prices); $taxa = unserialize($taxs); for ($i = 1; $i <= $count; $i++) { $tex .= '\Entry{'.$numbera[$i].' x '.$compa[$i].'}{\$ '. $pricea[$i]." per unit}{0}\n"; $turnover += $pricea[$i] * ($taxa[$i] / 100) * $numbera[$i]; $totprice += $pricea[$i] * (1 + $taxa[$i] / 100) * $numbera[$i]; } $tex .= '\Entry{+ Turnover Tax}{\$ '.$turnover."}{1}\n"; $tex .= '\Entry{Total Price}{\$ '.$totprice."}{2}\n"; $tex .= $end; # generating a temporary file and generating PDF file $filename = tempnam ("/tmp", "phptex_"); $fp = fopen($filename.".tex", "w") or die ("cannot generate file $filename".".tex<br>\n"); fwrite($fp, $tex) or die ("cannot send data to file<br>\n"); fclose($fp); @system("cd /tmp; latex $filename".".tex > /dev/null; dvips $filename". ".dvi -o $filename".".ps > /dev/null; ps2pdf $filename". ".ps $filename".".pdf"); checkfile($filename); echo "<br>The file has been generated successfully.<br>\n"; # checking if a file exists function checkfile($filename) { $fp = fopen($filename.".ps", "r") or die ("file has not been generated<br>\n"); $stat = fstat($fp); if ($stat["size"] > 0) { # Postscript file seems to be ok } else { die ("file has not been generated<br>\n"); } } ?> First the library containing some LaTeX code is included. After that a session is started. This is necessary to register the current script in the session that has been started when running index.php the first time. In the next step some variables are checked. The variables starting with an "s" are the ones stored in the session. However, some variables are passed to the script without using the session information. This happens when somebody inserts a date and clicks on the link for going to this script. All variables are checked, and if the user does not click on Add, the data is assigned to the variables stored in the session. In the next step the variables are displayed using simple echo commands. Now the script starts generating the LaTeX code. After generating the head of the document, the data in the session is unserialized and all products are processed one after the other. The turnover tax as well as the total price are computed. The total price consists of the price in the session plus the turnover tax. After the two prices have been generated, they are added to the document. Now $tex is sent to a file. This file is processed by the LaTeX compiler and converted to a PDF file. The problem with generating the PDF file is that PHP's system call returns void. In Perl this is different because Perl's system command returns something more useful, so errors can be caught easily. In PHP this is not possible, so we have to write a function that performs some simple checks to see whether or not the file has been generated. In this example we check if the size of the PostScript file is higher than zero. This will help us to identify any errors. After a PostScript file has been generated, it is an easy and reliable task to generate the PDF file. Checking the PDF file directly is slightly more difficult because the size of an empty PDF file is not zero. This size must be checked on your local machine, so we have decided to use the more insecure PostScript version here. Let's take a look at tex_code.php. It contains some LaTeX code that has been included in the document you have just generated: <?php $head = ' \documentclass[12pt,a4paper]{letter} \usepackage{billstyle_de} \input{addresses} \sloppy \begin{document} '; $end=' \end{Bill} \bf Please pay within 14 days\\\\ \bf Bank\rm : xy Bank; Account Number: 432432 3424 726 \end{Fee} \closing{Best regards,} \end{letter} \end{document} '; ?> Finally you can take a look at addresses.tex: \long\def\PostgresInc{% www.postgresql.at Inc.\\ Fünfhausgasse 20/1\\ A-1150 Vienna, Austria} \long\def\Pine{% Pine Networks\\ Anywherestreet 344/23\\ A-1010 Vienna, Austria} It contains nothing except a set of addresses. When defining the recipient of the bill, you have to use the shortcuts used in this file. If you want to send a bill to Pine Networks, you have to use Pine as a shortcut. When running the Web site, the result could look like this: date: July 29th, 2003 message: Thanks for buying our books. address: Pine The file has been generated successfully. Finally you can take a look at the document that has been generated in this example. Depending on which data you add to the Web form, the result might look different (see Figure 16.18). Figure 16.18. The output.
|
EAN: N/A
Pages: 201