Supporting Internet E-mail
|
|
Most all organizations have the ability to send and receive Internet mail. In this section, we'll cover configuring Exchange Server 2007 to send and receive Internet mail as well as implementing anti-spam protection. Outbound e-mail is actually pretty simple to configure and support because all you need to do is create a Send connector, which we discussed earlier in this chapter.
Inbound e-mail is another matter. You can choose from a number of different configurations or topologies to configure your Receive connectors based on security and message hygiene requirements. Depending on your needs and requirements, you can use one of the following:
-
E-mail is sent directly to the Exchange 2007 Hub Transport server.
-
E-mail is sent to the Edge Transport server, which performs anti-spam and antivirus inspections and then passes the message on to a Hub Transport server.
-
E-mail is first sent to third-party software or a third-party appliance for message hygiene functions and then forwarded on to a Hub Transport server.
-
E-mail is first sent to third-party software or a third-party appliance for message hygiene functions, then to an Edge Transport server for additional message hygiene functions, and then finally on the an Exchange 2007 Hub Transport server.
-
E-mail is sent to a managed provider such as MessageOne or Microsoft Exchange Hosted Security where message hygiene, archival, and other security functions are performed. Then the e-mail is sent to the organization's Exchange 2007 Hub Transport servers.
We could actually come up with a number of additional permutations and possibilities for message security and message hygiene functions. Actually, we could fill up a couple of chapters of material on message hygiene, messaging security, and possible configurations. However, we'll keep this simple and explain the topic more conceptually.
First we will explain how to allow Exchange 2007 to receive e-mail directly from the Internet, and then we will talk about the use of the Edge Transport server.
Configuring Exchange to Receive Internet Mail
In this section, we will cover the fairly simple task of allowing one or more Exchange 2007 Hub Transport servers to receive mail from any Internet sender. Figure 18.12 illustrates this configuration. Both the external and internal firewalls allow SMTP traffic sent over TCP port 25 from any Internet host to be sent directly to the Exchange 2007 Hub Transport server.
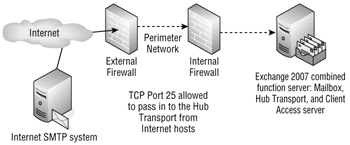
Figure 18.12: E-mail delivered directly to Hub Transport server
The Default Receive connector accepts the messages directly from Internet hosts once you have modified the Permissions Groups properties. Many organizations use this type of configuration successfully, but remember that this violates the concept of multilayer security because all content is delivered directly to the Hub Transport server role. You must employ some type of message hygiene function on the Hub Transport server to protect your organization from viruses and spam. Antivirus solutions are discussed in Chapter 20, "Securing Exchange Server."
By default, the Exchange 2007 anti-spam agents are not available on a Hub Transport server. However, you can enable the anti-spam agents on a Hub Transport server using the Install-AntispamAgents.ps1 script in the \ProgramFiles\Microsoft\Exchange Server\Scripts folder. Once the agents are installed, either reboot the Exchange server or restart the Microsoft Exchange Transport service. You can restart the service using the Exchange Management Shell with the following command:
Restart-Service msexchangetransport
Once the anti-spam agents are installed, management of the anti-spam agents on a Hub Transport is almost identical to managing them on an Edge Transport server. We will discuss these later in this chapter.
We mentioned this previously, but we want to make sure that you allow anonymous users to connect to the Receive connector that is exposed to the Internet. If you forget this step, you will end up spending a lot of time troubleshooting why your Exchange server is rejecting e-mail from the Internet. On the Permission Groups properties (shown in Figure 18.13) of the Default Receive connector, make sure that you have checked the Anonymous Users check box.
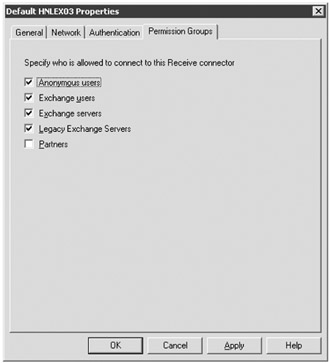
Figure 18.13: Allowing a Receive connector to receive mail from the Internet
By default, your Exchange 2007 servers will only accept e-mail destined to the Windows Active Directory DNS domain that the server was a member of. In order to accept e-mail intended for your external SMTP domain, you will need to create a new accepted domain. We discussed this in Chapter 10, "Managing Recipients," but we thought it was important to reiterate this here.
An accepted domain is a domain for which your Exchange organization can accept e-mail. You will need an accepted domain configuration for each domain for which your Exchange servers will accept e-mail. The accepted domain is the FQDN after the @ symbol in your e-mail address.
| Note | If you fail to create an accepted domain for the e-mail domains for which you accept mail, people who send e-mail directly to your users will probably get an NDR with the error "550 5.7.1 Unable to relay." |
We'll now go through a quick example. Accepted domains are created in the Hub Transport subcontainer of the Organization Configuration work center. You see the list of accepted domains on the Accepted Domains tab in the results pane. In this example, you support users whose e-mail domain is volcanocoffee.com, so you can to accept inbound mail for that domain. You should choose the New Accepted Domain task on the Actions pane to launch the New Accepted Domain Wizard (shown in Figure 18.14.)
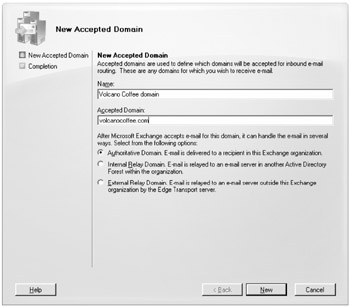
Figure 18.14: Creating a new accepted domain
You must specify a name for the accepted domain along with the DNS domain name for the accepted domain. Since the e-mail addresses will all belong to internal mailboxes (this is the usual configuration), select the Authoritative Domain radio button, and then click New to create the new accepted domain. For more information on authoritative, internal relay, and external relay domains, see Chapter 10, "Managing Recipients."
Using Edge Transport Services
Implementing an additional layer of protection for your e-mail servers is always a good idea. This is certainly not a new concept for medium and large organizations. Even 10 years or more in the past, organizations frequently would put an SMTP server in their perimeter network and configure the SMTP in the perimeter network to accept their inbound mail and then relay the mail into an internal mail server. In the past, usually this was a hardened Unix system that performed only SMTP mail relay functions.
As viruses become more prevalent, these systems usually included virus-scanning functions. As spam has become more and more of a problem, these systems would also filter or quarantine messages suspected of being spam. This concept of inspecting mail before it arrives on the mail server has spawned a whole cottage industry of service providers, appliance vendors, and third-party software. Performing this initial inspection could be important for a number of reasons:
-
It filters the unwanted content arriving on your network before it reaches internal mail servers.
-
It reduces the load on mailbox and internal mail transport servers by keeping unwanted content off of them.
-
It provides an additional layer of protection against spam or viruses.
-
It filters the mail as closely as possible to the originating source.
-
It prevents Internet hosts from directly accessing the internal Exchange servers.
Microsoft decided shortly after the release of Exchange Server 2003 that the Exchange server platform was not the best place for preliminary virus and spam inspection. Neither was it a good idea to put any Active Directory member server in the perimeter network. After all, an Exchange server is a member of the Active Directory and requires connectivity to other Exchange servers as well as the Active Directory domain controllers and global catalog servers. To build an Exchange 2000/2003 server that handles just message transfer, a number of unnecessary components had to be installed. The information store service even had to remain running. If this server is compromised, the entire network could be exposed.
The Edge Transport server was developed with minimal messaging functionality. Essentially, it is nothing more than a message transport engine that allows for the plug-in of additional components such as transport rules, anti-spam agents, and antivirus software. Edge Transport does not communicate or require Active Directory; instead, Edge Transport uses the Microsoft Active Directory Application Mode (ADAM) database for its configuration. The Hub Transport server runs a feature called Microsoft Exchange EdgeSync that pushes configuration data, recipient information, and safe/blocked senders lists. The EdgeSync process replicates the following data from the internal Active Directory to the ADAM database:
-
A list of the valid SMTP addresses for the Active Directory, including mailbox-enabled users, mail-enabled users, mail-enabled contacts, mail-enabled groups, and mail-enabled public folders
-
The list of internal accepted domains
-
The list of remote domains
-
Configured message classifications
-
Safe and blocked sender lists for each user
-
Internal send connector configuration
Edge Transport rules are based on SMTP addresses, not Active Directory objects - but you can use the SMTP addresses of mail-enabled groups. For the most part, the Edge Transport rules are a subset of hub rules - the exception is quarantine, which is only available on the edge as it is intended for spam.
As an added advantage, the Edge Transport server is managed using the same management tools (the Exchange Management Console, Exchange Management Shell, Queue Viewer, Best Practices Analyzer, and so on) you use to manage other Exchange 2007 server roles, so there is no steep learning curve associated with deploying the Edge Transport server role.
To maximize the security benefits, we recommend that the Edge Transport server be deployed in your perimeter network such as is shown in Figure 18.15. Figure 18.15 takes a slightly modified version of the implementation shown in Figure 18.12. The organization's DNS MX record directs inbound e-mail to the Edge Transport server that is located in the perimeter network.
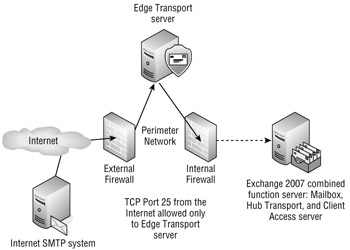
Figure 18.15: Deploying an Exchange Edge Transport server
The Edge Transport server performs anti-spam and antivirus functions and then passes messages on to an internal Hub Transport server. The firewall is configured such that TCP port 25 inbound from the Internet is allowed only to the Edge Transport server. The internal firewall only allows inbound TCP port 25 from the Edge Transport server in the perimeter network and only to the Hub Transport server on the internal network.
The Edge Transport server has specific anti-spam transport agents installed that handle different types of filtering, analysis, and transport rules. Table 18.1 shows the transport agents that are installed on an Edge Transport server.
| Agent | Default State | Features Provided |
|---|---|---|
| Address Rewriting Inbound agent | Installed, Enabled | Messaging policy and compliance |
| Address Rewriting Outbound agent | Installed, Enabled | Messaging policy and compliance |
| Attachment Filter agent | Installed, Enabled | Anti-spam and antivirus |
| Connection Filter agent | Installed, Enabled | Anti-spam and antivirus |
| Content Filter agent | Installed, Enabled | Anti-spam and antivirus |
| Edge Rule agent | Installed, Enabled | Messaging policy and compliance |
| Protocol Analysis agent | Installed, Enabled | Anti-spam and antivirus |
| Recipient Filter agent | Installed, Enabled | Anti-spam and antivirus |
| Sender Filter agent | Installed, Enabled | Anti-spam and antivirus |
| Sender ID agent | Installed, Enabled | Anti-spam and antivirus |
Setting Up the Edge Transport
Now we'll go through a sample configuration of the Edge Transport server and the Hub Transport server, as illustrated in Figure 18.16. The internal firewall must first be configured to allow certain types of inbound and outbound connectivity between the internal network and the perimeter network. Specifically, connectivity is required between the Edge Transport server and the Hub Transport server. We have kept this example really simple; you would need to scale this for additional Hub Transport servers and Edge Transport servers.
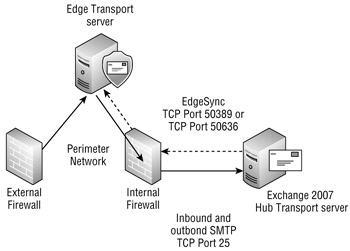
Figure 18.16: Simple Edge Transport deployment
The Edge Transport server must be able to send SMTP (TCP port 25) to the Hub Transport server. The Hub Transport server should be able to send SMTP to the Edge Transport server if the Edge Transport server will be used for outbound mail. The Hub Transport server must also be able to communicate using the ports designated for LDAP synchronization to the ADAM database; these are either TCP port 50389 for regular LDAP or TCP port 50636 for secure LDAP. You will usually use port 50389 unless you have configured ADAM to use SSL.
You might need to open additional ports through the internal firewall and to the Edge Transport server if you want to use the Remote Desktop Connection (RDP) client to manage the Edge Transport server remotely. The RDP client uses TCP port 3389.
To configure simple mail flow between an Edge Transport server and a Hub Transport server, you could configure the necessary Send and Receive connectors, but you would not be reaching the full benefits of the Edge Transport. To receive the full benefits of the Edge Transport server role, you need to configure Edge Synchronization (EdgeSync). This process involves five basic steps:
-
Perform prerequisite checks and configuration settings.
-
Create an Edge Subscription file on the Edge Transport server.
-
Copy the Edge Subscription file to the Hub Transport server.
-
Import the Edge Subscription file and create a Send connector for the Edge Subscription.
-
Start the Microsoft Exchange EdgeSync service on the Hub Transport server (if it's not already started).
You should perform all of these steps within a fairly short period of time; this should be performed in under 24 hours because the bootstrap account that is created with the Edge Subscription file is only good for 24 hours from the time it was created.
The Edge Subscription that you are creating will work for all existing Hub Transport servers at the time you create it. However, if you add additional Hub Transport servers into the Active Directory site, you must create a new Edge Subscription.
Configuring EdgeSync
Let's go through the preconfiguration checklist and make sure you are ready to configure EdgeSync. Here is a list of tasks you should perform:
-
Confirm that DNS name resolution between the Hub Transport and the Edge Transport works. In some cases, you may need to create HOSTS files for the two systems if the internal Hub Transport server is not resolvable in DNS by the Edge Transport server and vice versa.
-
Ensure that the necessary ports on the firewall are opened.
-
Configure the accepted domains and remote domains for your organization (on the internal Exchange 2007 servers).
-
Define the internal SMTP servers so that Sender ID knows which servers are internal to your organization and so that connection filters know not to reject connections from your internal IP addresses.
The internal SMTP servers must be configured using the EMS cmdlet Set-TransportConfig. In the following example, we're defining internal mail servers as being the following IP addresses: 192.168.254.102, 192.168.254.19:
Set-TransportConfig -InternalSMTPServers 192.168.254.102,192.168.254.19
Next you need to switch to the console of the Edge Transport server and create the Edge Subscription file. The following command creates a new Edge Sync subscription file called EdgeSync.xml. Note that the confirmation message mentions a couple of the prerequisites:
New-EdgeSubscription -FileName "c:\EdgeSync.xml" Confirm Creating an Edge Subscription makes the configuration of this Edge Transport server ready to be managed via EdgeSync. Any of the following types of objects that were created manually will be deleted: accepted domains; message classifications; remote domains; and Send connectors. Also, the InternalSMTPServers list of the TransportConfig object will be overwritten during the synchronization process. The Exchange Management Shell tasks that manage those types of objects will be locked out on this Edge Transport server. You must manage those objects from inside the organization and allow EdgeSync to update the Edge Transport server. EdgeSync requires that this Edge Transport server is able to resolve the fully qualified domain names (FQDN) of the Hub Transport servers in the Active Directory site to which the Edge Transport server is being subscribed. Those Hub Transport servers must be able to resolve the FQDN of this Edge Transport server. You should complete the Edge Subscription inside the organization in the next "1440" minutes before the bootstrap account expires. [Y] Yes [A] Yes to All [N] No [L] No to All [S] Suspend [?] Help (default is "Y"):y
The file that is created is shown in Figure 18.17. Take special note of the EdgeServerFQDN; this XML tag will be used by the Hub Transport server when it must transmit data (SMTP data or EdgeSync replication data) to the Edge Transport server, so this FQDN must be resolvable by the Hub Transport server.
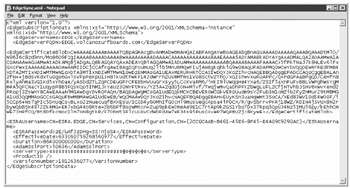
Figure 18.17: The result of the New-EdgeSubscription command
Other content you will find in the EdgeSync subscription file includes the Edge server's certificate, the username, and password information that the Hub Transport server will use when authenticating to the Edge Transport server and vice versa.
You need to transport this EdgeSync.xml file to the Hub Transport server now. If all file sharing ports between the perimeter and the internal network are locked down, you may have to use a USB drive, CD-ROM, or, a floppy (oh, the horror). Once you have the EdgeSync subscription file on the Hub Transport server, you can import the file into the Exchange 2007 organization.
In the Organization Configuration work center of the Exchange Management Console, open the Hub Transport subcontainer and select the Edge Subscriptions tab. To import the new EdgeSync subscription file, choose the New Edge Subscription task from the Actions pane. This launches the New Edge Subscription Wizard (shown in Figure 18.18).
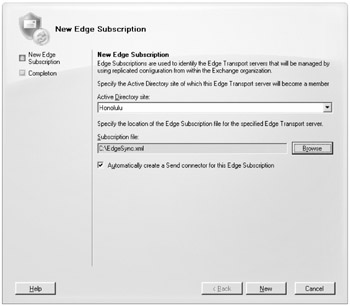
Figure 18.18: Creating a new Edge Subscription for the Hub Transport server
You must specify the Active Directory site that this Edge Transport server will be a member of. We recommend that you allow the New Edge Subscription Wizard to create the necessary Send connector to be used with the Edge Transport server. When you are ready, click the New button. The Completion page will remind you to verify firewall connectivity and name resolution.
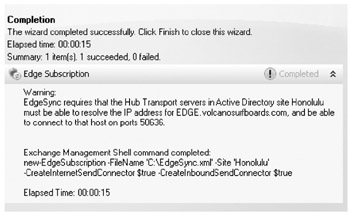
The Edge Synchronization process should start almost immediately and will synchronize configuration data once every hour afterward. Recipient information will be synchronized once every 4 hours. You can force the synchronization to run by running the EMS cmdlet Start-EdgeSynchronization with no parameters.
Confirming EdgeSync Is Running
Once you have started Edge Synchronization, you can perform a few tasks to confirm that the data is synchronizing to the ADAM database on the Edge Transport server. The first, of course, is to check the Application event log on the Hub Transport server that is running EdgeSync. Event ID 1000 from source MSExchange EdgeSync indicates that synchronization has completed successfully. Figure 18.19 shows this event.
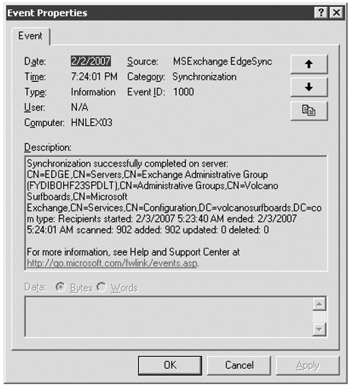
Figure 18.19: Viewing successful EdgeSync information
Annoyingly, if you look in the Description field of Event ID 1000, the times are in GMT time rather than in local time. The actual event time displays in local time, but the time in the description is different, so keep that in mind if you are troubleshooting.
In addition, you can verify that the configuration data has been transferred over to the Edge Transport server's ADAM database by looking in the Exchange Management Console on the Edge Transport server. Figure 18.20 shows the Exchange Management Console and the Edge Transport work center. In the Accepted Domains tab in the work pane for server EDGE, you can see the accepted domains that were transferred from the Exchange 2007 organization.
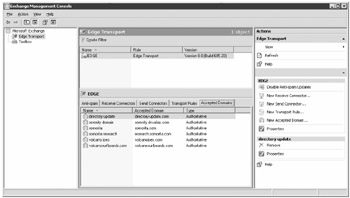
Figure 18.20: Viewing the accepted domains that have synchronized to an Exchange 2007 Edge Transport server
Any objects or properties that have synchronized from the internal Exchange Server 2007 organization (such as accepted domains, remote domains, Send connectors) should not be managed on the Edge Transport server. These objects and properties should be managed on the internal Exchange Server 2007 organization; they will be replicated to the Edge Transport server automatically.
| Note | Note that Edge Transport servers cannot be managed remotely. You must manage them from their console or using Remote Desktop Connection. |
Configuring the Edge Transport Server to Fight Spam
You now have an Edge Transport server running and synchronizing with the internal Exchange Server 2007 system and the Active Directory. Out of the box, many of the anti-spam agents are enabled and configured; the configuration is usually targeted toward a typical organization. You can make some tweaks to ensure that your organization is effectively filtering spam. You can find the anti-spam features of the Edge Transport server on the Anti-spam tab, as shown in Figure 18.21.
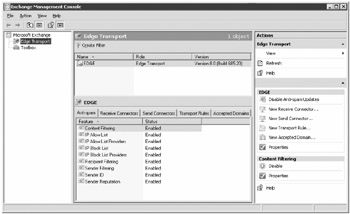
Figure 18.21: Customizing anti-spam features of an Edge Transport server
You can see the different anti-spam configuration options you can configure for the Exchange 2007 Edge Transport server. It is also helpful to note that the same anti-spam configuration options will be available for your Exchange Server 2007 organization if you have run the Install-AntispamAgents.ps1 script on your Hub Transport servers.
Content Filtering
Content Filtering is the new feature in Exchange Server 2007 that was formerly known as the Intelligent Message Filter. The content filter examines the message's content based on keyword analysis, message size, and other factors and assigns the message a spam confidence level (SCL) ranking. This ranking is from 0 to 9. A message with a ranking of 0 is the least likely to be spam and a message with an SCL of 9 is very likely to be spam. Based on the SCL value of the message, you have a series of actions you can take (see Figure 18.22).
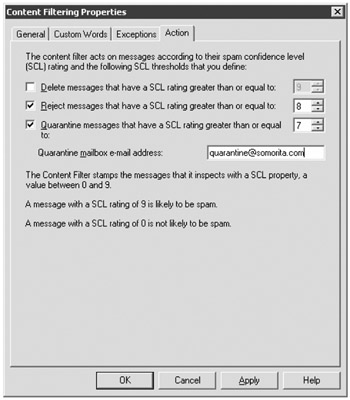
Figure 18.22: The Actions property page of the Content Filtering object
You can take three possible actions:
-
Delete messages that meet or exceed a specific SCL threshold. This is the most drastic of actions because the sender does not know this has occurred and you can't later evaluate whether the message really was spam.
-
Reject messages that meet or exceed a specific SCL threshold. The Exchange server analyzes the message and kicks it back to the sender with text indicating that the message was rejected because it looks like spam.
-
Quarantine messages that meet or exceed a specific SCL threshold. Any messages with the specified SCL value or higher will be sent to an SMTP address where you can then analyze it to determine if it was truly spam or not.
You can take none, one, two, or all three of the actions, but the SCL values for each option must at the highest value and progress downward. For example, you could set a reject value of 8 and a quarantine value of 7. Any messages with a SCL value of 8 or 9 will be rejected; messages with an SCL value of 7 will be sent to the quarantine e-mail address. However, you could not set a quarantine value of 9 but then delete everything with an SCL value of 7.
On the inside of your Exchange organization, a global value called the SCL Junk Threshold is set to 8. This instructs the information stores to place any messages with a spam confidence level of 8 or higher into the user's Junk E-mail folder. The user can then review their Junk E-mail folder to determine whether a message was truly spam. However, if the quarantine value on the Edge Transport server is set to 7, then only messages with an SCL value of 6 or less will reach the Junk E-mail folder.
You can safely drop this value to 5 or 6. To lower the Junk E-mail threshold for all users, on one of the Exchange Server 2007 servers in your organization, type this command:
Set-OrganizationConfig -SCLJunkThreshold 6
You can view the organization configuration using the Get-OrganizationConfig cmdlet.
In some cases, a specific user may need a different set of SCL values than the Edge Transport server provides. The values the Edge Transport server provides can be overridden on a user-by-user basis. In the following command, we have disabled the quarantine and reject parameters for this particular user, and we have specified that this user's Junk E-mail threshold is 4:
Set-Mailbox "Matt Paleafei" -SCLRejectEnabled $False -SCLQuarantineEnabled $False -SCLJunkThreshold 4 -SCLJunkEnabled $True
You can view the resulting configuration for the mailbox with the Get-Mailbox cmdlet. Here is an example:
Get-Mailbox "Matt Paleafei" | FL Name,*scl* Name : Matt Paleafei SCLDeleteThreshold : SCLDeleteEnabled : SCLRejectThreshold : 7 SCLRejectEnabled : False SCLQuarantineThreshold : 9 SCLQuarantineEnabled : False SCLJunkThreshold : 4 SCLJunkEnabled : True
On the Exceptions property page of the Content Filtering properties, you can configure the SMTP addresses of the internal recipients to which you do not want to apply the content filter. This can be useful when managing a mailbox that is so important you never want a message to be filtered.
The Custom Words property page of the Content Filtering object enables some interesting features (see Figure 18.23). You can enable two types of word lists. If the message contains words in the first list, even if the message appears to be spam, the message is accepted. If the words in the second list are contained in a message, the message is blocked unless it contains words from the first list.
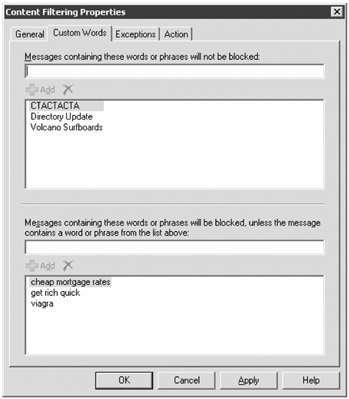
Figure 18.23: Configuring custom words for the content filter
The list with words and phrases that are always accepted can be particularly useful for organizations that know that legitimate messages to your company will frequently contain a particular word or phrase.
IP Block and Allow Lists
The IP Block List and IP Allow List features allow you to specify individual IP addresses, subnets, or entire ranges of IP addresses from which you will not accept or always accept mail, respectively. Figure 18.24 shows the interface for the IP Block List, but the interface for the IP Allow List is identical.
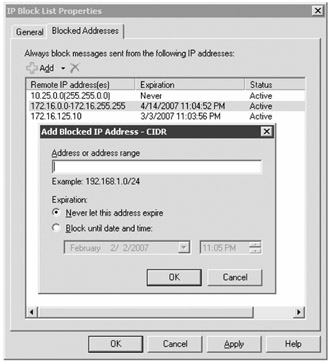
Figure 18.24: Configuring a IP Block List entry
In the foreground of Figure 18.24, you can see the interface for adding a single IP address. A nice feature of this interface is that you can specify that you always want to block an IP address, subnet, or address range or that you want to automatically unblock the address after a date and time.
IP Block and IP Allow Providers
An IP block list provider is better known as a realtime block list (RBL) provider. This is a service that keeps track of known sources of spam, open relays, open proxies, IP addresses used by dial-up connections, and IP addresses used by DHCP ranges. These are all frequent sources of spam. Conversely, an IP allow list provider is a service provider that maintains a list of IP addresses that are likely not to send spam.
The most common configuration is an IP block list provider. When an SMTP client connects to your Edge Transport server, the Edge Transport server issues a DNS query using the reverse format of the IP address along with the DNS suffix of the block list provider. For example, if an SMTP client at IP address 192.168.254.10 connects to an Edge Transport server, it will issue the DNS query 10.254.168.192.sbl-xbl.spamhaus.org if it is configured to use the Spamhaus SBL-XBL list.
If the IP address is not on the Spamhaus block list, then the DNS query will return a "host not found" message. However, if the entry is on a block list, the DNS query will return an IP address such as 127.0.0.1, 127.0.0.2, and so on. The different return codes have different meanings for different providers.
Figure 18.25 shows the IP Block List Providers properties; in this figure, three block list providers have been configured.
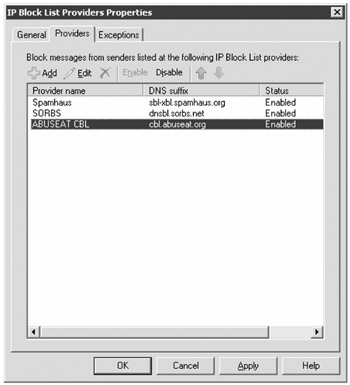
Figure 18.25: Viewing the current IP block list providers
If you click the Add button, you can add RBL providers (there are none configured by default). Figure 18.26 shows part of the Add IP Block List Provider dialog box and the custom error messages screen. The information that is required in the Add IP Block List Provider dialog box is a name for the provider and the DNS suffix or the lookup domain. You get the DNS suffix from the block list provider.
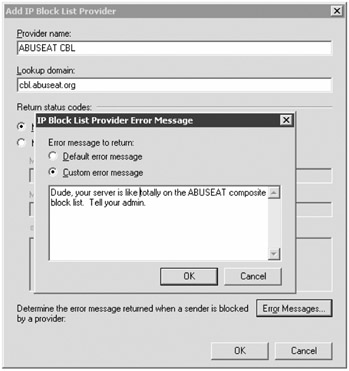
Figure 18.26: Adding a new IP block list provider
When you add a new IP block list provider, you can also configure it so that it responds only to certain error codes. This could be useful, for example, if the provider returns different error codes for different types of hosts and you only want to block mail for certain error codes.
For each block list provider, you can configure a custom error message. This can be useful for administrators whose systems may be on a block list. We recommend configuring a message that would be helpful for the administrator of a system from which you are rejecting mail.
The Exceptions property page is useful if you want to specify SMTP addresses to which the RBL blocking should not apply.
A lot of RBL providers are available on the Internet, and almost all are free. Some of these providers are pretty accurate, and some are not. Some are more aggressive than others. The more aggressive RBLs will often block entire IP subnets or entire IP ranges from regions of the world. Other IP block lists make it difficult to remove your IP address if you get on their list. Table 18.2 lists some of the RBLs we recommend using. We usually recommend choosing two RBLs; in the table they are in order of preference. Our preference is to choose less aggressive RBLs and using other filtering technologies such as content filtering or sender reputation.
| Provider | Provider's Website | Provider's DNS Suffix |
|---|---|---|
| Spamhaus | www.spamhaus.org | sbl-xbl.spamhaus.org |
| ABUSEAT CBL | cbl.abuseat.org | cbl.abuseat.org |
| SORBS | www.sorbs.net | dnsbl.sorbs.net |
| Spamcop | www.spamcop.net | bl.spamcop.net |
Recipient Filtering
When recipient filtering is enabled, the Edge Transport is configured to reject mail for any SMTP address that is not found in the Active Directory or to reject mail for specific SMTP addresses. This will reduce a lot of the garbage messages that your Exchange server accepts and then has to issue a non-delivery report for. Figure 18.27 shows the Blocked Recipients list for the Recipient Filtering object.
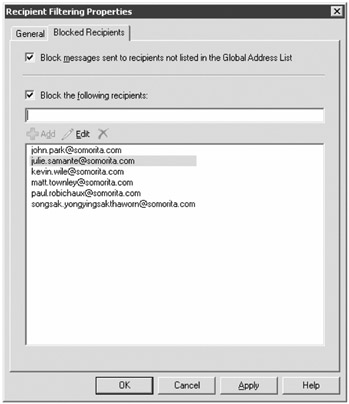
Figure 18.27: Configuring recipient filtering
We recommend that you check the Block Messages Sent to Recipients Not Listed in the Global Address List check box. This will help reduce the burden placed on your system by zombie networks of spammers. However, by recommending that you enable this check box, we are assuming that you have EdgeSync enabled and that all valid SMTP addresses are replicated to the Edge Transport server's local ADAM database.
If you are performing recipient filtering, newly created mailboxes may have their mail rejected by the Edge Transport server until the replication runs again. You can force the synchronization after new mailboxes are created by running the Start-EdgeSynchronization cmdlet. Or just make sure that the user does not give anyone their e-mail address for at least four hours after the account is created.
Sender Filtering
Sender filtering is one of the oldest anti-spam features in Exchange; it is probably also the least effective. The premise is that you provide a list of SMTP addresses or domains that should not be able to send your users e-mail. The problem is that most spammers don't use the same e-mail address twice, so this is less than completely effective. Figure 18.28 shows the Blocked Senders property page of the Sender Filtering object.
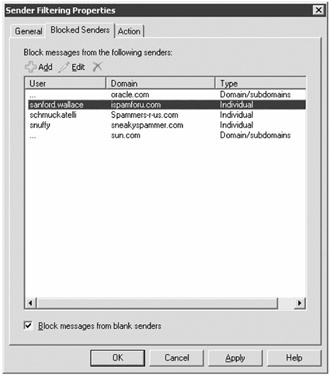
Figure 18.28: Configuring sender filtering
You can block individual senders and you can block all senders in a specific domain. One interesting anti-spam technique that some organization's employ is that they put their own domain in this list. This prevents those spam messages that claim to be from one of your own recipients. However, if you do that on an internal Hub Transport server, make sure that it is not being used for POP3, IMAP4, or other clients that use SMTP to send mail internally.
Another interesting anti-spam technique that blocks a few pieces of mail is the check box Block Messages from Blank Senders. If a message does not have a sender (and it should), then this rejects the message.
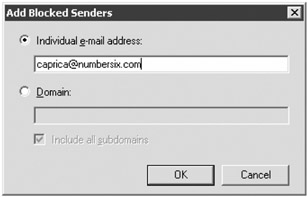
The interface is a little different than in previous versions of Exchange Server. When you add or edit blocked senders, you have the option of adding an individual user or an entire domain and subdomains.
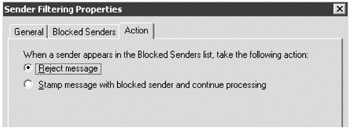
On the Action property page of the Sender Filtering object, you can specify what action to take. You can either reject the message entirely or stamp the message with a blocked sender and allow it on through. If you stamp the message as being from a blocked sender, the content filter will rank it as spam.
Sender ID
Contrary to popular misconception, Sender ID is not an anti-spam technology but a anti-spoofing technology. Quite simply, each organization on the Internet that sends e-mail should register a sender protection framework (SPF) record in their public DNS server. This SPF record contains a list of the servers authorized to send mail on behalf of their domain.
When a server receives a message from a particular domain, it analyzes the message to determine the actual sender and determines which server sent it. If the message originated from an authorized server, it is probably not being spoofed. If it is accepted from a server who is not in the DNS SPF record, then the message might be from a spoofed sender.
On the Action property page of the Sender ID object, you can specify which action to take. Figure 18.29 shows the Action property page. You can reject the message, delete the message, or accept it for further processing by the content filter.
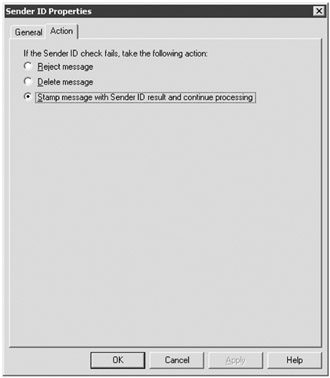
Figure 18.29: Configuring a Sender ID action
The problem with Sender ID is that fewer than 15 percent of all domains on the Internet have an SPF record. at least by our estimates. And frequently an organization's SPF records get out-of-date and are therefore wrong. The only thing worse than not having an SPF record is having one that is wrong. Therefore, it is impractical to reject or delete messages that fail the Sender ID test. You should keep this configured to Stamp Message with Sender ID Result and Continue Processing.
Sender Reputation
Sender reputation is the most promising feature of Exchange 2007 when it comes to reducing the amount of spam you receive. This is because much of the spam that is received today is sent by 'bot or zombie networks. Spammers have joined forces with virus writers; the virus writers have written malware that infects hundreds of thousands of users' computers. Periodically, these computers check with the spammer and download a new batch of spam. Blocking a single IP address becomes impractical because they have so many of these computers all over the Internet. However, these zombie networks are usually not using correct SMTP commands and are not RFC compliant. A lot of spammers also use SMTP proxies by sending messages through a proxy on the Internet.
Sender reputation allows Exchange to analyze the connections that are coming in to an Edge Transport server and look for things such as the number of protocol errors, invalid delivery attempts, and the number of messages from the same sender. These can be used to determine if a specific IP address is sending spam. On the Action property page of the Sender Reputation object (shown in Figure 18.30), you can specify the Sender Reputation Level (SRL) Block Threshold value; this is a value from 0 to 9 that is used to determine if a sender should be blocked if they exceed a certain "suspicious" threshold.
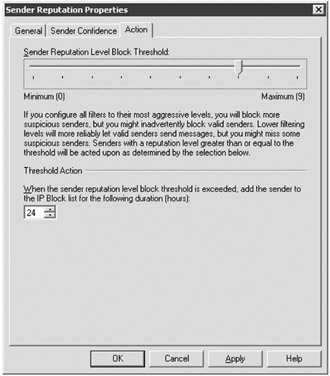
Figure 18.30: Configuring the sender reputation level block threshold
The default for the SRL block threshold is 9, but we recommend scaling it back to a slightly less aggressive value of 7 or 8 and then monitoring it to see if you still get a lot of spam. If so, you can increase it slightly, but keep in mind that as you get more aggressive with this value, the possibility of valid connections getting rejected becomes higher.
The Threshold Action section allows you to specify how long a sender is retained on an IP block list once they have been determined to be suspicious. The default is 24 hours and we recommend that you keep that value.
Exchange can test for open proxies and determine if the source of a connection is an open proxy that is probably being used to send spam. On the Sender Confidence property page (Figure 18.31), you can enable the open proxy test. If a connecting SMTP client is determined to be an open proxy, they will be added to the IP block list for the time specified on the Action property page.
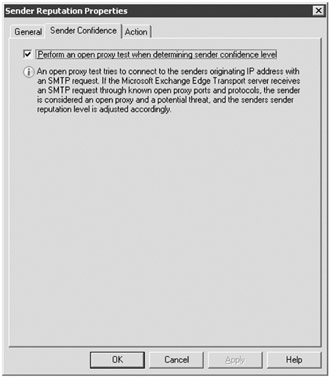
Figure 18.31: Configuring the sender reputation filter to perform an open proxy test
Configuring the Edge Transport Server to Enforce Organization Policies
The Edge Transport server has a transport rules feature just as the Exchange 2007 Hub Transport server does. You may find this useful if there are certain types of organizational policies that you wish to enforce on messages that are arriving on the Edge Transport server and before they are delivered on to the Exchange 2007 Hub Transport server. We discussed transport rules in more detail in Chapter 13, "Managing Messages in Transit."
To illustrate the use of transport rules on the Edge Transport server, let's go through an example where to enforce a policy of blocking outbound messages that contain certain confidential words and phrases. Here are the requirements:
-
All messages being sent to a user outside of the organization should have this transport rule applied to them.
-
If the message subject or body contains the words confidential, secret formula, or secret recipe, we want to take action on the message.
-
If the message meets the criteria, an error should be recorded in the event log, the message should be dropped, and a copy of the message should be sent to the company audit alias.
For this example it is assumed that the Edge Transport server is used to relay outbound messages to the Internet as well as to accept inbound messages. This example could also apply to transport rules used inside the organization.
In the Actions pane, select the New Transport Rule task to launch the New Transport Rule Wizard. On the Introduction page (shown in Figure 18.32), provide a descriptive name for the policy as well as an accurate description of the function of the transport rule. When finished, click Next to move on to the next page of the wizard.
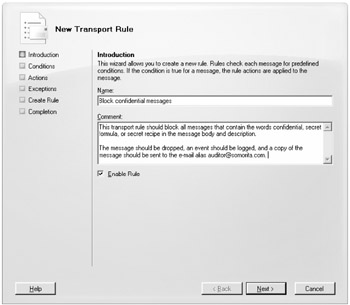
Figure 18.32: Introduction page of the New Transport Rule Wizard
On the Conditions page, specify the conditions of the transport rule. For this rule, you have two conditions that must be met: the message must be from a user inside the organization and there must be specific words in the message body or subject. First check the condition When the Subject Field or the Message Body of the Message Contains Specific Words; this will add that condition to the Step 2 portion of the wizard page. From here you need to click the specific word's link so that you can use the Specify Words dialog box. In the Specify Words dialog box, you can add or remove words and phrases that are part of the condition.
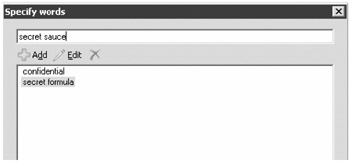
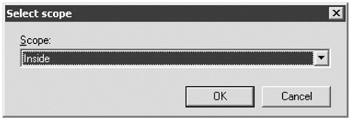
When finished, click the OK button to close the Specify Words dialog box. You now need to select the second condition; select the From Users Inside or Outside the Organization check box. This adds that selection to the Step 2 portion of the wizard page. The default is from users inside the organization, but you could change this by clicking the Inside link to see the Select Scope dialog box.
The finished product for the Conditions page looks like Figure 18.33. You can see the conditions selected on the top part of the wizard page (the Step 1 section) and the additional information that was specified for the conditions, such as the words to search for and the fact that it applies to message sent by users inside the organization.
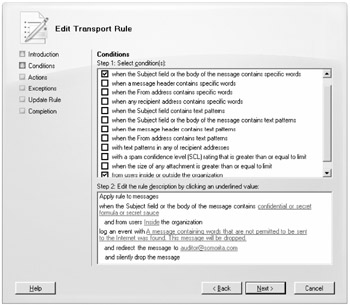
Figure 18.33: Conditions page of the transport rule
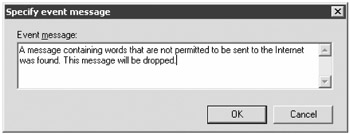
The next page of the wizard is the Actions page. On this page, you specify what you want to do if you find a message that meets the conditions you set on the Conditions page. First, you select the Log an Event with Message action; this adds a message link to the Step 2 section of the page. You click the message link to see the Specify Event Message dialog box. Here you enter the information you want entered in the event log.
Next you select the Redirect the Message to Address check box and then click the addresses link that is now in Step 2 of the wizard page. This will display the Specify Recipients dialog box. Here you need to add the SMTP address auditor@somorita.com.
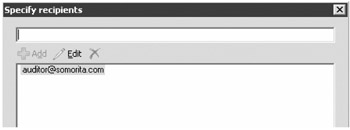
After you add the e-mail address to the Specify Recipients dialog box, click OK and then check the Silently Drop the Message check box. There is nothing else you need to do for this particular action. Figure 18.34 shows the finished product for the Actions property page.
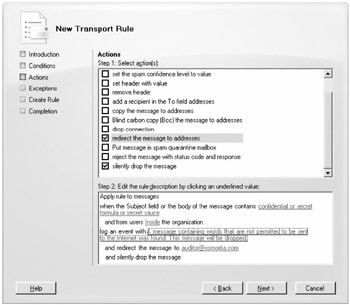
Figure 18.34: The Actions page of the New Transport Rule Wizard
You can now click Next to see the Exceptions page of the wizard. The Exceptions page allows you to add exceptions to this particular rule. In this example, there are none, so you can click Next to move on to the Create Rule configuration summary. From here, you can click the New button to create the new rule.
|
|
EAN: 2147483647
Pages: 198