Creating and Administering User Logins
3 4
Let's begin our examination of user and security management by looking at user logins. In this section, we'll first look at why logins are important and at the authentication methods that can be used to maintain logins. We'll then look at three methods for creating logins: using SQL Server Enterprise Manager, using Transact-SQL (T-SQL), and using the Create Login Wizard. And finally, we'll see how to use Enterprise Manager and T-SQL to create new user accounts.
Why Create User Logins?
User logins enable you to protect your data from being intentionally and unintentionally modified by unauthorized users. With user logins, SQL Server is able to identify individual authorized users. Each user login is assigned a unique name and password. Each user should be assigned his or her own SQL Server login account. Without user logins, all connections to SQL Server would use the same identifier, which means that you could not create different levels of security based on who is accessing the database.
With user logins, you can create multiple levels of security by granting different login accounts different permissions to access objects and to perform functions. You can also encrypt certain database objects, such as stored procedures and views, to hide their definitions from unauthorized users. And with user logins, you can allow only some users to insert and update information in certain database tables, and grant read-only access to the tables to the general user community.
To see how data access can be limited with user logins, let's return to the example, first presented in Chapter 18, of using a view to restrict access to sensitive data. Suppose you have an Employee table that contains information about employees, including each employee's name, phone number, office number, grade level, salary, bonus, and so on. To prevent certain users from accessing the confidential data in the table, you would first create a view that contains only nonsensitive information, such as employee names, phone numbers, and office numbers. Then, by implementing user logins, you can restrict access to the underlying table while allowing all users to access the view. However, if you did not take advantage of user logins, any user could access either the view or the table, thus defeating the purpose of using the view.
Authentication Modes
Two authentication modes are available for accessing SQL Server: Microsoft Windows Authentication and Mixed Mode Authentication. With Windows Authentication, the operating system is responsible for authenticating the user. SQL Server then uses this operating system authentication to determine which user permissions to apply. With Mixed Mode Authentication, both Windows NT/2000 and SQL Server are responsible for authenticating the user. To access SQL Server, you always have to first log on to a Windows NT/2000 account, so when choosing an authentication mode, you must decide simply whether you want to use SQL Server Authentication in addition to Windows Authentication. Let's look at each of these authentication modes in more detail. Later in this section, you'll learn how to implement these modes.
Windows Authentication
As mentioned, with Windows Authentication, SQL Server relies on Windows NT/2000 to provide the login security. When a user logs on to Windows NT/2000, the user's account identity is validated. SQL Server verifies that the user was validated by Windows NT/2000 and allows access based on that authentication. SQL Server integrates its login security process with the Windows login security process to provide these services. Network security attributes are validated through a sophisticated encryption process provided by Windows NT/2000. Because the SQL Server and Windows login security processes are integrated when this mode is used, once you are authenticated by the operating system, no further authentication methods are required for you to access SQL Server. The only password you need to supply in order to log on to SQL Server is your Windows NT/2000 password.
Windows Authentication is considered a better security method than Mixed Mode Authentication because of the additional security features it provides. These features include secure validation and encryption of passwords, auditing, password expiration, minimum password length, and automated account lockout after a certain number of unsuccessful logon attempts.
Mixed Mode Authentication
With Mixed Mode Authentication, users can access SQL Server by using either Windows Authentication or SQL Server Authentication. When Mixed Mode Authentication is used, if a connection is made from an insecure system, SQL Server authenticates the login by verifying whether a SQL Server login account has been set up for the user requesting access. SQL Server performs this account authentication by comparing the name and password provided by the user attempting to connect to SQL Server with login account information stored in the database. If a login account has not been set up for the user or if the user does not provide the correct name and password, SQL Server access is denied.
Windows Authentication mode is not available when you are running SQL Server on Windows 95/98, so you must use SQL Server Authentication (by using Mixed Mode Authentication) on those platforms. In addition, Web applications require SQL Server Authentication (through Microsoft Internet Information Server) because users of these applications will most likely not be within the same domain as the server and thus they can't rely on Windows security. Other applications that require database access might require SQL Server Authentication as well: some application developers prefer to use SQL Server security for their applications because it simplifies the security of their applications. When applications use SQL Server security (within a trusted network), application developers do not have to provide security authentication within the application itself, which simplifies their job.
Setting Up the Authentication Mode
To set up the authentication mode, follow these steps:
- Open the Enterprise Manager window. In the left-hand pane, right-click the name of the server that hosts the database for which you want to set the authentication mode, and choose Properties from the shortcut menu to display the SQL Server Properties window. Click the Security tab, shown in Figure 34-1.

Figure 34-1. The Security tab of the SQL Server Properties window.
- On this tab, you can choose both the security method and the startup service account. In the Security area, specify whether Windows NT/2000 and SQL Server (Mixed Mode) Authentication should be used or whether just Windows NT/2000 Authentication should be used. You can also specify the login audit level. This setting determines what, if any, type of login auditing is performed. The audit level you choose will depend on your security requirements. The following four levels are available:
- None Performs no login auditing. This is the default setting.
- Success Logs all successful login attempts.
- Failure Logs all failed login attempts.
- All Logs all login attempts.
NOTE
The auditing level is a database property. As such, the same auditing level will apply to all logins. - In the Startup Service Account area, specify which Windows NT account should be used when the SQL Server service is started up. You can either use the built-in local system account or specify an account, such as Administrator, and a password. Click OK to accept your settings.
Logins vs. Users
In the next couple of sections, you'll learn how to create logins and users. But before you start this process, you need to understand what logins and users are. This section provides brief definitions of these two terms.
As we've seen, a Windows NT/2000 user account might be needed to connect to the database. SQL Server Authentication might also be involved. Whether you are using Windows NT/2000 Authentication or Mixed Mode Authentication, the account that you use to connect to SQL Server is known as the SQL Server login. In addition to the SQL Server login, each database has a set of user pseudo-accounts assigned to it. These pseudoaccounts provide aliases to SQL Server login accounts. For example, in the Northwind database, you might have a user named manager that is associated with the SQL Server guest login, and the pubs database might have a user named manager that is associated with the SQL Server sa login account. By default, a SQL Server login account does not have a database user ID associated with it; thus, it has no permissions.
Creating SQL Server Logins
You can perform most SQL Server administrative tasks by using one of several methods, and the task of creating user logins is no exception. As mentioned earlier, you can create a login in one of three ways: using Enterprise Manager, using T-SQL, or using the Create Login Wizard. In this section, you'll learn how to create SQL Server logins by using each of these methods.
Using Enterprise Manager to Create SQL Server Logins
To create SQL Server logins by using Enterprise Manager, follow these steps:
- In the left-hand pane of the Enterprise Manager window, expand the server group, expand the server, and then expand the Security folder. Right-click Logins, and choose New Login from the shortcut menu to display the SQL Server Login Properties window, shown in Figure 34-2. On the General tab, enter a SQL Server login name in the Name text box. If you are using Windows Authentication, this name must be a valid Windows NT or Windows 2000 account name. Next specify the Windows NT or Windows 2000 domain in the Domain text box. In the Default area, specify the default database and language that the user will use. In the Authentication area, specify whether a Windows NT or Windows 2000 account will be used or whether SQL Server Authentication will be used. If you choose SQL Server Authentication, Mixed Mode Authentication will be used.
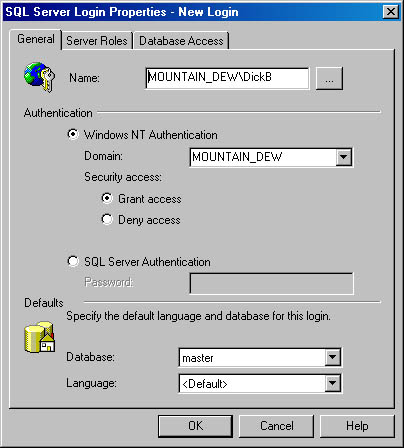
Figure 34-2. The General tab of the SQL Server Login Properties window.
- Click the Server Roles tab, shown in Figure 34-3. On this tab, you can specify which server roles the new login will be able to choose by selecting roles from the list of roles available to the user. Clicking Properties allows you to view and modify the role that you selected. (Roles are explained in the section "Administering Database Roles" later in this chapter.)
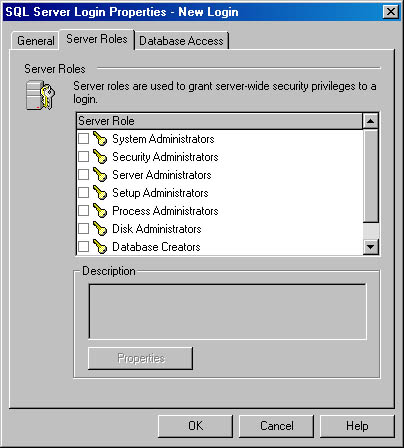
Figure 34-3. The Server Roles tab of the SQL Server Login Properties window.
- Click the Database Access tab, shown in Figure 34-4. This tab lets you specify which databases the user has permission to access. (Database permissions are covered in the section "Administering Database Permissions" later in this chapter.) You can select multiple databases and the roles that are available to those databases. Clicking Properties allows you to view and manage the database role properties.

Figure 34-4. The Database Access tab of the SQL Server Login Properties window.
- When you have finished specifying options, save the login by clicking OK. To see the new login listed with the other logins, click the Logins folder in Enterprise Manager. The logins will be listed in the right-hand pane.
Using T-SQL to Create Logins
To create logins by using T-SQL, you use the sp_addlogin stored procedure or the sp_grantlogin stored procedure. The sp_addlogin stored procedure can add only a SQL Server_authenticated user to a SQL Server database. The sp_grantlogin stored procedure can add a Windows NT/2000_authenticated user.
The sp_addlogin stored procedure has the following syntax:
sp_addlogin [ @ loginame = ] ' login' [ , [ @ passwd = ] ' password' ] [ , [ @ defdb = ] ' database' ] [ , [ @ deflanguage = ] ' language' ] [ , [ @ sid = ] ' sid' ] [ , [ @ encryptopt = ] ' encryption_option' ]
The optional parameters are as follows:
- password Specifies the SQL Server login password. The default is NULL.
- database Specifies the default database of the login. The default is master.
- language Specifies the default language of the login. The default is the current SQL Server language setting.
- sid Specifies the security identifier, which is a unique number. If you do not specify a value, one will be generated for you. The sid parameter is not generally used by users, but administrators use sid in a number of situations. When the DBA performs troubleshooting tasks, sid might be needed to determine which login is being checked. The sid parameter is the internal identifier for the login.
- encryption_option Specifies whether the password will be encrypted in the system tables. The default value is NULL, which means that the password will be encrypted. Specifying skip_encryption means that the password will not be encrypted. If you specify skip_encryption_old, the password that was encrypted already by an earlier version of SQL Server will not be encrypted again. This setting should be changed from the default only if you want to avoid encrypting the password in the system tables.
A simple example of adding a login is shown here:
EXEC sp_addlogin 'PatB'
Remember to use the EXEC keyword before the stored-procedure name.
A more complex example of adding a login is shown here:
sp_addlogin 'SharonR', 'mypassword', 'Northwind', 'us_english'
This command creates a user named SharonR with the password "mypassword." The default database is Northwind, and the default language is U.S. English. In general, you should let SQL Server create a security identifier for you instead of creating your own.
The sp_grantlogin stored procedure has the following syntax:
sp_grantlogin 'login_name'
An example of using the sp_grantlogin stored procedure is shown here:
EXEC sp_grantlogin 'MOUNTAIN_DEW\DickB'
"DickB" is the Windows NT or Windows 2000 account name. "MOUNTAIN_ DEW" is the system name.
After you add these logins, you can view them in Enterprise Manager. To do so, click the Logins folder in the left pane.
Using the Create Login Wizard
To create a SQL Server login by using the Create Login Wizard, follow these steps:
- In Enterprise Manager, expand a server group, and click a server name. From the Tools menu, choose Wizards. In the Select Wizard dialog box that appears, expand the Database folder, click Create Login Wizard (shown in Figure 34-5), and then click OK. The Create Login Wizard welcome screen appears, as shown in Figure 34-6.
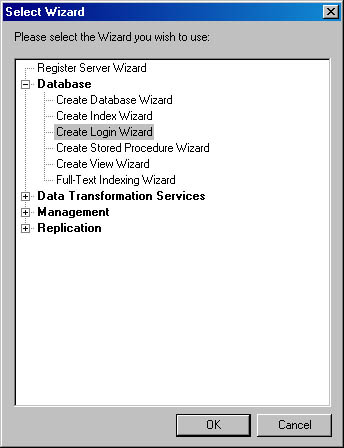
Figure 34-5. A Select Wizard screen.

Figure 34-6. The Create Login Wizard welcome screen.
- Click Next to display the Select Authentication Mode For This Login screen, as shown in Figure 34-7. In this screen, you can specify whether Windows Authentication or SQL Server (Mixed Mode) Authentication should be used.
Figure 34-7. The Select Authentication Mode For This Login screen.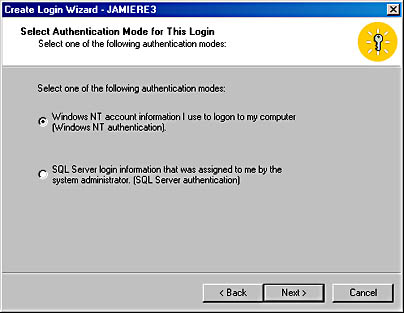
- Click Next to display the Authentication With Windows NT screen or Authentication With SQL Server screen, depending on the authentication mode you selected in step 2. Figure 34-8 shows the latter screen. In this screen, you specify the login ID and password. If you had selected Windows NT Authentication, you would be prompted to enter a domain name and user account name for the authentication.
Figure 34-8. The Authentication With SQL Server screen.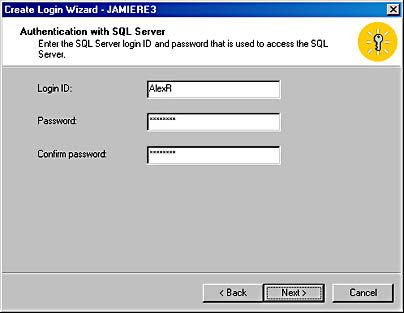
- Click Next to display the Grant Access To Security Roles screen, as shown in Figure 34-9. In this screen, you can select the database roles to be assigned to this login.
Figure 34-9. The Grant Access To Security Roles screen.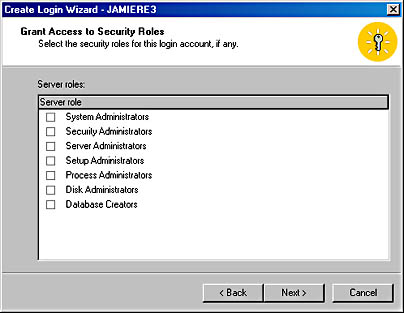
- Click Next to display the Grant Access To Databases screen, shown in Figure 34-10. In this screen, you can select the databases to which this login will have access.
Figure 34-10. The Grant Access To Databases screen.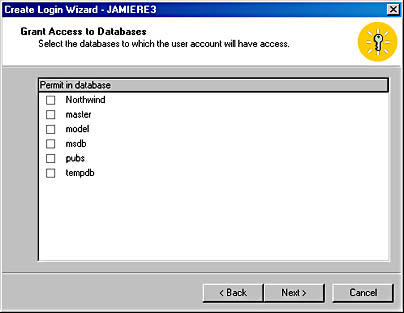
- Click Next to display the Completing The Create Login Wizard screen, shown in Figure 34-11, where you can examine the summary information in the text box. Click Back to make any changes, and click Finish to create the login.
Figure 34-11. The Completing The Create Login Wizard screen.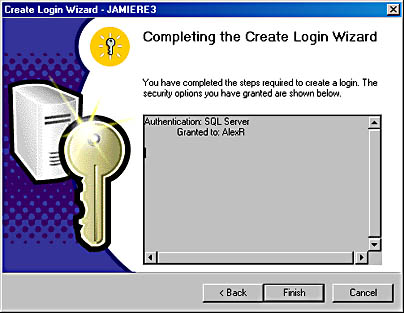
Creating SQL Server Users
You can create SQL Server users by using Enterprise Manager or T-SQL. (SQL Server does not include a wizard to help you with this process.) In this section, you'll learn how to use both these methods to create SQL Server users. Remember, a SQL Server user is defined for a particular database and permissions are assigned for that database to a specific user login. The SQL Server user ID can be thought of as analogous to the SQL Server login, but it is not required to have the same name as the login.
NOTE
To create a SQL Server user, you must already have defined the SQL Server login for that user because the user name is a reference to a SQL Server login.
Using Enterprise Manager to Create Users
Unlike SQL Server logins, which are created from within the Security folder of Enterprise Manager, SQL Server users are created from within the specific database folder in the left-hand pane of Enterprise Manager. To create users by using Enterprise Manager, follow these steps:
- Right-click the database in which the user is to be created, point to New in the shortcut menu, and then choose Database User to display the Database User Properties window, shown in Figure 34-12. Enter a valid SQL Server login name in the Login Name drop-down list, and type a new user name in the User Name text box. Then specify the database roles that you want the new user to be a member of by selecting the appropriate check boxes in the Database Role Membership list box. As you'll see later in this chapter, by assigning permissions to these roles, you can apply the permissions to the user.
- Click Properties to display the Database Role Properties window, as shown in Figure 34-13. In this window, you can modify a database role you have selected. This task is explained in the section "Administering Database Roles" later in this chapter.
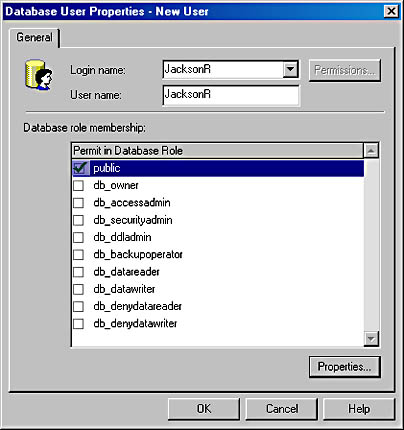
Figure 34-12. The Database User Properties window.

Figure 34-13. The Database Role Properties window.
- When you are finished setting options, click OK twice to create the database user.
Using T-SQL to Create Users
To use T-SQL to create database users, you run the sp_adduser stored procedure. This stored procedure can be run from ISQL or OSQL and has the following syntax:
sp_adduser[ @loginame = ] 'login' [ , [ @name_in_db = ] 'user' ] [ , [ @grpname = ] 'group' ]
The login parameter is the SQL Server login account name and must be provided. The user variable is the new user name, and group is the group or role that the new user will belong to. If a user value is not specified, it will be the same as the login parameter.
The following command creates a new database user with the name JackR and the Windows NT or Windows 2000 account FORT_WORTH\DB_User:
sp_adduser 'FORT_WORTH\DB_User', 'JackR'
"FORT_WORTH" is the system or domain name. "DB_User" is the Windows NT or Windows 2000 account name.
EAN: N/A
Pages: 264