Using Analysis Services
3 4
Now that you know what Analysis Services is and how to install it, let's look at how to use the services it provides to create and manage your data warehouse. In this section, we will configure a data source, build an OLAP database on the data source, and finally build a cube on the database.
Configuring the Data Source
The first step in connecting Analysis Services to a SQL Server database is to set up an Open Database Connectivity (ODBC) system data source for the server. You accomplish this task by using the ODBC Data Sources utility located in the Administrative Tools folder. To set up a system data source, follow these steps:
- Click Start, point to Programs, point to Administrative Tools, and then choose Data Sources (ODBC). The ODBC Data Source Administrator dialog box appears, as shown in Figure 29-6.
Figure 29-6. The User DSN tab of the ODBC Data Source Administrator dialog box.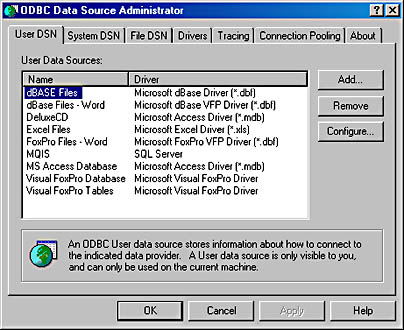
- Click the System DSN tab, shown in Figure 29-7. You will notice several data sources listed in the System Data Sources list box. Some of these data sources are already defined as connections to SQL Server. It is acceptable and sometimes desirable to have multiple ODBC data sources referencing the same database, depending on how the database is used. In this example, we'll create an ODBC data source that references the Northwind database.
Figure 29-7. The System DSN tab of the ODBC Data Source Administrator dialog box.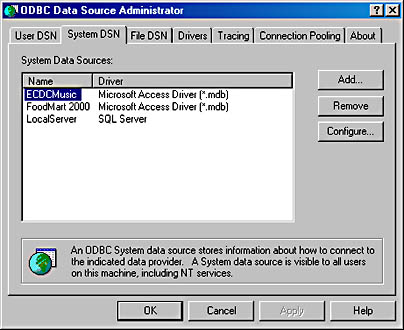
- Click Add. The Create New Data Source dialog box appears, as shown in Figure 29-8. In the list box, select SQL Server. Then click Finish.
Figure 29-8. The Create New Data Source dialog box.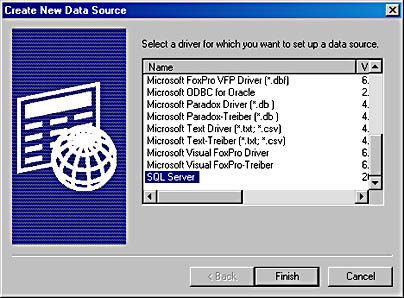
- The Create A New Data Source To SQL Server dialog box appears, as shown in Figure 29-9. Here you must assign a name to your data source, give it a description, and specify which SQL server you want to connect to. Click Next to continue.
Figure 29-9. The Create A New Data Source To SQL Server dialog box.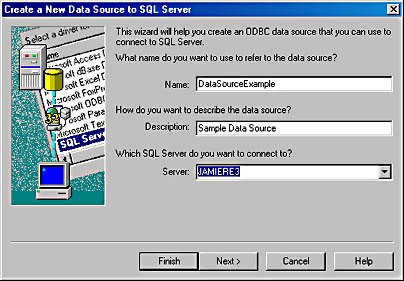
- In the next dialog box, shown in Figure 29-10, you specify the authentication mode that will be used when users connect to SQL Server. You can select Windows NT authentication or SQL Server authentication. (The user authentication modes are described in Chapter 34.) In the lower part of the dialog box, you will see a check box that is selected by default. If you do not want to log into SQL Server at this time to retrieve default information for the rest of the setup process, clear this check box. Click Next to continue.
Figure 29-10. Specifying the authentication mode.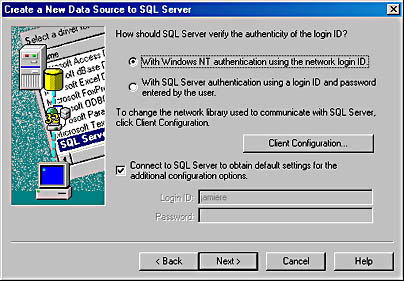
- In the next dialog box, shown in Figure 29-11, you specify the database to use, the database filename, and ANSI modes. Analysis Services will allow you to select the database you will be connecting to, so providing a default database name is not necessary. However, it doesn't hurt to supply one, because other applications might use this data source name (DSN). When you are finished, click Next.
Figure 29-11. Specifying the default database.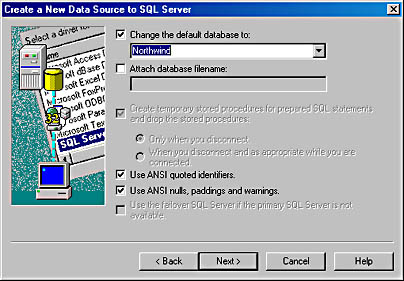
- In the next dialog box, shown in Figure 29-12, you can change the language used for SQL Server messages to a language other than English, enable translations, specify regional settings, and specify log file locations for long-running queries and driver statistics. When you are ready to continue, click Finish.
Figure 29-12. Specifying language and other settings.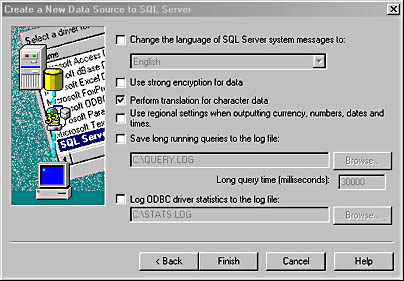
- The ODBC Microsoft SQL Server Setup dialog box appears, as shown in Figure 29-13. This dialog box states that a new ODBC data source will be created and lists all the options you chose for that data source.
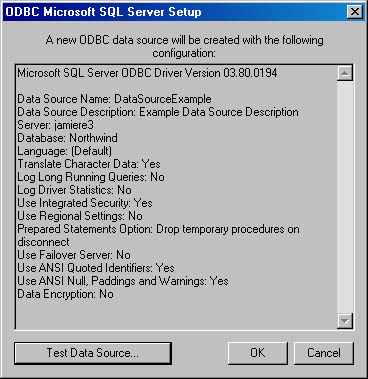
Figure 29-13. The ODBC Microsoft SQL Server Setup summary dialog box.
- You should test the data source by clicking Test Data Source. When you do this, the connection to the database will be tested. Once you have successfully tested the connection, click OK, and the DSN will be available for use.
NOTE
In order for you to configure and test the data source, SQL Server must be up and running.
Creating an OLAP Database
Now that you have configured and tested the ODBC data source, you're ready to create an OLAP database. Creating an OLAP database involves setting up an existing database as an OLAP database. You must be prepared to specify which tables will be used as fact tables and which will be dimension tables.
NOTE
In this section, we'll set up the Northwind database as an OLAP database. This database does not have all of the properties of a data mart or data warehouse, but we'll use it in this example because it comes with SQL Server, and the example can be easily reproduced.
In the OLAP database creation process, you use Analysis Manager, the Cube Wizard, the Dimension Wizard, and the Storage Design Wizard. To create the database, follow these steps:
- Click Start, point to Programs, point to Microsoft SQL Server, point to Analysis Services, and then choose Analysis Manager. The Analysis Manager window appears, as shown in Figure 29-14.
Figure 29-14. The Analysis Manager window.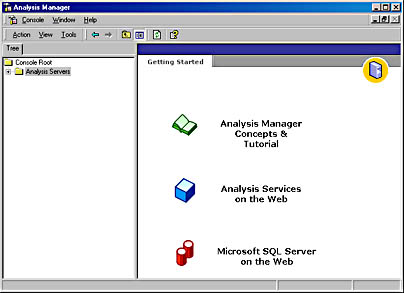
- Expand the Analysis Servers folder in the left pane, and then expand your server name folder. Right-click the server name and choose New Database from the shortcut menu to display the Database dialog box, shown in Figure 29-15. Name the new database and provide a brief description. In this example, we'll name the database Northwind_OLAP.
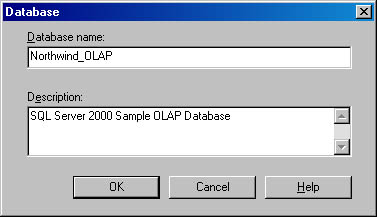
Figure 29-15. The Database dialog box.
NOTE
When you expand your server name folder, you'll see a sample database already configured in Analysis Manager. This database, named FoodMart 2000, was set up automatically if you selected the Sample Applications check box in the Select Components dialog box during Analysis Services installation. - Click OK to return to the Analysis Manager window. If you expand the Analysis Servers folder and expand your server name, you will see that the new database has been added. (The database is named, but it does not have a connection to the SQL Server data source—we'll take care of that shortly.) Expand the database folder (in this case, the Northwind_OLAP folder) to reveal the Data Sources, Cubes, Shared Dimensions, Mining Models, and Database Roles folders, as shown in Figure 29-16.
Figure 29-16. An expanded OLAP database.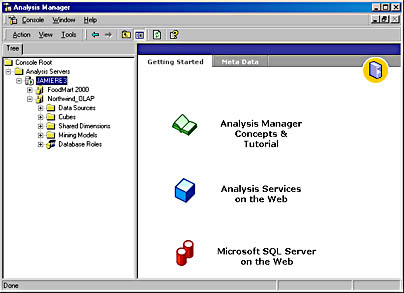
- Right-click the Cubes folder, point to New Cube in the shortcut menu, and then choose Wizard from the New Cube submenu. The Cube Wizard welcome screen appears, as shown in Figure 29-17. This wizard is used to select a data source, which is specified at the cube level.
Figure 29-17. The welcome screen of the Cube Wizard.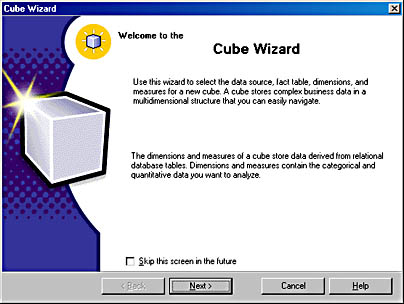
- Click Next to display the Select A Fact Table From A Data Source screen, shown in Figure 29-18. To select the SQL Server database, click New Data Source.
Figure 29-18. The Select A Fact Table From A Data Source screen.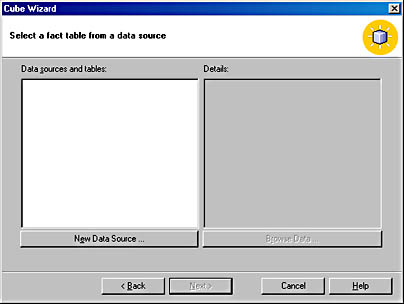
- The Data Link Properties window appears, as shown in Figure 29-19. On the Provider tab, you can specify a data source for the cube—however, in this case, we'll use the Connection tab to select the data source that we created earlier in this chapter.
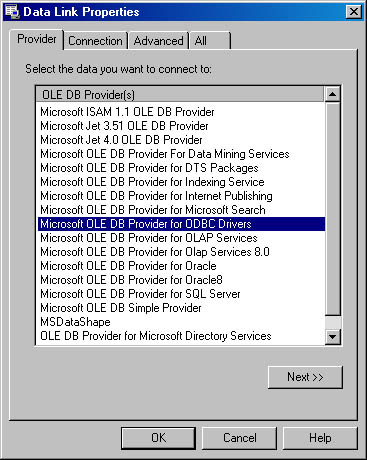
Figure 29-19. The Provider tab of the Data Link Properties window.
- On the Connection tab of the Data Link Properties window (Figure 29-20), select the data source name (DataSourceExample, in this example), type the login user name and password, and enter the initial catalog to use. If you don't have an administrator password (you should have one if you are on a network), select the Blank Password check box.
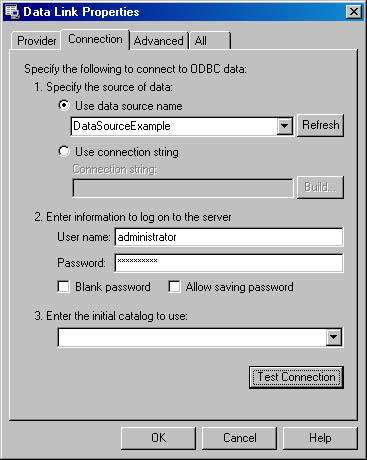
Figure 29-20. The Connection tab of the Data Link Properties window.
- At this point, you should test the connection by clicking Test Connection. If the test succeeds, you will receive a "connection succeeded" message. If the test fails, you have probably entered something incorrectly. After the connection test is successful, click OK to return to the Select A Fact Table From A Data Source screen of the Cube Wizard, as shown in Figure 29-21.
Figure 29-21. The Select A Fact Table From A Data Source screen of the Cube Wizard, populated with data sources and tables.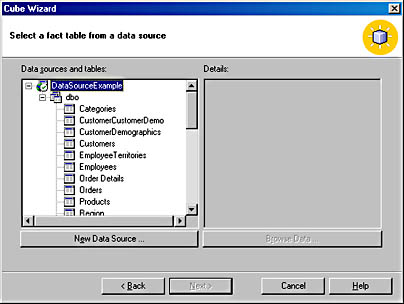
- In the Data Sources And Tables list box of this screen, double-click a table that you want to use as the data source for your cube. In this example, we will double-click the Orders table. Even though the Orders table is not exactly a dimension table, it's similar to one. (This table is used here so that the general user can work through this example.)
- Click Next to display the Select The Numeric Columns That Define Your Measures screen, shown in Figure 29-22. Here you can select a column or columns that define the numeric measures of the cube; these will be used for the aggregations. In this case, choose OrderID and Freight by double-clicking or by selecting each column name and clicking the right-arrow button.
- Click Next to display the Select The Dimensions For Your Cube screen, shown in Figure 29-23. Here you select the dimension tables that will be used in this cube. In this example, we'll create a dimension table.
Figure 29-22. The Select The Numeric Columns That Define Your Measures screen.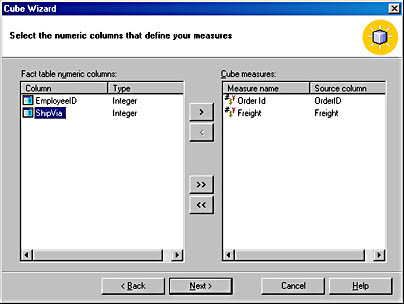
Figure 29-23. The Select The Dimensions For Your Cube screen.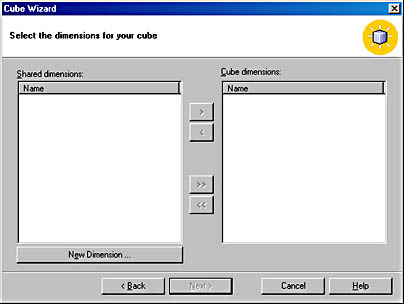
- Click New Dimension to display the Dimension Wizard welcome screen, shown in Figure 29-24.
Figure 29-24. The welcome screen of the Dimension Wizard.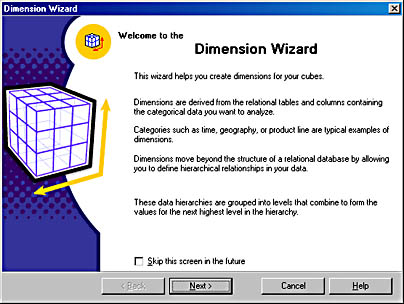
- Click Next to continue. The Choose How You Want To Create The Dimension screen appears, as shown in Figure 29-25. In this screen, you specify how you want to create the dimension. You can choose a star schema, a snowflake schema, a parent/child relationship, a virtual dimension, or a mining model. For this example, click Star Schema.
Figure 29-25. The Choose How You Want To Create The Dimension screen.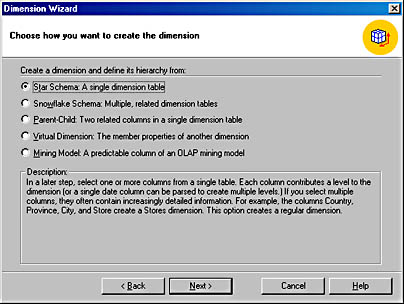
- Click Next to display the Select The Dimension Table screen, shown in Figure 29-26. For this example, select the Employees table as the dimension table.
Figure 29-26. The Select The Dimension Table screen.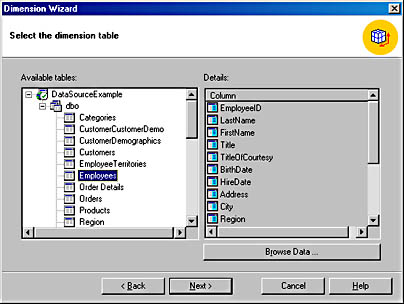
- Click Next to display the Select The Dimension Type screen, shown in Figure 29-27. Here you can select whether to use a standard dimension or a time dimension. For this example, click Standard Dimension.
Figure 29-27. The Select The Dimension Type screen.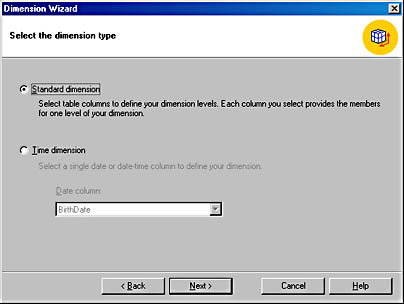
- Click Next to display the Select The Levels For Your Dimension screen, shown in Figure 29-28. You can select several levels of aggregations in this screen, but in this simple example, we'll select only one level—Employee Id. To choose a level, select the column and click the right-arrow button, or simply double-click the column name.
Figure 29-28. The Select The Levels For Your Dimension screen.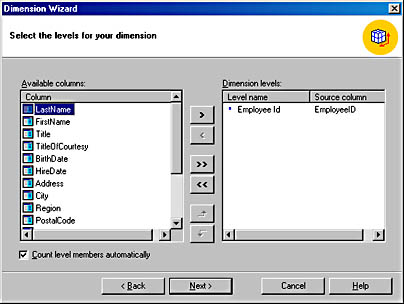
- Click Next to display the Specify The Member Key Columns screen, shown in Figure 29-29. If you are building a cube from multiple tables, you specify the table key columns here.
- Click Next to display the Select Advanced Options screen, shown in Figure 29-30. Here you can modify the dimension, specify the sort order used on the members, and define the storage model. If the cube you are creating is extremely large, you should specify the ROLAP storage model, as discussed previously in this chapter. If you select any of these options, the wizard will display the appropriate screens to help you make the selection. We will not discuss these screens here.
Figure 29-29. The Specify The Member Key Columns screen.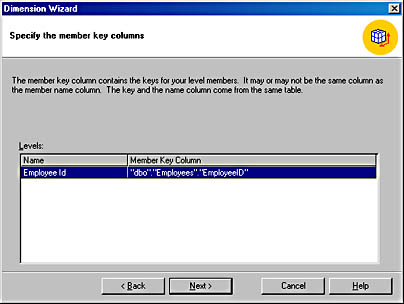
Figure 29-30. The Select Advanced Options screen.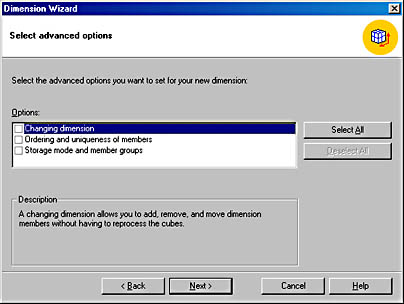
- Click Next to display the Finish The Dimension Wizard screen, shown in Figure 29-31. Name the dimension and then click Finish.
Figure 29-31. The Finish The Dimension Wizard screen.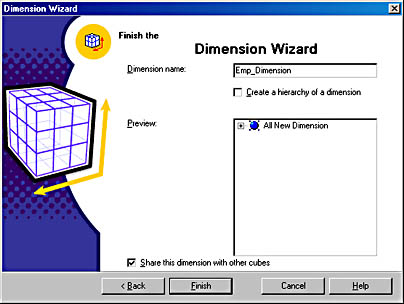
- Once you have completed the Dimension Wizard, you will be returned to the Select The Dimensions For Your Cube screen (shown earlier in Figure 29-23) of the Cube Wizard. Your new dimension appears in the Cube Dimensions list. From here, you can proceed with selecting the dimension table that is used to create the summary data on the fact table, or you can create more dimension tables by clicking New Dimension and running the Dimension Wizard again.
To proceed, click Next. If you are asked if you want to count the rows, click yes. The Finish The Cube Wizard screen appears, as shown in Figure 29-32. All that remains to be done in this wizard is to name the cube.
- Clicking Finish takes you to the Cube Editor window, shown in Figure 29-33. Edit the cube as necessary, and then exit the Cube Editor window by clicking the Close button. Usually, no editing is needed.
Figure 29-32. The Finish The Cube Wizard screen.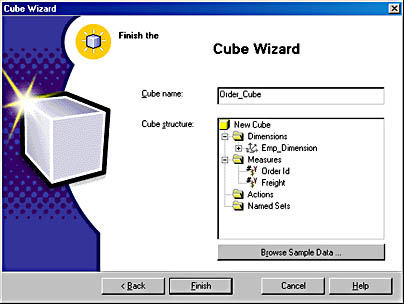
Figure 29-33. The Cube Editor window.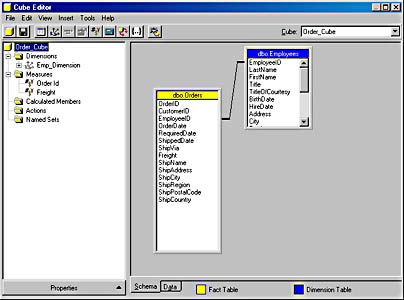
- When you exit the Cube Editor window, you will be asked whether you want to create storage options for the cube. Click Yes. The Storage Design Wizard welcome screen appears, as shown in Figure 29-34.
Figure 29-34. The welcome screen of the Storage Design Wizard.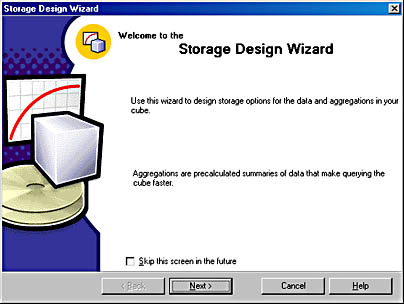
- Click Next to display the Select The Type Of Data Storage screen, as shown in Figure 29-35. Here you specify whether you want to store your data dimensionally, relationally, or using a combination of both data types—for this example, click MOLAP to store the data within the data structures of Analysis Services. If you choose to store the data relationally (using ROLAP), the new tables will be stored in the database you are working with, in this case, Northwind database. The final option is HOLAP (Hybrid OLAP), in which the underlying data is stored relationally and the aggregation data is stored multidimensionally.
- Click Next to display the Set Aggregation Options screen, shown in Figure 29-36, where you can specify optional ways of creating aggregates. For this example, accept the default, 100 MB, and click Start to create the aggregates.
Figure 29-35. The Select The Type Of Data Storage screen.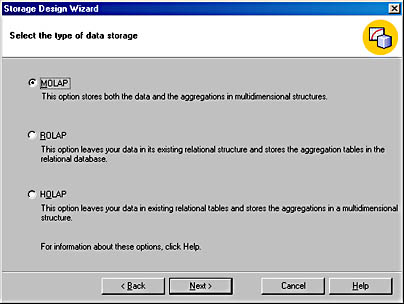
Figure 29-36. The Set Aggregation Options screen.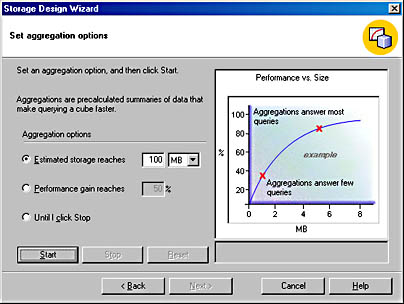
Because the table we're using in this example is such a small table, only a few seconds are needed to calculate the aggregates. The resulting aggregates are then charted, and the Set Aggregation Options screen is shown again (Figure 29-37). Note that we have not charted much in this example, so the graph is just a vertical line on the far left side of the chart.
Figure 29-37. The Set Aggregation Options screen with the aggregates charted.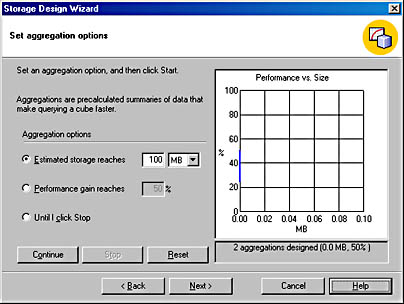
- Click Next to display the Finish The Storage Design Wizard screen, shown in Figure 29-38. Here you specify whether to finish the Storage Design Wizard now or save your settings and wait until later. The latter option can be useful if you want to wait until after business hours, when the system load is low, to create the storage. In this example, we'll select Process Now.
- Click Finish. The Process dialog box appears, as shown in Figure 29-39. Once the operation of creating the cube storage is complete, a message will appear at the bottom of the screen, informing you that the operation was completed successfully. Click Close to finish the process.
Figure 29-38. The Finish The Storage Design Wizard screen.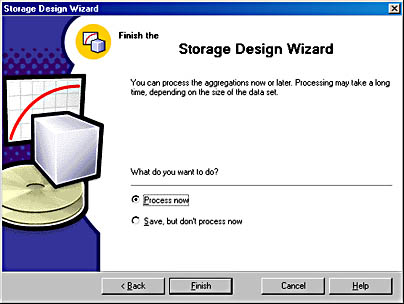
Figure 29-39. The Process dialog box.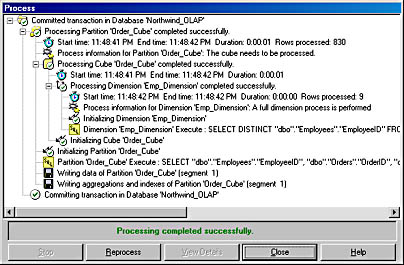
Modifying an Existing OLAP Database
You modify an OLAP database through Analysis Manager in a manner similar to that in which you created the OLAP database. In this section, we'll modify the FoodMart 2000 database. The FoodMart 2000 database is provided as part of the Analysis Services installation (if you selected the Sample Applications check box during the installation). To edit a cube in the FoodMart 2000 database, follow these steps:
- In the Analysis Manager window, expand the Analysis Servers folder, expand a server, expand the FoodMart 2000 folder, and then expand the Cubes folder, as shown in Figure 29-40.
Figure 29-40. The Analysis Manager window.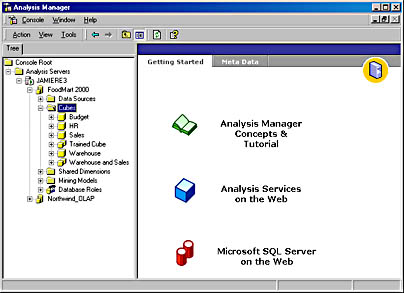
- Right-click the Sales folder and choose Edit from the shortcut menu. This invokes the Cube Editor window, shown in Figure 29-41. This window shows the relationships of the dimension and fact tables within the cube.
Once you have invoked the Cube Editor window, a number of options are available to you. These options are described here:
- Create a new dimension. Invoke the Dimension Manager by right-clicking either the Dimensions folder or any dimension name in the left pane. The Dimension Manager is similar to the Dimension Wizard that you saw earlier in this chapter. It is used to add new dimensions to a database or to remove existing dimensions.
- Delete a dimension. Delete a dimension by right-clicking it and choosing Remove. This action will permanently remove a dimension from the database.
- Create, delete, or rename a measure. Right-click the measure and choose New Measure, Delete, or Rename.
- Create a new calculated member. Either right-click the Calculated Members folder or right-click a calculated member, and choose New Calculated Member.
- Edit, delete, or rename a calculated member. Right-click a calculated member and then choose Edit, Delete, or Rename.
On the Schema tab of the right pane, you can right-click the headings of either dimension or fact tables and choose the following options:
- Insert Tables Allows you to add tables to the database.
- Change Alias Allows you to rename an existing cube property. You can define a derived cube property that is based on another cube property without changing the underlying property.
- Browse Data Allows you to retrieve table data for viewing.
- Replace Allows you to select a different table to replace a table that is already in the database.
- Remove (dimension table only) Allows you to remove a dimension table from the database.
Figure 29-41. The Cube Editor window.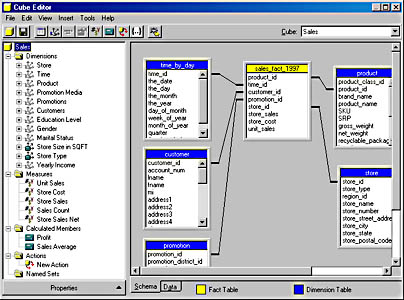
- Choose Data from the View menu of Analysis Manager or click the Data tab to witness the true usefulness of the OLAP system. On the Data tab of the Cube Editor window, shown in Figure 29-42, you can select summary data based on criteria that you can select through a number of drop-down menus. These menus are derived from the dimensions in the cube. The Data tab is similar to the Cube Browser dialog box that we'll see in a moment.
On the Data tab, you can select different combinations of variables to achieve different views of the data. Because the summary data is already calculated, the results are instantaneous. If the summary data were not available, you would have to run individual queries. In a large data mart or data warehouse, the process of calculating the aggregates could take a long time.
Figure 29-42. The Data tab of the Cube Editor window.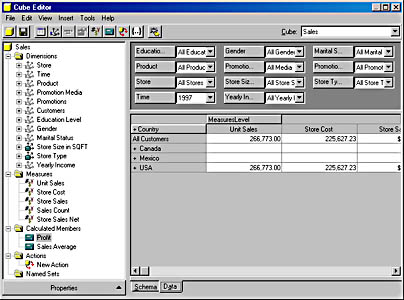
Processing the Data
Once you have created the cubes, a number of options are available that enable you to view and process that data. You can access many of these services by right-clicking the cube name in the left-hand pane of the Analysis Manager window. Some of these options include the following:
- Process Used to update the aggregates. Because the aggregates are not automatically updated when the underlying data is changed, they must be periodically updated. This process can be time consuming and should be scheduled accordingly (for nights, weekends, and so forth).
- Design Storage Invokes the Storage Design Wizard. This allows you to modify the underlying storage properties of the OLAP cubes. Earlier in this chapter, you learned how to use the Storage Design Wizard.
- Usage-Based Optimization Invokes the Usage Based Optimization Wizard, which helps you tune the cube by improving the aggregations based on a history of queries that have been run against them. You accomplish this by viewing the queries that have been run against the database and optimizing those queries. The Usage Based Optimization Wizard offers suggestions of ways to modify the queries or the aggregates themselves.
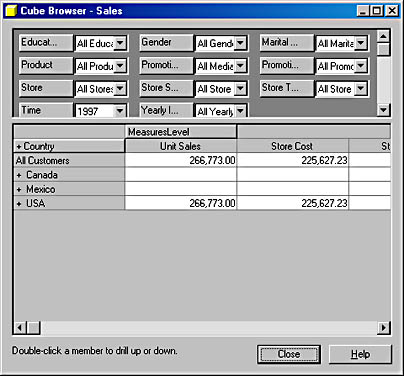
- Browse Data Enables you to view the aggregations. Choosing the Browse Data option invokes the Cube Browser dialog box, shown in Figure 29-43 for the FoodMart 2000 database example. As you can see, this dialog box is similar to the Data tab of the Cube Editor window. In the Cube Browser dialog box, you can easily create customized results, using the stored aggregates within the cube.
- Usage Analysis Invokes the Usage Analysis Wizard, which enables you to analyze queries that are sent to the cube. The Usage Analysis Wizard uses data about the queries that were run against the cube based on your criteria. This wizard is similar to the Usage Based Optimization Wizard in that it allows you to choose criteria to judge which queries take the longest time to run. The Usage Analysis Wizard, however, is used just for viewing that data.
Because Analysis Services does not automatically update the OLAP cubes and because the underlying data might change, you must update these cubes as often as you think necessary for your system. If the data is modified often and users depend on up-to-date information, you might need to update the cubes frequently. If yesterday's data is acceptable, a nightly refresh might be good enough.
You update all cubes by right-clicking the Cubes folder of the desired OLAP database folder and choosing Process All Cubes. As mentioned, if you want to update cubes individually, right-click the cube name and choose Process from the shortcut menu.
You access the SQL Server OLAP cubes through an OLE DB application, by viewing data through Analysis Manager, or by setting up a link to the OLAP database. The Cube Browser dialog box of the Analysis Manager is a useful tool for viewing data based on the cubes that you have created.
However, if you have a data warehouse or data mart that is already functioning, you might find SQL Server Analysis Services difficult to merge into your existing operation because Analysis Services works by creating new data cubes that are based on your database and that are accessed via an OLE DB interface. If your current application does not use OLE DB, you might not be able to take advantage of these services.
Analysis Services can be used to perform multidimensional analysis in many types of data warehouses and data marts. From the aggregates, you can use the Cube Browser dialog box of Analysis Manager to perform multidimensional analysis. Whether you can take advantage of Analysis Services depends on how well the services it provides fit into your business.
EAN: N/A
Pages: 264