| Controlling one Mac from another over a network is called remote access. As a safety measure, remote access on your Mac is turned off by default. There are times, however, when you may need to allow someone to control your Mac remotely, or you may want to control your office Mac from another workstation. If you work in an agency that has a staff IT department, they may need to access your Mac remotely for maintenance, updates, and troubleshooting. Remote Login Remote Login is a way for someone to access your Mac using a network protocol called SSH. Connecting to your Mac this way requires using the Unix command line and should be done only by someone who knows what he or she is doing. If that someone is from your IT department, he or she is probably using this to perform maintenance tasks and install system updates for you. Don't give your user name and password to well-meaning friends so that they can log in to your Mac remotely. They might unintentionally damage your operating system or delete client files. Tip Remote Login is disabled by default, and you should leave it off unless you have a really good reason to turn it on. If your Remote Login information falls into the wrong hands, someone could log in to your Mac from another workstation and steal or delete client files from your hard drive.
If your agency's IT department needs you to, here's how to turn on Remote Login: 1. | Launch System Preferences (choose Apple menu > System Preferences).
| 2. | Click the Sharing icon.
| 3. | In the Sharing preference pane, click the Services tab (Figure 10.26).
Figure 10.26. If you need to activate Remote Login on your Mac, check the Remote Login box in the Sharing preference pane's Services pane. 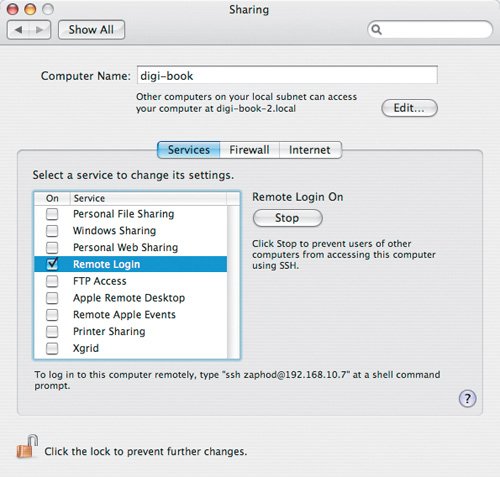
| 4. | In the Services pane, check the Remote Login box.
If you need to disable Remote Login, just uncheck the box.
|
Remotely Controlling Macs Sometimes your IT department may need to use other tools to connect to your Mac. For example, they may want to take control over your Desktop to teach you how to use a new printer or RIP system while you watch. In those cases, they are probably using Apple Remote Desktop (ARD), or a free virtual network computing (VNC) tool like Chicken of the VNC. Apple Remote Desktop ARD makes your IT department's life much easier. They can check your Mac from their office when you are having system problems, take control of your Desktop for troubleshooting, let you see their Desktop for training, and even distribute system updates to all of the Macs on your network. To activate access to your Mac through Apple Remote Access, we'll go back to the Services pane of the Sharing preference pane. 1. | Launch System Preferences (choose Apple menu > System Preferences).
| 2. | Click the Sharing icon.
| 3. | In the Sharing pane, click the Services tab.
| 4. | In the Services pane, check the Apple Remote Desktop box (Figure 10.27).
Figure 10.27. To activate ARD access so that your IT department or Mac consultant can remotely access your Mac, just check the Apple Remote Desktop box in the Sharing preference pane's Services pane. 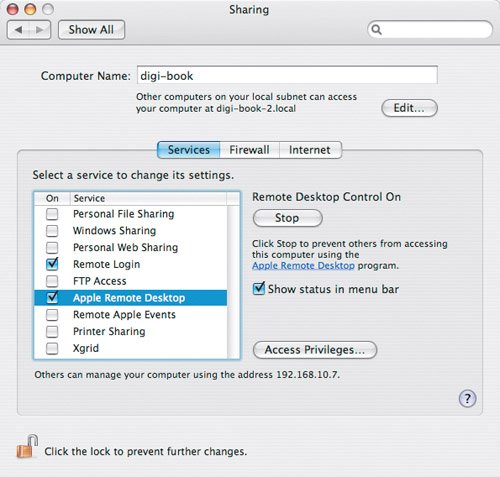
|
Tip Check the "Show status in menu bar" box. This adds a binocular icon to your menu bar that shows when your IT department is monitoring your Mac (Figure 10.28).
Figure 10.28. The ARD menu bar item adds a visual cue to let you know if someone is remotely monitoring your Mac. 
Tip Not every user needs to have the same level of access through ARD. Selecting a name in the User list shows the access level that only that user has when he or she logs in remotely.
Apple Remote Desktop access privileges The Sharing preference pane's Access Privileges button allows you to fine-tune what someone using Apple Remote Access can do when he or she connects to your Mac (Figure 10.29). If you don't see the button, make sure you are still in the Services pane of the Sharing preference pane and check the Apple Remote Desktop box. A list of options helps you manage what users can and can't do: User list. The User list shows every login name on your Mac. If you are the only user, there should be only one name. Checking the box next to a user name means your IT department can use that user's name and password to log in to your Mac with ARD. Odds are they created a special user account on your Mac for just that purpose. Figure 10.29. When you click the Access Privileges button for ARD, you can control exactly what someone is allowed to do if he or she connects to your Mac through ARD. In this case, anyone who connects with my login information has full control of my Mac. 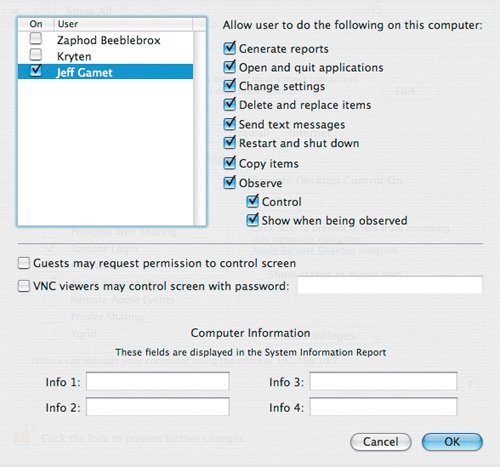 "Allow user to do the following on this computer" list. When a user name is selected, this list activates. You can check any activities you want to allow when someone logs in to your Mac remotely. You can choose how much or how little a remote access user can do, ranging from allowing someone to only observe your Desktop, all the way to letting him or her do everything that you can do while sitting at your Mac. Your IT department will tell you which items need to be checked. "Guests may request permission to control screen." This option lets someone that doesn't know the login information for your Mac request access so that he or she can take control or monitor your Desktop. Unless your IT department or Mac consultant explicitly tells you to turn this option on, don't. Although you have to allow each guest ARD connection to occur, there's no need to risk lowering your Mac's security level. "VNC viewers may control screen with password." Don't worry about the VNC option just yet. We'll talk about that in the next section, appropriately named "VNC." Computer Information. The Computer Information fields are useful for an IT department that generates information reports from the Macs on your network for auditing, maintenance, inventory, and other logging tasks. The information you enter here can be used in report searches, so your IT department may have specific keywords they want you to enter. If not, leave the fields blank.
When you are finished setting up each user's remote access control level, click the OK button to return to the Sharing preference pane. VNC VNC is an alternative method for controlling your Desktop through a network. It has the budgetary benefit of being free, unlike ARD, which costs up to $499. If your IT department is using this technology, all you need to do is grant them access to your Mac. 1. | Launch System Preferences (choose Apple menu > System Preferences).
| 2. | Click the Sharing icon.
| 3. | In the Sharing pane, click the Services tab.
| 4. | In the Services pane, check the Apple Remote Desktop box.
| 5. | Click the Access Privileges button.
| | | 6. | In the dialog that drops down, check "VNC viewers may control screen with password" (Figure 10.30).
Figure 10.30. Allowing VNC connections lets other people log in to your Mac remotely and see and control your Desktop. Be sure to include a password, or anyone with a VNC client and network access to your Mac can take complete control over it without your permission. 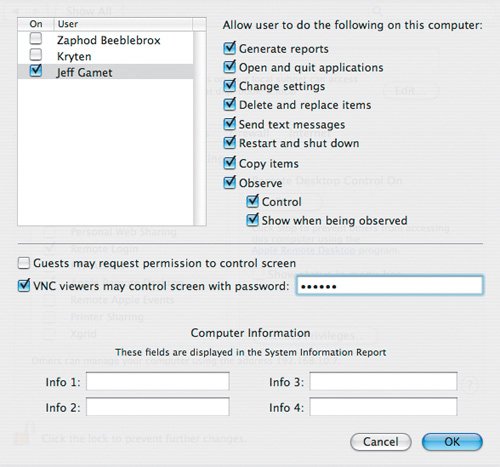
| 7. | Enter a password to prevent unauthorized users from remotely accessing your Mac.
| 8. | Click OK when you have finished entering your settings.
To turn VNC access off, just uncheck the "VNC viewers may control screen with password" box.
|
Connecting to another Mac Activating VNC on a Mac is only half the battle. In order to connect to another workstation and control it, you need a VNC client application on the Mac you will be working from. Luckily, VNC client applications tend to be free, and one of the most popular is called Chicken of the VNC. Chicken of the VNC, by Geekspiff (www.geekspiff.com), is a fairly easy program to use. Its only purpose is to connect you to remote computers that have VNC turned on. 1. | Launch Chicken of the VNC.
| 2. | Choose Connection > Open Connection.
| | | 3. | In the VNC Login dialog, enter the TCP/IP address of the computer you want to control (Figure 10.31).
Figure 10.31. In Chicken of the VNC's login window, enter the TCP/IP address of the Mac you want to control in the Host field. Leave the Display/Port field set to 0, and enter the remote Mac's VNC password in the Password field. 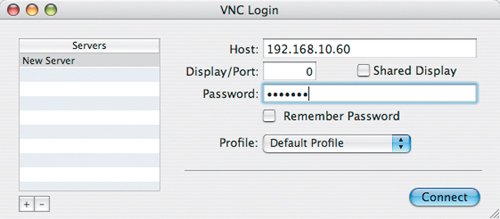
| 4. | Leave the Display/Port field set to 0.
| 5. | Enter the remote computer's VNC password in the Password field.
| 6. | Click the Connect button.
|
Tip If a Windows PC has VNC server software installed and running, you can control it just the same as a Mac.
Apple Remote Desktop vs. VNC ARD will set you back $299 for 10 users, or $499 for unlimited users, and VNC is free. The compelling price point that VNC offers is great, but you give up many of ARD's powerful network management features. If you need to manage software updates and installations for several Macs, ARD is a much better option. On the other hand, if you only need to take control of another Mac's Desktop, VNC can save you a lot of money. Warningtechno-speak! If you are interested in building your own software updater and installer packages and pushing them to every Mac on your network, you need ARD. It will save you untold hours of time and frustration. It's also a powerful tool for remote diagnostics and maintenance, and for system auditing. If that last paragraph made your eyes glaze over, ARD may be more than you need. Stick with VNC. On the other hand, if you jumped up with glee thinking of the lost weekends you could get back, break out the credit card. |
Finding Chicken of the VNC The hardest part of using Chicken of the VNC is downloading it. It should be as simple as going to a Web page and clicking a link, but that's not the case. 1. | Go to the Chicken of the VNC download Web site at http://sourceforge.net/projects/cotvnc
| 2. | Click the Download Chicken of the VNC button.
| 3. | Find the heading titled Latest File Releases.
| 4. | Find the link for cotvnc-20b4.dmg. The number after cotvnc is the file version, so it will likely be different for you (Figure 10.32).
Figure 10.32. Scroll down the Web page until you see a file whose name starts with cotvnc and ends with .dmg. Between the two parts of the name sits the application version number. In this case, the full filename is cotvnc-20b4.dmg. Click the filename. 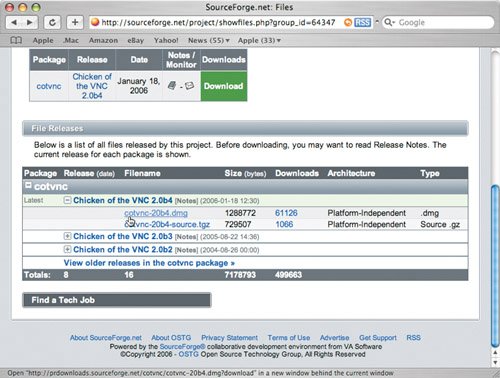
| 5. | Choose a location from which to download Chicken of the VNC. It doesn't matter which location you choose, because the download time will be nearly identical from all of the locations. I chose Seattle, Washington (Figure 10.33), simply because it's near the top of the list.
Figure 10.33. Choose a location from which to download Chicken of the VNC. It doesn't matter which location you choose; I selected Seattle, Washington. 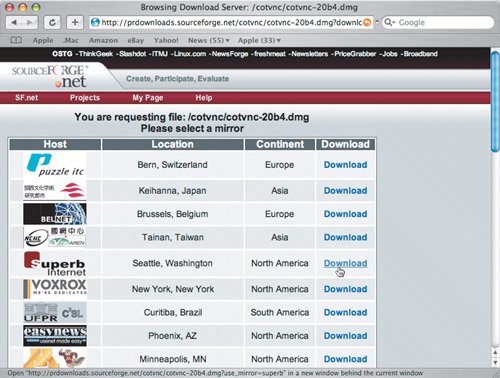
|
Once the download completes, you need to install the application. 1. | Find the disk-image file you just downloaded. The filename should look like cotvnc-20b4.dmg. Don't forget that the numbers in the middle of the filename might be different.
| 2. | Double-click the file to open the disk image.
| 3. | Double-click the new disk icon on your Desktop.
| 4. | Drag the Chicken of the VNC application from the window to your Applications folder.
|
|
A new window should open, showing you the Desktop of the remote Mac you just connected to. You can use the remote Mac just as if you were sitting in front of it. Although this feature is especially useful for network administrators who need to manage several workstations and servers without having to run around the office, it's also useful for designers. For example, if you work with several Macs, each primarily used for different activities, you can monitor each one from your primary workstation. If you work in an agency that produces multimedia content, you may work with a video-editing station, an audio-mixing station, as well as your primary workstation. You can do your audio- and video-editing projects at the appropriate workstations, but you can monitor rendering progress through Chicken of the VNC without leaving your primary workstation. Responsible remote control We just made it through some fairly technical-sounding stuff, and it turns out it's not quite the rocket science some people make it out to be. Used wisely, ARD and VNC can be valuable resources when you're working with other Macs on your network. You can, for example, see the Desktop of a Mac sitting across the office that acts as a RIP for a wide-format printer and manage the jobs it's going to print. Instead of walking over to the Mac and checking if the RIP software is running, or maybe restarting it, you can handle those chores from your own desk. I use VNC to control my file servers that sit behind a locked door one floor below me. Keep in mind that you can potentially open your Macs to hackers and other evildoers, so be sure to use these tools only if you need them, and make sure that you follow the setup steps correctly. Convenience is of no value if you have to sacrifice the security of your business to gain it. |