Flylib.com

Books Software


Configure Now, Remember Me Later


Configure Now, Remember Me Later

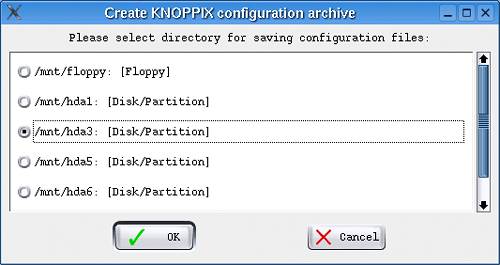
As you go through and try out the various things written about in this book, you will probably configure a number of things. Speaking of which, let's take another look at that Configure submenu under the KNOPPIX. Notice that you can configure a TV tuner, a sound card, or a printer as well (both local and network connected).

Look below that and you will discover two of the more interesting options, at least from the perspective of booting into Knoppix at a later time. There is an item on this KNOPPIX menu called Save KNOPPIX configuration . As you go along, you'll be making some changes, such as configuring printers or setting up your network. Using this menu option, you can save all of these configuration details to a diskette or to a disk partition.

The first dialog that appears (Figure 2-5) asks what settings to save. These include personal configuration files, network settings, graphics card configuration, and other settings, such as printers. Since the desktop icons are created by default when Knoppix boots, this is the only option that isn't checked. But if you have made custom changes to your desktop, you can override that now.

Figure 2-5. Tell Knoppix what settings you want to save.


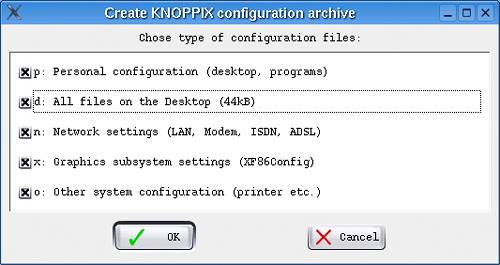
Then Knoppix reads your disk partitions and offers you a choice (Figure 2-6). You can write the configuration files either to a diskette or to one of your disk partitions. This operation is perfectly safe and does not format your drives .

Figure 2-6. Select which partition you would like to use to save your settings.


Tip

If you are coming from the Windows world, the concept of named partitions such as in Figure 2-6 (e.g., /mnt/hda1 ) may seem a bit odd. Partitions are still common to your old OS, but you are probably used to thinking of them as drive letters .


If you choose to save to a diskette, The next time you boot Knoppix, make sure the diskette is in your drive and enter this command at the boot prompt:

knoppix floppyconf

If, on the other hand, you chose to use one of your disk partitions, you would flag that in the boot string to restore your settings:

knoppix myconfig=/mnt/hda10

Should you forget where you stored these settings, you can also type " knoppix myconfig=scan " and Knoppix will look at all your disk partitions and load the appropriate configuration.


The Persistence of Memory

I don't think Salvador Dali had Knoppix in mind when he created The Persistence of Memory, one of my favorite paintings, but the title seems appropriate here. If you start saving any amount of data to your knoppix home directory, one of two things will happen. The first is that you will run out of space, since you are writing to a RAM disk, basically just virtual memory. The second is that you'll lose all that information when you reboot. Your digital memories are gone.

To deal with both of these issues, consider setting up a persistent home directory . This is a small section of disk, an external drive, or even a USB memory key. The size of this directory is defined either by the size of the partition you choose or as a selected number of megabytes. Here's how you do it.

Head once again to the KNOPPIX menu and choose the Configure submenu. From there, select "Create a persistent KNOPPIX home directory." A short dialog will appear describing the process and asking you if you want to continue. Once you've read it, click Yes. The next dialog will ask you to choose the disk partition (or external storage). It is very similar to the one seen earlier in Figure 2-6.

Once you've selected a partition, a very important message appears (Figure 2-7). You are asked whether you wish to format this partition or just create an image on it. I strongly urge you not to choose the format option. If you want some dedicated external storage that doesn't share space with your existing partitions, use a memory stick instead.

Figure 2-7. Read carefully ! Do you want to format your disk or just use a portion of it?


Important

I don't mean to sound repetitious, but it's vital that you make the right choice here. If you don't want to reformat your whole disk to create a persistent home directory, make sure you click No .


If you chose No, then you will then be asked to enter the size of your persistent home directory in megabytes (Figure 2-8). The default here is 30.

Figure 2-8. Define how much space you would like your persistent home directory to use.


Next you'll be asked whether you want that data encrypted, in which case you will also need to enter a password or passphrase to access that data at boot time. That's the last setting. The persistent home directory is created and you can then access it at boot time. Assuming that I chose my /mnt/hda10 partition again, here's how I would tell Knoppix to load the persistent home directory:

knoppix home=/mnt/hda10

(You can also enter " knoppix home=scan ".)

To select both my saved settings and the persistent home directory, use the myconf and home flags on boot:

knoppix home=scan myconf=scan

That's it. One final thought before we move on. The beauty of using the USB memory key is that you can take your WFTL Knoppix disk with you; wherever you go, you have a USB memory key in your pocket and all your configuration and files handy.