Creating Tables the Simple Way
When you use the Database Wizard to create a contact management database, the database has all the components needed to store basic information about people. But suppose The Garden Company needs to store different types of information for different types of contacts. For example, it might want to maintain different types of information about employees , customers, and suppliers. In addition to the standard information ”such as names , addresses, and phone numbers ”the company might want to track these other kinds of information:
-
Employee Social Security number, date of hire, marital status, deductions, and pay rate
-
Customer order and account status
-
Supplier contact, current order status, and discounts
While building the database, you could add a lot of extra fields to the Contacts table and then fill in just the ones it needs for each contact type, but cramming all this information into one table would soon get pretty messy. It s better to create a database with one table for each contact type: employee, customer, and supplier.
The Database Wizard doesn t offer exactly this combination of tables, so in this exercise, you will create a GardenCo database with an empty structure. You will then add several tables to the database by using the Table Wizard.
-
On the toolbar, click the New button to display the New File task pane.
-
In the New area of the New File task pane, click Blank database .
-
Navigate to the My Documents\Microsoft Press\Office System 2003 SBS\CreateNew\CreateGrdn folder, in the File name box, replace db1 with GardenCo , and then click Create .
Access displays a database window that contains no tables, queries, forms, or other database objects. (You can confirm that the database is empty by clicking each of the object types on the Objects bar.)
-
On the database window s toolbar, click the New button to display the New Table dialog box.
Tip Instead of clicking the New button, on the Database toolbar, you can click the down arrow to the right of the New Object button, and then click Table; or you can click Tables on the Objects bar, and then double-click Create table by using wizard"; or you can click Table on the Insert menu, and then double-click Table Wizard.
-
Double-click Table Wizard .
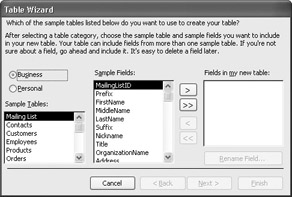
The wizard s first page appears. You can display a list of either business tables orpersonal tables. Although these categories are generally oriented toward business or personal use, depending on the nature of your business or preferences, you might find the sample table you want in either list.
-
Take a few minutes to browse through the business list, and then select the Personal option to see those sample tables.
Each category contains a list of sample tables. When you click an item in the Sample Tables list, the Sample Fields list displays all the fields available for that table.(If you need more fields, you can add them after creating the table.) Selecting an item in the Sample Fields list and then clicking the > button moves the selected field to the Fields in my new table list. Clicking the >> button moves all sample fields to the Fields in my new table list. The < and << buttons remove one or all fields from your new table list.
-
Select the Business option, and in the Sample Tables list, select Customers .
-
Click the >> button to copy all the fields to the Fields in my new table list, and then click Next .
The next page of the wizard is displayed, in which you can provide a name for your new table and specify whether the wizard should set a primary key for the table. A primary key consists of one or more fields that differentiate one record from another.
-
Accept Customers as the table name, click No, I ll set the primary key , and then click Next .
The wizard suggests CustomerID as the field that will uniquely identify records, and asks what type of data the field will contain.
-
Click Numbers and/or letters I enter when I add new records , and then click Next .
The last page of the wizard is displayed, in which you can select one of the three option buttons on this page to determine whether the table should open in Design view or in Datasheet view, or whether a wizard-generated form should open so that you can enter data.
-
Accept the default selection, Enter data directly into the table , and click Finish to create and open the Customers table.
-
Scroll horizontally through the table to view all the fields created by the wizard based on your selections on its first page. Then close the table.
The Customers table appears in the database window.
-
Start the Table Wizard again, this time by double-clicking Create table by using wizard in the database window.
-
Select the Business option, click Employees , and then move only the following fields to the Fields in my new table list, by selecting each field in the Sample Fields list and clicking the > button.
EmployeeID
FirstName
LastName
Title
Address
City
StateOrProvince
PostalCode
HomePhone
Birthdate
DateHired
Photograph
Notes -
In the Fields in my new table list, select StateOrProvince , click the Rename Field button , change the name of the field to State , and click OK .
-
Click the Next button twice to move two pages forward, naming the table Employees and allowing Access to create a primary key.
Because one table already exists in the database, the wizard attempts to establish a relationship between the tables and displays a new page.
-
Click Next .
-
Click Finish , and then close the Employees table.
-
Repeat steps 13 through 18 to create a table called Suppliers that includes all the fields provided (don t forget to rename StateOrProvince ). Click Finish to accept all the suggestions and defaults.
-
Close the Suppliers table.
Three tables are now listed in the Tables pane of the database window.
CLOSE the GardenCo database.
EAN: 2147483647
Pages: 350