Checking the Work of a Wizard
Using a wizard to create a database is quick and painless, but just what do you end up with? The Database Wizard creates a database application, complete with a switchboard, several tables, and some other objects. In many cases, all you have to do to have a working database application is add the data. If the wizard s work doesn t quite suit your needs, you can modify any of the database objects or use another type of wizard to add more objects.
For example, if you tell the Database Wizard to create a contact management database, it creates three tables. It doesn t create any queries for this type of database, but it does for some of the other types. It creates forms that you can use to enter or view data, and two reports that you can use to list contacts or summarize the calls made or received during the week. Finally, it creates a switchboard so that users can quickly access the parts of the database needed to perform specific tasks .
In this exercise, you ll use the switchboard to take a quick tour of the Contacts database that the Database Wizard has created. You can t check out some of the objects unless the database contains data, so along the way, you will enter information in several of the tables.
USE the Contacts database in the practice file folder for this topic. This practice file is located in the ![]() My Documents\Microsoft Press\Office 2003 SBS\CreateNew\CheckDB folder and can also be accessedby clicking Start/All Programs/Microsoft Press/Microsoft Office System 2003 Step by Step .
My Documents\Microsoft Press\Office 2003 SBS\CreateNew\CheckDB folder and can also be accessedby clicking Start/All Programs/Microsoft Press/Microsoft Office System 2003 Step by Step .
OPEN the Contacts database and acknowledge the safety warning, if necessary.
-
In the switchboard, click the Enter/View Other Information button to display the Forms Switchboard window.
This switchboard has two buttons : the first opens a form you can use to enter or view contact types, and the second returns you to the Main Switchboard window.
-
Click Enter/View Contact Types to display the Contact Types form.
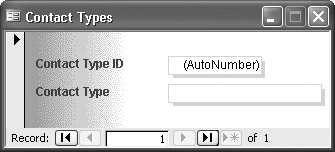
If the underlying Contact Types table contained any records, you could use this form to view them. The only action you can take now is to add a new record.
-
In the Contact Type box, type Supplier and press the [ENTER] key.
Access supplies the entry for the Contact Type ID field. Access keeps track of this number and enters the next available number in this field whenever you adda new record.
-
Repeat the previous step to enter records for Customer and Shipper .
-
Use the Navigation buttons at the bottom of the form to scroll through the records in the Contact Types table. Then click the Close button to close the form.
Important With most computer programs, saving your work often is important to avoid losing it if your computer crashes or the power goes out. With Access, it is not only not important to save your data, it is not possible to manually save it. When you move the insertion point out of a record after entering or editing information, Access saves that record. This mixed blessing means that you don t have to worry about losing your changes, but you do have to remember that any data entry changes you make are permanent and can be undone only by editing the record again.
-
Click Return to Main Switchboard .
-
Click Enter/View Contacts .
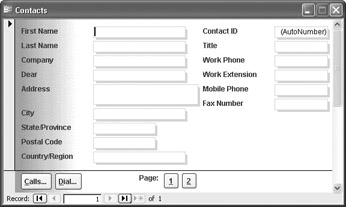
The Contacts form is displayed. You use this two-page form to enter records in the underlying Contacts table or to view records that are already there. The form has buttons at the bottom to switch between pages and to open other forms from which you can place calls (Dial) or where you can record information about communications you ve had with the contact (Calls).
-
Enter some information on this form ”your own first and last name will do ”and notice that when you enter your name , Access provides a contact ID.
-
At the bottom of the form, click the 2 button to move to page 2, and then expand the list of contact types.
The list displays the three types you just entered in the Contact Types table through the Contact Types form.
-
Click one of the contact types.
-
Return to the first page, click in the Work Phone box to place the insertion point there, type 555-0100 , and press [ENTER].
-
Click in the Work Phone box again, and click Dial .
The AutoDialer dialog box appears, with the contents of the box that is currently selected on the form displayed as a potential number to dial.
Tip This dialog box is not part of Access; it is a Windows utility. When you click the Dial button, VBA code attached to the button calls the utility. If you were to click Setup, the Windows Phone And Modem Options dialog box would be displayed. (If you don t have a modem installed, the Install New Modem dialog box appears instead.)
-
Click Cancel to close the AutoDialer dialog box, and then click the Calls button.
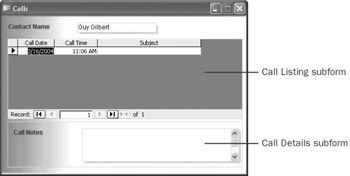
The Calls form is displayed. This form includes the Call Listing subform, which lists any previous calls you have recorded, and the Call Details subform, which displays details of the selected call. You can record information about communications (phone calls, e-mail exchanges, and so on) that you ve had with this contact.
-
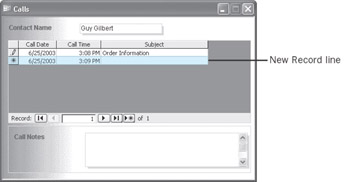
Click in the Subject cell of the new record, and enter Order information as the subject.
Access adds a New Record line, where the Call Date and Call Time fields default to the current date and time.
-
Click in the Call Notes box, and type a short note.
-
Click the Close button to close the Calls form, and then close the Contacts form.
-
Click Preview Reports to display the Reports Switchboard window.
-
Preview the two short reports by clicking the button for each one, reading it, and then closing it.
When you preview the Weekly Call Summary report, you can enter a range of dates that you want included on the report. If you accept the default range of the current week, the summary of the call you just added is included in the report.
-
Click Return to Main Switchboard , and then click the Close button to close the Main Switchboard window without closing the database.
-
Double-click the database window s title bar to restore the window.
-
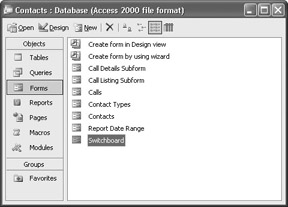
Explore all the objects in the database by clicking each type on the Objects bar and then opening the individual tables, forms, and reports.
You won t be able to open the Report Date Range form directly, because it is designed to be opened by VBA code that supplies the information that the form needs.
CLOSE the Contacts database.
EAN: 2147483647
Pages: 350