Making Printouts Easier to Follow
Changing how your data appears in the body of your worksheets can make your data much easier to understand, but it doesn t communicate when the worksheet was last opened or whom it belongs to. You could always add that information to the top of every printed page, but you would need to change the current date every time you opened the document; and if you wanted the same information to appear at the top of every printed page, any changes to the body of your worksheets could mean you would need to edit your workbook so that the information appeared in the proper place.
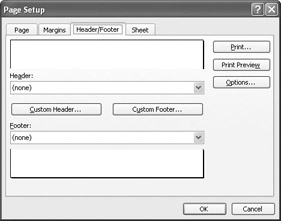
If you want to ensure that the same information appears at the top or bottom of every printed page, you can do so using headers or footers. A header is a section that appears at the top of every printed page, while a footer is a section that appears at the bottom of every printed page. To create a header or footer in Excel, you open the Page Setup dialog box to the Header/Footer tab.
| Important | Everything you will learn about creating headers in this section applies to creating footers as well. Also, you can have both headers and footers in the same document. |
The list boxes on the Header/Footer tab page will hold a number of standard headers and footers, such as page numbers by themselves or followed by the name of the workbook. You can create your own headers by opening the Header dialog box.
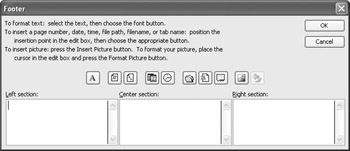
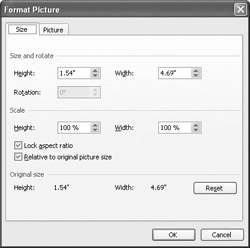
In the Header dialog box, you can add your own text or use the box s buttons to change the appearance of the text in the header or to insert a date, time, or page number. Beginning with Excel 2002, you have had the option of adding a graphic to a header or footer. Adding a graphic such as a company logo to a worksheet lets you identify the worksheet as referring to your company and helps reinforce your company s identity if you include the worksheet in a printed report distributed outside your company. After you insert a graphic into a header or footer, the Format Picture button will become available. Clicking that button will open a dialog box with tools to edit your graphic.
In this exercise, you create a custom header and a custom footer for a workbook. You add a graphic to the footer and then edit the graphic using the Format Picture dialog box.
USE the ![]() Follow.xls document in the practice file folder for this topic. This practice file is located in the
Follow.xls document in the practice file folder for this topic. This practice file is located in the ![]() My Documents\Microsoft Press\Office 2003 SBS\ChangingDocAppearance folder, and can also be accessed by clicking Start/All Programs/Microsoft Press/Microsoft Office System 2003 Step by Step .
My Documents\Microsoft Press\Office 2003 SBS\ChangingDocAppearance folder, and can also be accessed by clicking Start/All Programs/Microsoft Press/Microsoft Office System 2003 Step by Step .
OPEN the ![]() Follow.xls document.
Follow.xls document.
-
On the View menu, click Header and Footer .
The Page Setup dialog box appears, opened to the Header/Footer tab page.
-
Click the Custom Footer button.
The Footer dialog box appears.
-
Click anywhere in the Center section box, and then click the Insert Picture button.
The Insert Picture dialog box appears.
-
Navigate to the Changing DocAppearance folder, and then double-click the
 tgc_logo.gif file.
 The Insert Picture dialog box disappears, and & [Picture] appears in the Center section box.
-
Click the Format Picture button.
The Format Picture dialog box appears.
-
If necessary, select the Lock aspect ratio check box.
-
In the Height box, type 50% and then click OK .
The Format Picture dialog box disappears.
-
In the Footer dialog box, click OK .
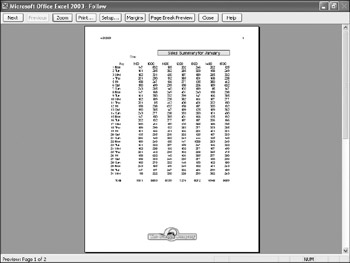
The Footer dialog box disappears, and part of the graphic you added appears in the footer section of the Page Setup dialog box.
-
Click the Custom Header button.
The Header dialog box appears.
-
Click anywhere in the Left section box, and then click the Date button.
& [Date] appears in the Left section box.
-
Click anywhere in the Right section box, and then click the Page Number button.
& [Page] appears in the Right section box.
-
Click OK .
The Header dialog box disappears.
-
Click the Print Preview button.
The Print Preview window appears.
-
Click Close .
The Print Preview window and the Page Setup dialog box disappear.
-
Click cell E2.
-
On the Edit menu, point to Clear , and then click All .
The contents of the merged cell disappear, and the cells are unmerged.
-
On the Standard toolbar, click the Save button to save your changes.
CLOSE the ![]() Follow.xls document.
Follow.xls document.
EAN: 2147483647
Pages: 350