Applying an Existing Format to Data
As you work with Excel, you will probably develop preferred formats for data labels, titles, and other worksheet elements. Rather than add the format s characteristics one element at a time to the target cells , you can have Excel store the format and recall it as needed. You can find the predefined formats available to you in the Style dialog box.
You can apply an existing style to a cell from within the Style dialog box. If none of the existing styles are what you want, you can create your own by typing the name of your new style in the Style name box and then clicking Modify. The Format Cells dialog box appears.
Once you ve set the characteristics of your new style, click OK to make your style available permanently.
The Style dialog box is quite versatile, but it s overkill if all you want to do is apply formatting changes you made to a cell to the contents of another cell. To do so, you can use the Standard toolbar s Format Painter button; just click the cell with the format you want to copy, click the Format Painter button, and select the target cells.
Of course, if you want to change the formatting of an entire worksheet, the Format Painter and the Style dialog box are not the most efficient tools available to you. Instead, Excel lets you apply AutoFormats , which are pre-defined format patterns for a group of cells (as opposed to styles, which are pre-defined formats for individual cells). To apply an AutoFormat, you select the cells you want to format and click AutoFormat on the Format menu. In the AutoFormat dialog box, select the AutoFormat you want to apply and click OK.
In this exercise, you create a style, apply the new style to a data label, and then use the Format Painter to apply the style to the contents of another cell. Finally you assign an AutoFormat.
USE the ![]() CreateNew.xls document in the practice file folder for this topic. This practice file is located in the
CreateNew.xls document in the practice file folder for this topic. This practice file is located in the ![]() My Documents\Microsoft Press\Office 2003 SBS\ChangingDocAppearance folder, and can also be accessed by clicking Start/All Programs/Microsoft Press/Microsoft Office System 2003 Step by Step .
My Documents\Microsoft Press\Office 2003 SBS\ChangingDocAppearance folder, and can also be accessed by clicking Start/All Programs/Microsoft Press/Microsoft Office System 2003 Step by Step .
OPEN the ![]() CreateNew.xls document.
CreateNew.xls document.
-
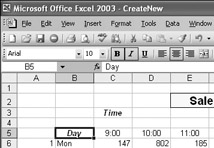
If necessary, click the January sheet tab.
-
Click cell C3.
-
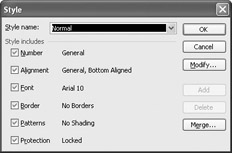
On the Format menu, click Style .
The Style dialog box appears, with Normal in the Style name box.
-
In the Style name box, delete the existing value and then type Emphasis.
The Add button is activated.
-
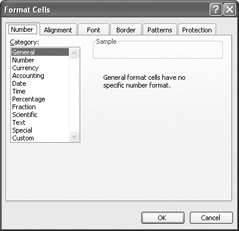
Click Modify .
The Format Cells dialog box appears.
-
If necessary, click the Font tab.
The Font tab page appears.
-
In the Font style box, click Bold Italic .
The text in the Preview pane, in the lower-right corner of the dialog box, changes to reflect your choice.
-
Click the Alignment tab.
The Alignment tab page appears.
-
In the Horizontal box, click the down arrow and, from the list that appears, click Center .
-
Click OK .
The Format Cells dialog box disappears.
-
Click OK .
The Style dialog box disappears, and the text in cell C3 takes on the chosen style.
-
On the Standard toolbar, click the Format Painter button.
The mouse pointer changes to a white cross with a paintbrush icon next to it.
-
Click cell B5.
Cell B5 takes on the format of cell C3.
-
Select cells A3 to P38.
-
On the Format menu, click AutoFormat .
The AutoFormat dialog box appears.
-
Scroll the list, click the List 3 AutoFormat, and click OK .
The AutoFormat dialog box disappears, and the cells take on the selectedAutoFormat.
-
On the Standard toolbar, click the Save button.
Excel saves your changes.
CLOSE the ![]() CreateNew.xls document.
CreateNew.xls document.
EAN: 2147483647
Pages: 350