Managing and Organizing Appointments
You can use the Outlook Calendar to manage and organize your appointments in a variety of ways. You can enter details about an appointment to help you remember important information, such as the agenda for a meeting or directions to a client s office. And as with e-mail messages, you can assign meetings to categories and organize them in folders to help you sort your appointments. For example, you might assign a dentist appointment to the Personal category. Outlook includes a selection of useful categories, including Business, Personal, and Miscellaneous, but you can create additional categories to meet your needs. Or you might create a separate Personalcalendar folder for your non-work- related appointments. When your schedule changes, you can also move, copy, and delete appointments.
| See Also | For more information about categories, see Finding and Categorizing Messages in Chapter 19, Finding and Organizing E-Mail Messages. |
In this exercise, you will add details to an appointment and assign an appointment to a category. Then you will move, copy, and delete an appointment.
| Important | You can work through this exercise in your own Calendar or in the practice Calendar. If you use your own Calendar, be sure to delete the appointments you create in the exercise. To make it easier to locate and identify the sample appointments, each appointment subject starts with the letters SBS . |
USE the SBSCalendar data file in the practice file folder for this topic. This practice file is located in the ![]() My Documents\Microsoft Press\Office 2003 SBS\Calendar folder and can also be accessed by clicking Start/All Programs/Microsoft Press/Microsoft Office System 2003 Step by Step .
My Documents\Microsoft Press\Office 2003 SBS\Calendar folder and can also be accessed by clicking Start/All Programs/Microsoft Press/Microsoft Office System 2003 Step by Step .
BE SURE TO open the SBSCalendar data file before beginning this exercise.
-
Click tomorrow s date in the Date Navigator.
Tomorrow s schedule is displayed.
-
Drag through the 9:30 and 10:00 time slots to select them.
-
Type SBS Budget Meeting , and press the [ENTER] key.
The appointment is added to the Calendar.
-
With the appointment selected, press [ENTER] again.
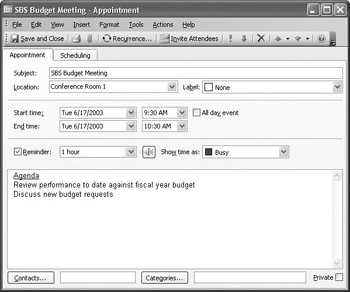
The Appointment form appears.
-
Click in the Location box, and type Conference Room 1 .
Tip Outlook remembers the locations you type in the Location box. Instead of typing the location again, you can click the down arrow to the right of the Location box, and then click the location you want.
-
Be sure the Reminder check box is selected, and in the Reminder list, click 1 hour .
-
Click the comments area below the reminder, and type a rough agenda for the meeting.
Tip To format the comment text, select the text to be formatted, click the Format menu, and then click Text or Paragraph.
-
At the bottom of the Appointment form, click the Categories button.
The Categories dialog box appears.
-
Click in the Item(s) belong to these categories box, type Finance , and click the Add to List button.
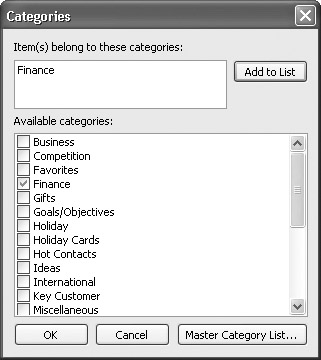
The Finance category is added to the list and is selected.
-
In the Available categories list, select the Business check box, and then click OK .
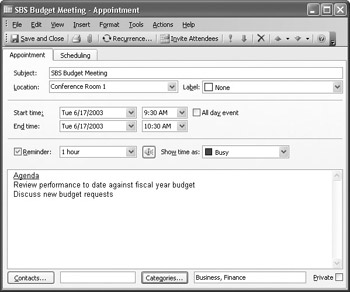
The selected categories are added to the Categories box in the Appointment form.
-
Click the Save and Close button.
-
If Outlook warns you that the reminder will not appear, click Yes .
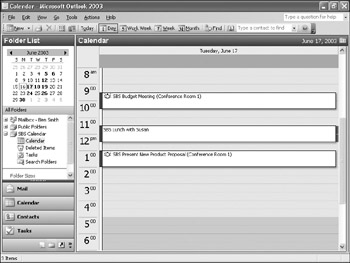
The Calendar displays the updated appointment.
-
Click the 12:00 P.M. time slot, and type SBS Lunch with Susan .
-
Point to the bottom border of the appointment, and when the pointer changes to a vertical double-headed arrow, drag the bottom of the appointment to 1:00 P.M. ,and then press the [ENTER] key.
The Calendar displays the updated appointment. In the Date Navigator, the selected date appears in bold, indicating that appointments are scheduled.
-
Point to the left border of the SBS Lunch with Susan appointment.
The pointer becomes a four-headed arrow.
-
Drag the appointment to the 11:30 A.M. time slot.
The lunch appointment is rescheduled for 11:30 A.M.
-
Point to the left border of the SBS Budget Meeting appointment.
The pointer becomes a four-headed arrow.
-
Using the right mouse button, drag the appointment to the same day of the following week in the Date Navigator.
A shortcut menu appears.
-
On the shortcut menu, click Copy .
Outlook displays the schedule for a week from tomorrow, showing the new Budget Meeting appointment.
-
In the Date Navigator, click tomorrow s date.
Tomorrow s schedule is displayed, showing the original Budget Meeting appointment.
-
Click the SBS Lunch with Susan appointment, and on the toolbar, click the Delete button.
The appointment is removed from your Calendar.
BE SURE TO delete the SBS Budget Meeting and SBS Budget Team appointments if you worked throughthis exercise in your own Calendar.
EAN: 2147483647
Pages: 350