Creating New Messages
With Outlook, communicating by e-mail is quick and easy. You can send messages to people in your office and at other locations. You can personalize your messages using Outlook s many formatting options; you can also embed hyperlinks in and attach files to your messages.
If you have installed Microsoft Office Word 2003, Outlook can use Word as its default e-mail editor. Many of Word s powerful text-editing capabilities, including styles, tables, and themes, are available to you as you create messages in Outlook. Word will check your spelling as you type, correcting many errors automatically. You can also have Word check the spelling of your message when you send it.
| Important | The exercises in this book assume that you are using Word as your default e-mail editor. |
| Tip | If Word is not your default e-mail editor and you would like it to be, on the Tools menu, click Options. Click the Mail Format tab, and select the Use Microsoft Word to edit e-mail messages check box. To turn off Word as your default e-mail editor, make sure the check box is cleared. |
In this exercise, you will compose and send a new e-mail message. You can complete this exercise from the practice file Inbox or your own.
OPEN the Inbox.
-
On the toolbar, click the New Mail Message button.
An Untitled Message form appears. Take a few minutes to investigate the Message window menus and commands. If you are familiar with Word, you will recognize many of them.

Tip By clicking the down arrow to the right of the New Mail Message button, you can choose to create other types of Outlook items such as appointments, contacts, tasks , notes, or faxes, as well as organizational items such as folders and data files.
-
In the To box, type Karen@gardenco.msn.com . Then type ; (a semi- colon ), and type Kim@gardenco.msn.com .
Tip By default, Outlook requires that you separate multiple e-mail addresses with semicolons. If you prefer, you can instruct Outlook to accept both semicolons and commas. To do this, on the Tools menu, click Options. On the Preferences tab, click the E-mail Options button, and then click the Advanced E-mail Options button. Select the Allow comma as address separator check box, and then click OK to close each window.
If your recipient s address is in your address book or you ve typed it in a message header before, Outlook automatically completes the address for you, and pressing the [TAB] key inserts the entry. If there are multiple matches, Outlook presents a list of items that match what you ve typed so far. Use the arrow keys to select the item you want, and press the Enter key.
Tip If you are working on a network that uses Exchange Server, when you send messages to other people on your network, you can type just the part of the address that is to the left of the @ sign. The remaining part of the address identifies the server that handles the e-mail account, so within an organization, the server name is not needed.
-
Press [TAB], and in the Cc box, type your own e-mail address.
Tip If you want to send a copy of a message to a person without the other recipients being aware of it, you can send a blind copy. Display the Bcc box by clicking the arrow to the right of the Options button, and then clicking Bcc. Then type the person s e-mail address in the Bcc box.
-
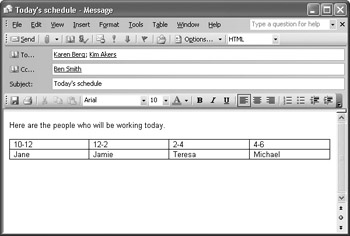
Press the [TAB] key to move to the Subject box, and type Today s schedule .
-
Press [TAB] again, and type Here are the people who will be working today. Then press [ENTER] twice.
Important After your message has been open for a period of time, Outlook saves a draft of it in the Drafts folder so that any work you have done is saved if you are somehow disconnected from Outlook before you send the message. If you close a message without sending it, Outlook asks you if you want to save the message in the Drafts folder. To find these messages later, click the Drafts folder under your name in the All Mail Folders list. If the All Mail Folders list is not visible, click the Mail icon on the Navigation Pane to display it.
-
On the Table menu, point to Insert , and then click Table .
Word s Insert Table dialog box appears.
-
Change the number of columns to 4 , and click OK .
A table appears in your message.
-
Fill in the cells of the table as shown here, pressing [TAB] to move from cell to cell .
-
Click the Send button.
The Message form closes , and the message is sent on its way.
| |
If you are connected to a network that uses Microsoft Exchange Server, you can recall messages you ve sent. For example, if you discover an error in a message you ve sent, you can recall the message so that you can correct the error and resend the message.
To recall a message:
-
In the Sent Items folder, open the message you want to recall.
-
On the Actions menu, click Recall This Message .
-
Select whether you want to delete unread copies of the message or delete unread copies and replace them with a new message, and then click OK .
You can recall or replace a message only if its recipient is logged on, using Microsoft Outlook, and has not yet read the message or moved it from the Inbox.
| |
EAN: 2147483647
Pages: 350