Chapter 4: VBA Programming Starter Kit
|
| < Day Day Up > |
|
Introducing the Visual Basic Editor
The Visual Basic Editor is a powerful tool that lets you extend the power and versatility of macros beyond anything that can be done through recording alone. So that you can fully understand how to use the Visual Basic Editor, this chapter examines all facets of the Visual Basic Editor: what the various components are, what they do, and how to use them. With that purpose stated, it’s time to examine the Visual Basic for Applications language, which is used to program all macros.
If you have never worked with the Visual Basic Editor before, you might find it more convenient to work through this chapter from start to finish. If you’ve worked with the Visual Basic Editor before, jumping to specific sections will allow you to quickly find the information you are seeking.
Opening the Visual Basic Editor
As with most Microsoft Windows–based applications, there are several methods for opening the Visual Basic Editor. You can select Tools, Macro, Visual Basic Editor from the menu bar or press Alt+F11. If there is a specific macro that you want to edit or view, you can select Tools, Macro, Macros to bring up the Macro dialog box. From there, you can highlight the macro you want to work with and select the Edit button. You can also open the Macro dialog box by pressing Alt+F8.
Recognizing Parts of the Visual Basic Editor
When you open the Visual Basic Editor directly, you use the Project Explorer window to select the macro you want to work on. The Project Explorer presents all projects (groupings of code) and the macros they contain in a tree view that works the same as the tree view in Windows Explorer. The root object, or base object of the tree, is the current workbook that you are working in, along with any other workbooks and Add-Ins that might be open.
The main elements utilized by VBA projects are each stored in a separate folder within the project. Those elements include objects, which were introduced in Chapter 3; modules, which contain the macro code associated with a worksheet; class modules, which are definitions of user-defined objects you’ve created for your workbook (described in more detail in Chapter 14); and user forms, which are described in Chapter 19.
In the example shown in Figure 4-1, the current workbook is identified as VBAProject (DateTimeManipulations.xls). The three worksheets included in the workbook (Sheet1, Sheet2, Sheet3), along with the entire workbook (ThisWorkbook), are inside the Microsoft Office Excel Objects folder. Any macros programmed in VBA or recorded also appear in the Modules folder. Any class modules or user forms would appear in a Class Modules or a Forms folder, respectively.
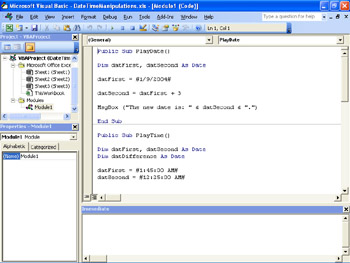
Figure 4-1: The Visual Basic Editor organizes your programming elements to make them easier to manage.
Directly below the Project Explorer window is the Properties window, which is used to examine and change the various properties associated with the selected object. For modules and worksheets, usually the Name property is the only one available, although worksheets do have additional properties that can be changed. Working with properties is most often done when working with user forms.
| Caution | The value in the Name property of a worksheet or workbook is not necessarily the same as the name of the same object inside of Excel. Although the two names might appear to be similar because of default naming rules that the Visual Basic Editor uses, the names might be different but could be linked together internally to ensure the proper object is referenced. Object names are more restrictive because they must follow the Visual Basic for Applications naming rules (no spaces, must begin with a letter, can’t be a reserved word, and no more than 31 characters in length). |
The Code window is the largest window within the Visual Basic Editor and is topped with two drop-down boxes, as shown in Figure 4-2. The drop-down box on the left, the Object box, is used to select an object to work on. When working with code only, the box will display the default General object. The second drop-down box, the Procedure box, is used to select individual macros within the current module. As macros are added and deleted from the module, they are also added and deleted from the Procedure box.
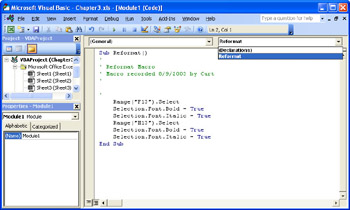
Figure 4-2: The Visual Basic Editor Code Window lets you pick objects and procedures to work on.
Besides using the Procedure box to select a macro, you can also use the up and down arrow keys to scroll through the code listings until you reach the macro you want. As you scroll through each macro, the Procedure box is updated to reflect the macro the insertion point is in.
The Code window is replaced by the Form Editor when you click Insert, user form, as shown in Figure 4-3.
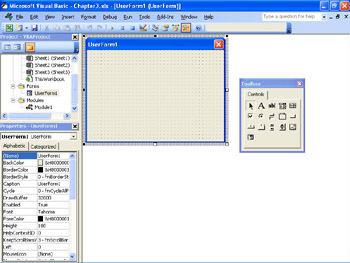
Figure 4-3: The Visual Basic Editor Form Editor takes over when you move from writing VBA code to creating user forms.
For more information about user forms, refer to Chapter 19, “Creating User Forms.”
Just like every other Windows-based application, the Visual Basic Editor has a menu bar and tool bar providing access to many other features. Most of the menu options available on the File, Edit, Window, and Help menus reflect the same options available in other Windows- based applications. The rest of the menus, however, contain valuable capabilities that you’ll use frequently while working with the Visual Basic Editor.
The View Menu
The View menu lets you open and/or jump to specific windows within the Visual Basic Editor; through it you can open windows that aren’t currently visible or even return to Excel without closing the Visual Basic Editor. Table 4-1 summarizes the items available on the View menu.
| Item | Description |
|---|---|
| Code | Displays or activates the Code window for the currently selected item within the Project Explorer. |
| Object | Displays or activates the object currently selected within the Project Explorer. |
| Definition | Displays or activates the Object Browser window showing the entry for the currently selected item within the Code window. If the item is a procedure or function, it displays the code for that procedure or function. |
| Last Position | Returns the cursor to the beginning of the last line of code edited. |
| Object Browser | Displays or activates the Object Browser window. |
| Immediate Window | Displays or activates the Immediate window. |
| Locals Window | Displays or activates the Locals window. |
| Watch Window | Displays or activates the Watch window. |
| Call Stack | Displays or activates the Call Stack dialog box. |
| Project Explorer | Displays or activates the Project Explorer window. |
| Properties Window | Displays or activates the Properties window. |
| Toolbox | Displays or activates the Toolbox, which contains objects used to design user forms. |
| Tab Order | Displays or activates the Tab Order dialog box. |
| Toolbars | Lets you turn on and off the various toolbars available within the Visual Basic Editor as well as customize them. |
| Microsoft Office Excel | Switches to the active workbook, restoring the display if it is minimized. |
The Insert Menu
The Insert menu lets you insert new procedures, modules, or user forms into your project. Table 4-2 summarizes the items available on the Insert menu in the Visual Basic Editor.
| Item | Description |
|---|---|
| Procedure | Displays the Add Procedure dialog box to help you build the declaration statement for a new procedure inside the current module. |
| UserForm | Inserts a new user form into the current project. |
| Module | Inserts a new module into the current project. |
| Class Module | Inserts a new class module into the current project. |
| File | Displays the File Open dialog box to allow you to import a text file (*.txt), a Basic file (*.bas), or a class file (*.cls). Text files will be inserted into the current Code window, whereas Basic or class files will be inserted into the current project as separate modules or class modules. |
The Format Menu
The Format menu contains commands to assist with the placement and formatting of objects on user forms. Table 4-3 lists the items available on the Format menu.
| Item | Description |
|---|---|
| Align | Displays the Align submenu, which lets you line up two or more objects along a common border |
| Make Same Size | Displays the Make Same Size submenu, which lets you make two or more objects the same size in width, in height, or both |
| Size to Fit | Resizes an object’s height and width so that its contents fit exactly |
| Size to Grid | Resizes an object’s height and width so that its borders rest upon the nearest grid lines shown on the user form |
| Horizontal Spacing | Displays the Horizontal Spacing submenu, which lets you adjust the horizontal spacing among two or more objects |
| Vertical Spacing | Displays the Vertical Spacing submenu, which allows you to adjust the vertical spacing among two or more objects |
| Center in Form | Displays the Center in Form submenu, which lets you center an object either horizontally or vertically on a form |
| Arrange Buttons | Displays the Arrange Buttons submenu, which allows you to arrange button objects evenly along the bottom or right side of the user form. |
| Group | Creates a group out of selected objects so that they can be manipulated together |
| Ungroup | Removes the grouping of objects |
| Order | Displays the Order submenu, which lets you rearrange the order in which objects are layered on the user form |
The Debug Menu
The Debug menu provides several tools to assist with debugging (testing) the execution of procedures. Table 4-4 lists the items available on the Debug menu.
| Item | Description |
|---|---|
| Compile | Compiles the code for the currently selected project. Identified on the menu as Compile <ProjectName>. |
| Step Into | Lets you step through your code one line at a time. Each line is highlighted before being executed. |
| Step Over | Allows you execute an entire procedure at once. This is useful if the current procedure calls a second procedure and you don’t need to step through the second procedure. |
| Step Out | Lets you execute all remaining code within the current procedure, stopping when all lines have been executed. |
| Run to Cursor | Lets you run all code up to the line where the cursor is currently residing. |
| Add Watch | Displays the Add Watch dialog box, which you use to add any variables or expressions you want to keep an eye on. |
| Edit Watch | Displays the Edit Watch dialog box, which you can use to modify any variables or expressions you’re currently watching. |
| Quick Watch | Displays the Quick Watch dialog box, which displays the value of the current variable or expression selected in the Code window. You can also hover the mouse over a variable or expression and have the value displayed in a ToolTip. |
| Toggle Breakpoint | Lets you create a breakpoint on the current line of code. Execution will pause whenever a breakpoint is encountered. If the current line already contains a breakpoint, selecting this command will clear it. You can also create and clear breakpoints by placing the mouse along the left border of the code (so that the mouse pointer changes to an arrow pointing to the top-right) and double-clicking. |
| Clear All Breakpoints | Lets you clear all breakpoints within the current code module. |
| Set Next Statement | Lets you set the next line of code that will be executed, skipping other lines if necessary. |
| Show Next Statement | Lets you quickly jump to the next line of code that will be executed. This is helpful when you have scrolled through the code listing and want to quickly return to the next executable line of code. |
The Run Menu
The Run menu contains several commands that allow execution of program code and the display of user forms. Table 4-5 lists the items available on the Run menu.
| Item | Description |
|---|---|
| Run Sub/UserForm | Start executing the current procedure or user form. If none is selected, the Run Macro dialog box is displayed, allowing you to select a procedure to run. When a procedure is running and in Break mode, this command will change to Continue to allow you to continue normal execution of the procedure. |
| Break | Lets you stop execution of the procedure and places the code in Break mode. |
| Reset | Lets you reset all module-level variables and clear the Call Stack. |
| Design Mode | Lets you toggle Design mode on and off for the selected procedure. |
The Tools Menu
The Tools menu gives you commands to run procedures, add references to external procedures, set options for the Visual Basic Editor, set properties for the current project, and digitally sign the project. Table 4-6 lists the items available on the Tools menu.
| Item | Description |
|---|---|
| References | Displays the References dialog box for the current project, which lets you specify which object libraries and other VBA projects the project should be able to access. |
| Additional Controls | Displays the Additional Controls dialog box, which lets you add more controls to the Toolbox. |
| Macros | Displays the Macros dialog box, which lets you quickly select and execute a macro from all open projects. |
| Options | Displays the Options dialog box, which lets you set different options for the Visual Basic Editor itself. |
| Properties | Displays the Project Properties dialog box, which lets you set several properties for the current project. The current project is identified on the Menu as ProjectName Properties. |
| Digital Signature | Displays the Digital Signatures dialog box, which allows you to digitally sign your code using any digital signature you have installed on your PC. |
Customizing the Visual Basic Editor
The Visual Basic Editor is fully customizable and can be configured to fit your own personal work style. The various windows can be undocked from their default positions and placed anywhere on the screen, including along a different edge of the window. Also, as discussed in Chapter 3, you can move, hide, and display any of the available toolbars, in addition to adding or removing toolbar buttons from any toolbar.
All of the ancillary windows within the Visual Basic Editor have a default docked location. To move a window, place the mouse pointer inside the title bar for the window and drag it to its desired location. An outline box will appear to show you where the window will be located when you release the mouse, as shown in Figure 4-4.
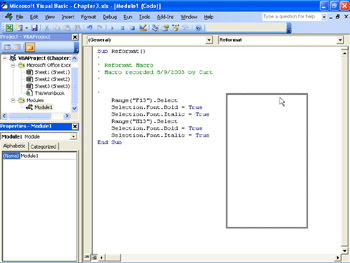
Figure 4-4: The default locations for the windows in the Visual Basic Editor appear here, but you can move the windows around to optimize your working environment.
| Tip | A quick way to swap between a docked window and the last undocked position is to double-click the Title bar of the window. This trick is especially handy when trying to return to the docked position because it can be hard at times to get the Visual Basic Editor to recognize that you want to return the window to a docked position. |
Customizing the toolbars requires the same procedures as in other Windows-based applications. To move a toolbar, simply click within a blank area of the toolbar and drag it to the desired location. Click the Toolbar Options button (located in the lower right corner of the toolbar) or right-click a blank area of the toolbar and click Customize to display the Customize dialog box, from which you can add or remove buttons from the visible toolbars. By right- clicking any of the toolbars, you can also show or hide any available toolbar.
The Options dialog box within the Visual Basic Editor also has several options that affect the Visual Basic Editor environment. The controls in the Options dialog box are organized on four tabs: Editor, Editor Format, General, and Docking.
The Editor tab, shown in Figure 4-5, is further divided into two sets of options. The first set, Code Settings, controls the display of IntelliSense tool tips, code formatting, variable declaration, and syntax errors. Auto Quick Info provides information on functions and their parameters as you type them, as well as applicable intrinsic constants during design mode. In run-time mode, Auto Data Tips provide the value of a variable when the mouse is hovered over it. Code formatting options include Auto Indent, which indents new lines to the same position as the line above it, and Tab Width, which sets the number of spaces one tab will occupy. Turning on the Require Variable Declaration option will prevent you from attempting to use a value in a variable you haven’t defined yet, and the Auto Syntax Check option will check each line of code for syntax errors as it is entered. Finally, selecting the Auto List Members check box causes the Visual Basic Editor to display information that could be used to complete a statement you’re typing.
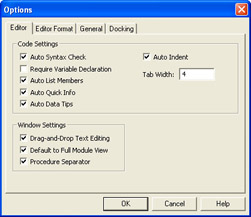
Figure 4-5: The Editor tab of the Options dialog box gives you the tools to change how code, errors, and tips are displayed in the Visual Basic Editor.
Avoiding Errors Through Declarations
Requiring yourself to define a variable before you use it might be annoying, but it can prevent one of the most mysterious errors in programming: the divide by zero error. A simple case of attempting to divide by zero would be if you want to find the average temperature for a week. If you try to divide the sum of the temperatures by a new variable named intNumDays, to which you have not assigned a value, the program will assume the value is zero and generate the error.
The second set of options, Window Settings, controls how the Code window displays multiple procedures and determines how you may move code using the mouse. By enabling the Drag-and-Drop-Text option, you can drag and drop elements within the current code and from the Code window to and from the Immediate and/or Watch windows. Turning on the Default to Full Module View sets the view for new module windows to either a scrollable window or a single procedure view, while turning on the Procedure Separator option will draw a line separating procedures.
The controls on the Editor Format tab of the Options dialog box, shown in Figure 4-6, let you control the font style that is used to display code. From the color of different code elements (keywords, comments, syntax errors, selected elements, and so on) to the typeface and the size of the font, the code window can be customized to fit your particular needs. You can also turn the Margin Indicator Bar on and off, though you should probably leave it on because it provides a quick way to turn Break Points on and off.
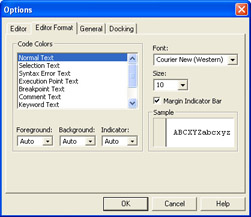
Figure 4-6: The Editor Format tab lets you determine everything from the font in which your code is displayed to the text color used to highlight important program elements.
The General tab, shown in Figure 4-7, provides options for Form Grid Settings, the display of ToolTips, the automatic closing of Form and Module windows, warning before variables are reset, error trapping, and determining when code is compiled. The Form Grid Settings allow you turn the grid dots on and off when designing user forms; you can also change the horizontal and vertical distance between grid dots and opt to have new controls aligned to the grid as they are added. You can also turn the ToolTips that help explain what each button on a toolbar does on and off.
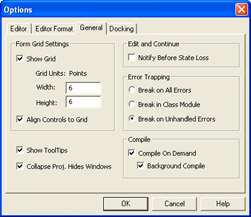
Figure 4-7: The General tab of the Options dialog box contains the controls that don't fit well into the other tab pages in the dialog box.
Selecting the Collapse Proj. Hides Windows option will automatically close module and user form windows when the project is collapsed in the Project Explorer window. Selecting the Notify Before State Loss option informs you when performing a specific action will reset all variables.
There are three options available for Error Trapping. Selecting the Break on All Errors option will force the Visual Basic Editor to enter Break mode on all errors, regardless of whether there are any error traps within the running procedures; selecting Break in Class Module will enter Break mode on an untrapped error, highlighting the line of code within the class module that produced the error; and selecting Break on Unhandled Errors will enter Break mode only if there is no error handler active. If the untrapped error occurred within a class module, the line of code within the calling procedure is highlighted instead of the code within the class module.
The last two options available on the General tab specify when the procedures are compiled. For fastest execution, both Compile on Demand and Background Compile should be selected. The first option allows faster application execution by compiling code on the fly rather than all at once, and the second determines if idle processing time is used to finish compiling the project during run-time mode.
The fourth and final tab available in the Options dialog lets you specify whether any of the ancillary windows within the Visual Basic Editor are dockable. By default, all windows are dockable with the exception of the Object Browser window.
|
| < Day Day Up > |
|
EAN: 2147483647
Pages: 161